electron+vue3+edge 调用C#.dll文件
electron-edge-js 用这玩意儿我血压高.....
血压高的谨慎食用…
文章目录
electron+vue3+electron-edge-js 调用C#.dll文件
起步
一、创建Vue3项目(ele)
二、Vue3项目中添加 electron 模块
1.添加 electron-edge-js 模块
2.加入C#的.dll文件 EdgeClassLibrary.dll
3.如何使用
总结
起步
1:安装 Node.js 坏境
这里推荐 14.16.0 版本,因为我在此版本下运行成功,其他版本请自行尝试
链接: Node v14.16.0 (LTS)
进入链接网址后鼠标滚轮往下划一点,根据系统自行选择32位是64位,我的系统是Windows64位所以我选win64位版本的

记得安装 淘宝镜像 cnpm
npm install -g cnpm --registry=http://registry.npm.taobao.org
避免每次安装都需要–registry参数,永久设置淘宝镜像
npm config set registry http://registry.npm.taobao.org
2:CMD 安装 Vue Cli
npm install -g @vue/cli
1
3:全局安装 Electron
cnpm install electron -g
1
一、创建Vue3项目(ele)
vue create ele
1
注:也可以使用 vue ui 命令进行可视化Vue项目的创建

回车默认Vue3

OK 这样Vue3项目就创建成功了
二、Vue3项目中添加 electron 模块
这里推荐使用 VS CODE 进行项目开发
1:在 VS CODE 中打开项目

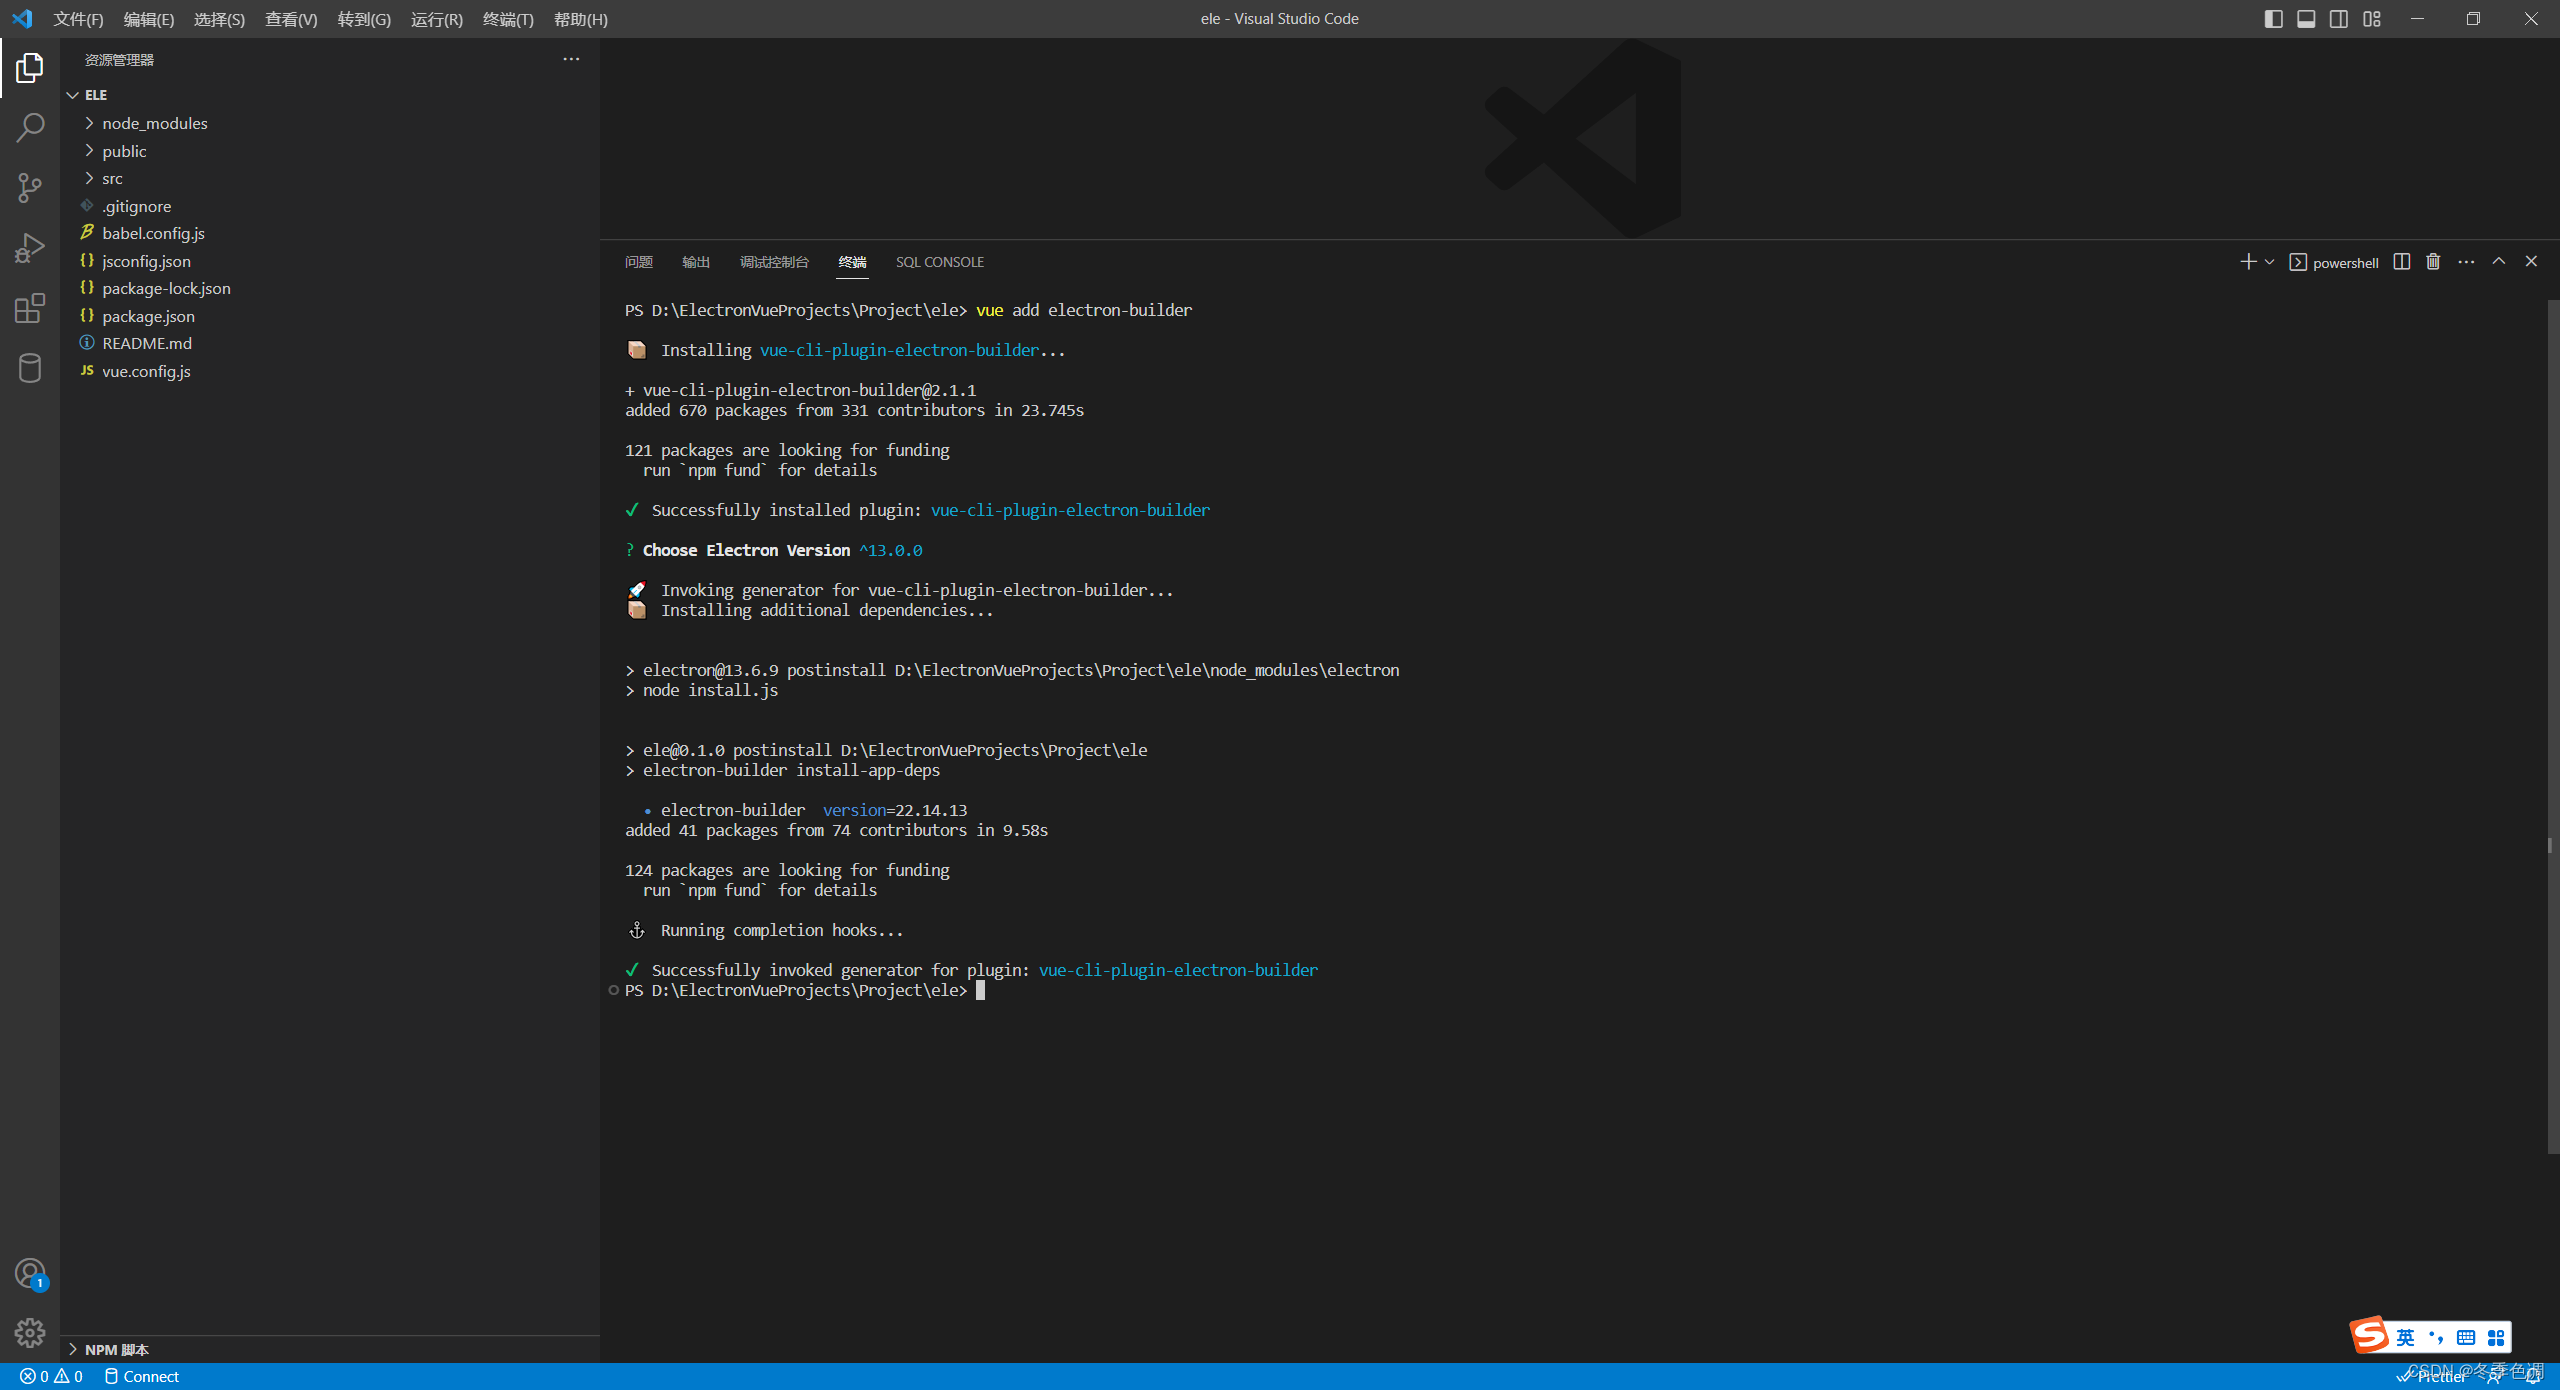
2:在终端中输入以下命令
vue add electron-builder
- 1
3:然后选择最新版本 ^13.0.0

OK Electron模块添加成功,如下:
此时 为保证项目至此是没有问题的,我们运行项目看看是否运行成功
1:打开 src 目录下的 background.js 文件
2:注释 app.on(‘ready’, async () => { }) 其中一段代码 ,切记保留 createWindow()
// This method will be called when Electron has finished
// initialization and is ready to create browser windows.
// Some APIs can only be used after this event occurs.
app.on('ready', async () => {
// if (isDevelopment && !process.env.IS_TEST) {
// // Install Vue Devtools
// try {
// await installExtension(VUEJS3_DEVTOOLS)
// } catch (e) {
// console.error('Vue Devtools failed to install:', e.toString())
// }
// }
createWindow()
})

3:新建终端输入 npm run electron:serve 开始运行,或者在NPM 脚本中直接点击 electron:serve 调试按钮(一个甲壳虫样子的图标 )开始运行,
运行成功桌面会弹出一个应用程序


OK 运行成功
1.添加 electron-edge-js 模块
链接: electron-edge-js
1
再打开 background.js
import { app, protocol, BrowserWindow } from 'electron'
import { createProtocol } from 'vue-cli-plugin-electron-builder/lib'
// import installExtension, { VUEJS3_DEVTOOLS } from 'electron-devtools-installer'
// 这里引入 electron-edge-js
var edge = require('electron-edge-js');
// 这里引入 path
var path = require('path');
1
2
3
4
5
6
7
8
9
2.加入C#的.dll文件 EdgeClassLibrary.dll
dll文件内容:
using System;
using System.Collections.Generic;
using System.Linq;
using System.Text;
using System.Threading.Tasks;
namespace EdgeClassLibrary
{
public class EdgeClassPrinter
{
/// <summary>
/// electron 测试文件
/// </summary>
/// <param name="input">传入的内容</param>
/// <returns></returns>
public async Task<object> Add(object input)
{
Dictionary<int, string> keyValuePairs = new Dictionary<int, string>
{
{ 0, input.ToString() }
};
return await Task.FromResult(keyValuePairs);
}
}
}
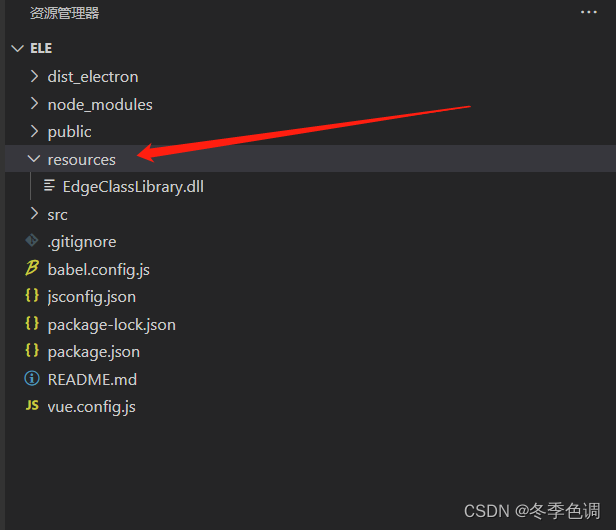
生成 .dll 文件后复制到Vue项目 resources 目录下
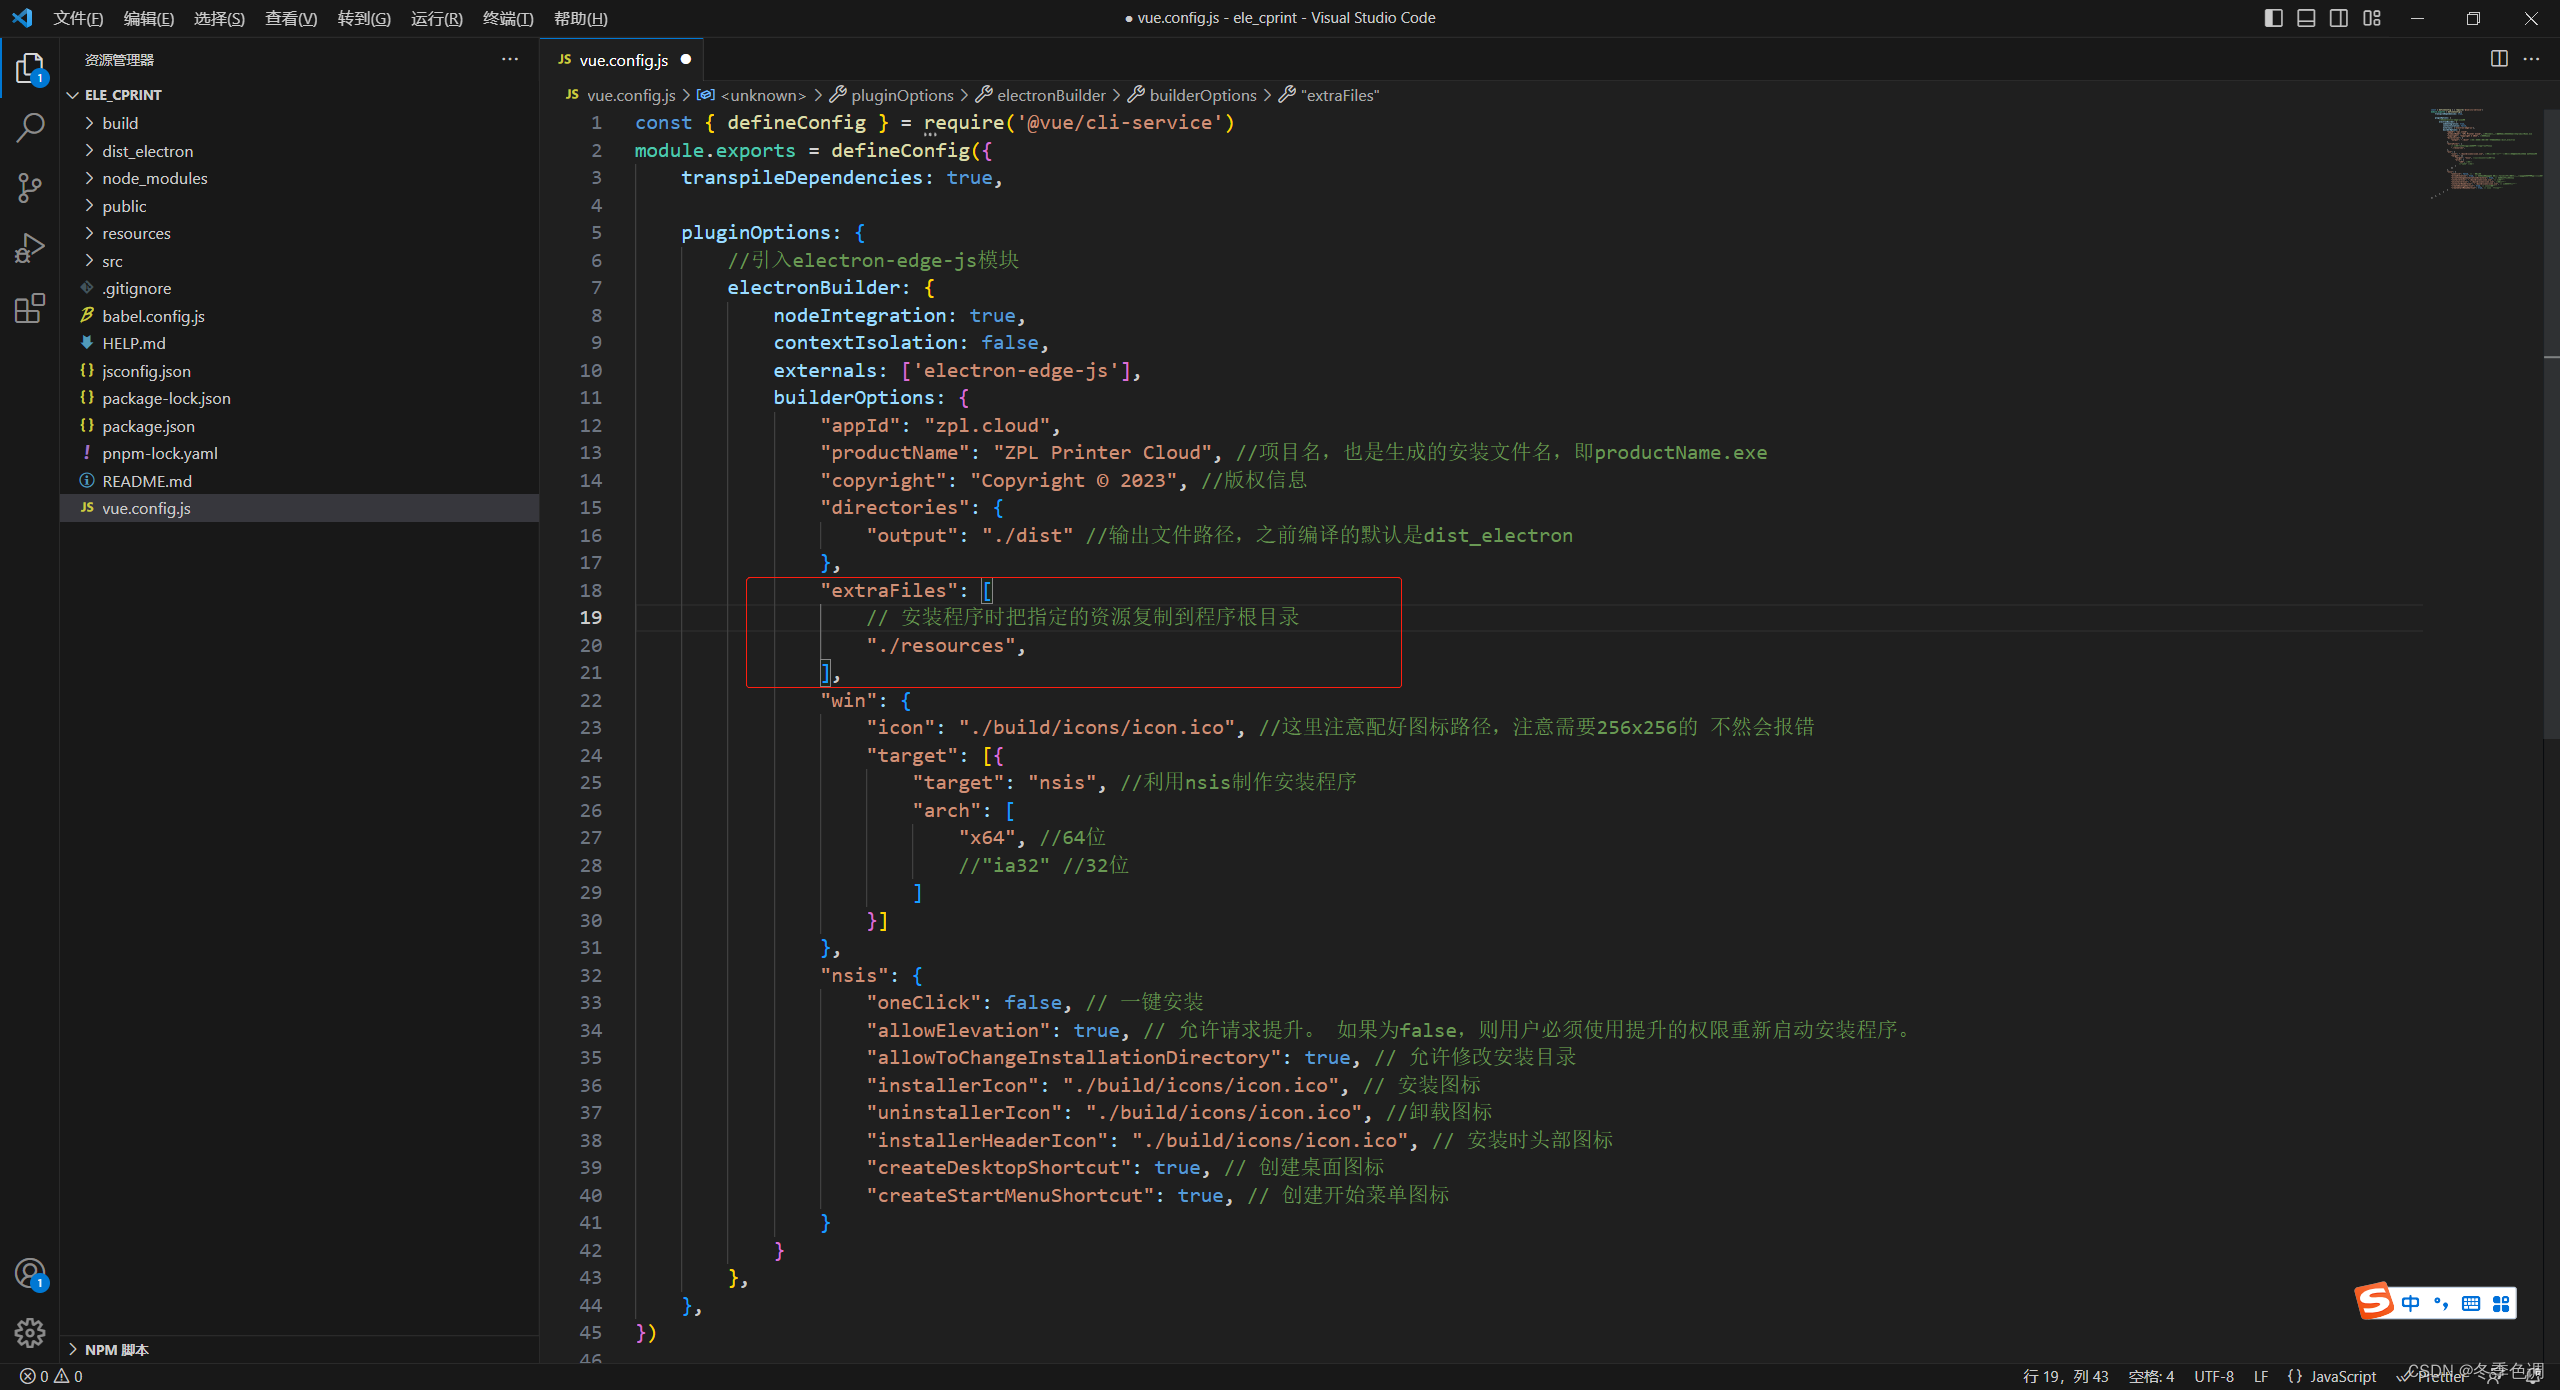
配置 vue.config.js 文件
const { defineConfig } = require('@vue/cli-service')
module.exports = defineConfig({
transpileDependencies: true,
pluginOptions: {
//复制resources下的文件到根目录
builderOptions: {
"extraFiles": [
// 安装程序时把指定的资源复制到程序根目录
"./resources",
],
},
//引入electron-edge-js模块
electronBuilder: {
externals: ['electron-edge-js']
}
}
})
3.如何使用
再打开 background.js 在app.on(‘ready’, async () => {})之前添加以下代码
let edgeSend = edge.func({
assemblyFile: path.join(__dirname, '../resources/EdgeClassLibrary.dll'),// dll 文件地址
typeName: 'EdgeClassLibrary.EdgeClassPrinter',//类库名.类名
methodName: 'Add'//方法名
})
edgeSend('JavaScript', function (error, result) {
if (error) throw error;
console.log(result);
});
OK 点击NPM脚本 甲壳虫图标运行项目

OK 项目运行成功并且成功返回
总结
总之,坑很多
来自https://blog.csdn.net/weixin_42270683/article/details/129667629
---------------------------------------------------------------------------------------------------------------------------------------
electron+vue3+electron-updater 实现程序更新
文章目录
electron+vue3+electron-updater 实现程序更新
一、首先,你需要一个`干净的`、`基础的`、`可运行的` electron+vue3 项目
二、引入electron-updater
1.引入 electron-updater 和 electron-log 库
2.在 `background.js` 中使用
2.在 `vue.config.js` 中设置打包配置
更新文件挂在IIS的情况下需要注意的地方
三、打包两个版本的安装包 0.1.0 和 0.2.0
四、安装0.1.0的版本,把0.2.0版本放到服务器,可以去网页中访问一下latest.yml文件,确保可以访问到而不是404
最后,打开安装的0.1.0版本的软件,就可以实现更新了,
因为只是实现了功能,但是没有写页面更新的动画效果,
但是可以去日志文件里看更新进度
页面展示更新进度动画UI
HomeView.vue
效果图
下载完成后自动进行安装引导
electron+vue3+electron-updater 实现程序更新
本文主要介绍electron+vue3+electron-updater实现程序更新的具体步骤
一、首先,你需要一个干净的、基础的、可运行的 electron+vue3 项目
若是不会创建项目,可以参考我的另一篇文章
electron+vue3+edge 调用C#.dll文件
那篇文章不要添加 electron-edge-js 模块就是一个干净的、基础的、可运行的项目
二、引入electron-updater
1.引入 electron-updater 和 electron-log 库
npm install electron-updater
1
electron-log 打印日志方便调试
npm install electron-log
1
2.在 background.js 中使用
"use strict";
import { app, protocol, BrowserWindow, ipcMain } from "electron";
import { createProtocol } from "vue-cli-plugin-electron-builder/lib";
const { autoUpdater } = require('electron-updater');
const log = require('electron-log');
// const fs = require('fs');
// const fs_extra = require('fs-extra');
// const path = require('path');
const isDevelopment = process.env.NODE_ENV === "development";
// Scheme must be registered before the app is ready
protocol.registerSchemesAsPrivileged([
{ scheme: "app", privileges: { secure: true, standard: true } },
]);
// 存在新版本时,默认自动下载更新
autoUpdater.autoDownload = false // 若想通过渲染进程手动触发,需要设置autoDownload为false
autoUpdater.setFeedURL({
provider: 'generic',
url: 'http://106.130.55.44:8082', // 打包文件存放地址
})
async function createWindow() {
// Create the browser window.
const win = new BrowserWindow({
width: 800,
height: 600,
webPreferences: {
// Use pluginOptions.nodeIntegration, leave this alone
// See nklayman.github.io/vue-cli-plugin-electron-builder/guide/security.html#node-integration for more info
nodeIntegration: process.env.ELECTRON_NODE_INTEGRATION,
contextIsolation: !process.env.ELECTRON_NODE_INTEGRATION,
},
});
if (process.env.WEBPACK_DEV_SERVER_URL) {
// Load the url of the dev server if in development mode
await win.loadURL(process.env.WEBPACK_DEV_SERVER_URL);
if (!process.env.IS_TEST) win.webContents.openDevTools();
} else {
createProtocol("app");
// Load the index.html when not in development
win.loadURL("app://./index.html");
}
// if (!isDevelopment) {
//
ipcMain.on('thisCheckForUpdates', () => {
autoUpdater.checkForUpdates();
//检查更新
autoUpdater.on('checking-for-update', () => {
log.info("正在检查更新...");
})
//没有可用更新
autoUpdater.on('update-not-available', () => {
log.info('没有可用更新.');
win.webContents.send('thisUpdatenotavailable', { code: 102, msg: '没有可用更新', data: {} });
})
//有可用更新
autoUpdater.on('update-available', (info) => {
log.info('有可用更新.' + info);
log.info(info);
// autoUpdater.downloadUpdate()
win.webContents.send('thisUpdateavailable', { code: 200, msg: '有可用更新', data: info });
})
// 更新出错
autoUpdater.on('error', (err) => {
log.info('更新出错. ' + err);
win.webContents.send('thisUpdateerror', { code: 200, msg: '更新出错', data: err });
})
// 下载进度
autoUpdater.on('download-progress', (progressObj) => {
let log_message = progressObj.percent + '% (' + progressObj.transferred + "/" + progressObj.total + ')'
log.info('下载进度:' + log_message);
win.webContents.send('thisDownloadprogress', progressObj.percent);
})
//更新下载完成
autoUpdater.on('update-downloaded', (info) => {
log.info('更新下载完成', info);
log.info('开始安装...');
autoUpdater.quitAndInstall();
})
// }
})
// 接收更新命令
ipcMain.on('thisDownloadnow', () => {
// 更新前,删除本地安装包 ↓
// let updaterCacheDirName = app.getName() + '-updater';
// const updatePendingPath = path.join(autoUpdater.app.baseCachePath, updaterCacheDirName, 'pending')
// fs_extra.emptyDir(updatePendingPath)
// 更新前,删除本地安装包 ↑
//开始下载
autoUpdater.downloadUpdate();
})
}
// Quit when all windows are closed.
app.on("window-all-closed", () => {
// On macOS it is common for applications and their menu bar
// to stay active until the user quits explicitly with Cmd + Q
if (process.platform !== "darwin") {
app.quit();
}
});
app.on("activate", () => {
// On macOS it's common to re-create a window in the app when the
// dock icon is clicked and there are no other windows open.
if (BrowserWindow.getAllWindows().length === 0) createWindow();
});
// This method will be called when Electron has finished
// initialization and is ready to create browser windows.
// Some APIs can only be used after this event occurs.
app.on("ready", async () => {
// if (isDevelopment && !process.env.IS_TEST) {
// // Install Vue Devtools
// try {
// await installExtension(VUEJS3_DEVTOOLS);
// } catch (e) {
// console.error("Vue Devtools failed to install:", e.toString());
// }
// }
createWindow();
});
// Exit cleanly on request from parent process in development mode.
if (isDevelopment) {
if (process.platform === "win32") {
process.on("message", (data) => {
if (data === "graceful-exit") {
app.quit();
}
});
} else {
process.on("SIGTERM", () => {
app.quit();
});
}
}
2.在 vue.config.js 中设置打包配置
const { defineConfig } = require('@vue/cli-service')
module.exports = defineConfig({
transpileDependencies: true,
pluginOptions: {
electronBuilder: {
nodeIntegration: true,
builderOptions: {
"appId": "app.electron.wx001",
"productName": "app", //项目名,也是生成的安装文件名,即productName.exe
"copyright": "Copyright © 2023-02-28",
"directories": {
"output": "./dist"
},
"publish": {
"provider": 'generic',
"url": 'http://106.130.55.44:8082' // 服务器的下载链接。下面必须要 latest.yml文件和需要更新的exe文件
},
"extraFiles": ["./resources",], // 把指定的资源复制到程序根目录,即把resources文件夹的内容复制到程序根目录,
"win": {
"icon": "./build/icons/icon.ico", //这里注意配好图标路径,注意需要256x256的 不然会报错
"target": [{
"target": "nsis",
"arch": ["x64",]
}]
},
nsis: {
oneClick: false, // 一键安装
allowElevation: true, // 允许请求提升。 如果为false,则用户必须使用提升的权限重新启动安装程序。
allowToChangeInstallationDirectory: true, // 允许修改安装目录
installerIcon: "./build/icons/icon.ico", // 安装图标
uninstallerIcon: "./build/icons/uninsert.ico", //卸载图标
installerHeaderIcon: "./build/icons/icon.ico", // 安装时头部图标
createDesktopShortcut: true, // 创建桌面图标
createStartMenuShortcut: true, // 创建开始菜单图标
// include: "./resources/installer.nsh", //默认安装目录配置文件
},
}
},
},
})
更新文件挂在IIS的情况下需要注意的地方
- 需要在IIS上添加
MIME类型才能访问。MIME类型为:application/octet-stream

如果不添加MIME就会找不到latest.yml文件,结果就是无法实现更新 报错信息如下
[2023-05-11 16:50:55.409] [info] 开始检测更新...
[2023-05-11 16:50:55.414] [info] Checking for update...
[2023-05-11 16:50:55.500] [info] Error in auto-updater. Error: Cannot find channel "latest.yml" update info: HttpError: 404 Not Found
"method: GET url: http://106.130.55.44:8082/latest.yml?noCache=1h05034pq\n\nPlease double check that your authentication token is correct. Due to security reasons, actual status maybe not reported, but 404.\n"
Headers: {
"content-type": "text/html",
"server": "Microsoft-IIS/10.0",
"x-powered-by": "ASP.NET",
"date": "Thu, 11 May 2023 08:50:53 GMT",
"content-length": "1163"
}
at f (E:\Program Files (x86)\QRCloud\app\resources\app.asar\background.js:2:287305)
at o.handleResponse (E:\Program Files (x86)\QRCloud\app\resources\app.asar\background.js:2:289160)
at ClientRequest.<anonymous> (E:\Program Files (x86)\QRCloud\app\resources\app.asar\background.js:2:288605)
at ClientRequest.emit (events.js:315:20)
at SimpleURLLoaderWrapper.<anonymous> (electron/js2c/browser_init.js:105:6816)
at SimpleURLLoaderWrapper.emit (events.js:315:20)
- 文件拓展名:.yml
- MIME类型:application/octet-stream

三、打包两个版本的安装包 0.1.0 和 0.2.0

四、安装0.1.0的版本,把0.2.0版本放到服务器,可以去网页中访问一下latest.yml文件,确保可以访问到而不是404

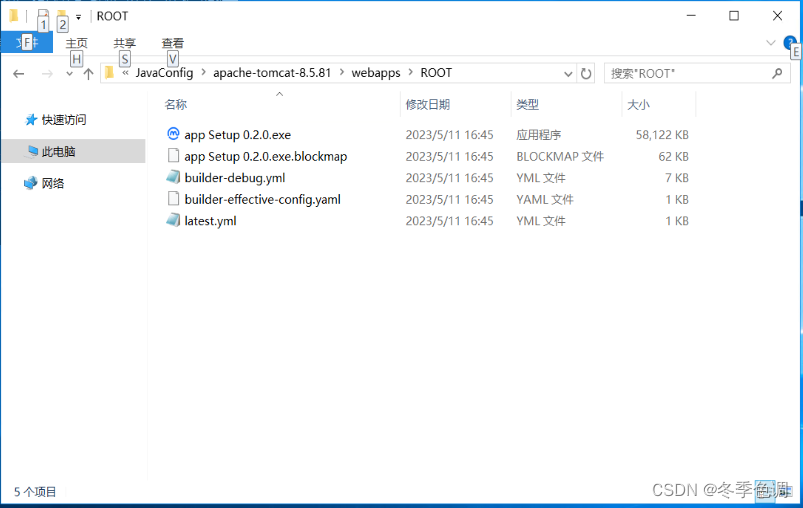
Tomcat下部署如下图
IIS部署如下(多一个web.config文件,是因为配置MIME)

最后,打开安装的0.1.0版本的软件,就可以实现更新了,
因为只是实现了功能,但是没有写页面更新的动画效果,
但是可以去日志文件里看更新进度
- 打开目录
C:\Users\OAO\AppData\Roaming\vele\logs此路是电脑中路径 -

找到 main.log 并打开
-
[2023-05-11 16:55:35.049] [info] 开始检测更新...
[2023-05-11 16:55:35.054] [info] Checking for update...
[2023-05-11 16:55:35.153] [info] {
version: '0.2.0',
files: [
{
url: 'app Setup 0.2.0.exe',
sha512: 'XL65AupO/8wLQBHDFqM7JBkq5tKDSXmgbhqC00Ekl+bGSyjhvVWu+K2QBLhS7BrxKhY9SY/cukFn+VWViaRfPw==',
size: 59516421
}
],
path: 'app Setup 0.2.0.exe',
sha512: 'XL65AupO/8wLQBHDFqM7JBkq5tKDSXmgbhqC00Ekl+bGSyjhvVWu+K2QBLhS7BrxKhY9SY/cukFn+VWViaRfPw==',
releaseDate: '2023-05-11T08:45:28.653Z'
}
[2023-05-11 16:55:36.376] [info] 下载进度:Download speed: 284467 - Downloaded 0.536275526379518% (319172/59516421)
[2023-05-11 16:55:37.673] [info] 下载进度:Download speed: 205174 - Downloaded 0.8339143914584515% (496316/59516421)
[2023-05-11 16:55:38.674] [info] 下载进度:Download speed: 187153 - Downloaded 1.0754410114815203% (640064/59516421)
...中间省略若干行
[2023-05-11 17:02:30.631] [info] 下载进度:Download speed: 142595 - Downloaded 99.52017612080539% (59230847/59516421)
[2023-05-11 17:02:31.670] [info] 下载进度:Download speed: 142557 - Downloaded 99.74218543820032% (59362979/59516421)
[2023-05-11 17:02:32.591] [info] 下载进度:Download speed: 142610 - Downloaded 100% (59516421/59516421)
[2023-05-11 17:02:33.435] [info] Update downloaded {
version: '0.2.0',
files: [
{
url: 'app Setup 0.2.0.exe',
sha512: 'XL65AupO/8wLQBHDFqM7JBkq5tKDSXmgbhqC00Ekl+bGSyjhvVWu+K2QBLhS7BrxKhY9SY/cukFn+VWViaRfPw==',
size: 59516421
}
],
path: 'app Setup 0.2.0.exe',
sha512: 'XL65AupO/8wLQBHDFqM7JBkq5tKDSXmgbhqC00Ekl+bGSyjhvVWu+K2QBLhS7BrxKhY9SY/cukFn+VWViaRfPw==',
releaseDate: '2023-05-11T08:45:28.653Z',
downloadedFile: 'C:\\Users\\OAO\\AppData\\Local\\vele-updater\\pending\\app Setup 0.2.0.exe'
}
[2023-05-11 17:02:39.869] [info] 开始安装...
页面展示更新进度动画UI
HomeView.vue
<template>
<div class="home">
<img alt="Vue logo" src="../assets/logo.png">
<h1>Welcome to Your Vue.js App 0.1.0</h1>
<div v-if="aProgress > 0" style="width:100%;margin: 0 auto;text-align: center;">
<a-progress type="circle" :percent="aProgress" />
</div>
<!-- <HelloWorld msg="Welcome to Your Vue.js App 0.1.0" /> -->
</div>
</template>
<script>
import { notification, Modal, Progress } from 'ant-design-vue';
import { ipcRenderer } from 'electron';
// import { autoUpdater } from 'electron-updater';
// @ is an alias to /src
// import HelloWorld from '@/components/HelloWorld.vue'
export default {
name: 'HomeView',
components: {
// 引入进度条组件
'a-progress': Progress
},
data() {
return {
aProgress: 0
}
},
mounted() {
var that = this;
if (process.env.NODE_ENV === 'production') {
// 生产环境下的逻辑
console.log("生产环境");
that.thisCheckForUpdates();
} else {
// 开发环境下的逻辑
console.log("开发环境")
var num = 3.2780868997482226.toFixed(2);
that.aProgress = num;
}
},
methods: {
/**
*
* @param {string} type 消息类型(success,info,warning,error)
* @param {string} msg 消息标题
* @param {string} descr 消息描述
* @param {number} timer 显示时长,默认1.5秒
*/
thisSysNoti(type, msg, descr, timer = 1.5) {
notification[type]({
message: msg,
duration: timer,
description: descr,
});
},
thisCheckForUpdates() {
var that = this;
//发送检测更新命令
ipcRenderer.send('thisCheckForUpdates');
//接收可以更新的命令
ipcRenderer.on('thisUpdateavailable', (ev, res) => {
console.log('有新的版本可用');
console.log(res);
var updaterMsg = '有新的版本可用(' + res.data.version + ')';
// 询问是否更新
Modal.confirm({
title: '温馨提示',
content: updaterMsg,
onOk() {
console.log('开始下载...');
ipcRenderer.send('thisDownloadnow');
Modal.destroyAll();
},
onCancel() { },
});
})
ipcRenderer.on('thisUpdatenotavailable', (ev, res) => {
console.log(res);
that.thisSysNoti('info', '温馨提示', res.msg, 2.5);
})
ipcRenderer.on('thisUpdateerror', (ev, res) => {
console.log(res);
that.thisSysNoti('error', '温馨提示', res.msg, 2.5);
})
// 监听下载进度
ipcRenderer.on('thisDownloadprogress', (ev, res) => {
console.log(res);
// 下载进度保留2位小数,比如: 3.2780868997482226 => 3.27
that.aProgress = res.toFixed(2)
})
}
}
}
</script>
效果图


下载完成后自动进行安装引导
来自https://blog.csdn.net/weixin_42270683/article/details/130626706