黄金架构LNMP
LNMP是网站架构初期最合适的单体架构。因为初创型技术团队对于技术的选型,需要考虑如下因素
- 在创业初期,研发资源有限,研发人力有限,技术储备有限,需要选择一个易维护、简单的技术架构;
- 产品需要快速研发上线,并能够满足快速迭代要求,现实情况决定了一开始没有时间和精力来选择一个过于复杂的分布式架构系统,研发速度必须要快;
- 创业初期,业务复杂度比较低,业务量也比较小,如果选择过于复杂的架构,反而会增加研发难度以及运维难度;
- 遵从选择合适的技术而不是最好的技术原则,并权衡研发效率和产品目标,同时创业初期只有一个PHP研发人员,过于复杂的技术架构必然会带来比较高昂的学习成本。
基于如上的因素,LNMP架构就是最合适的。
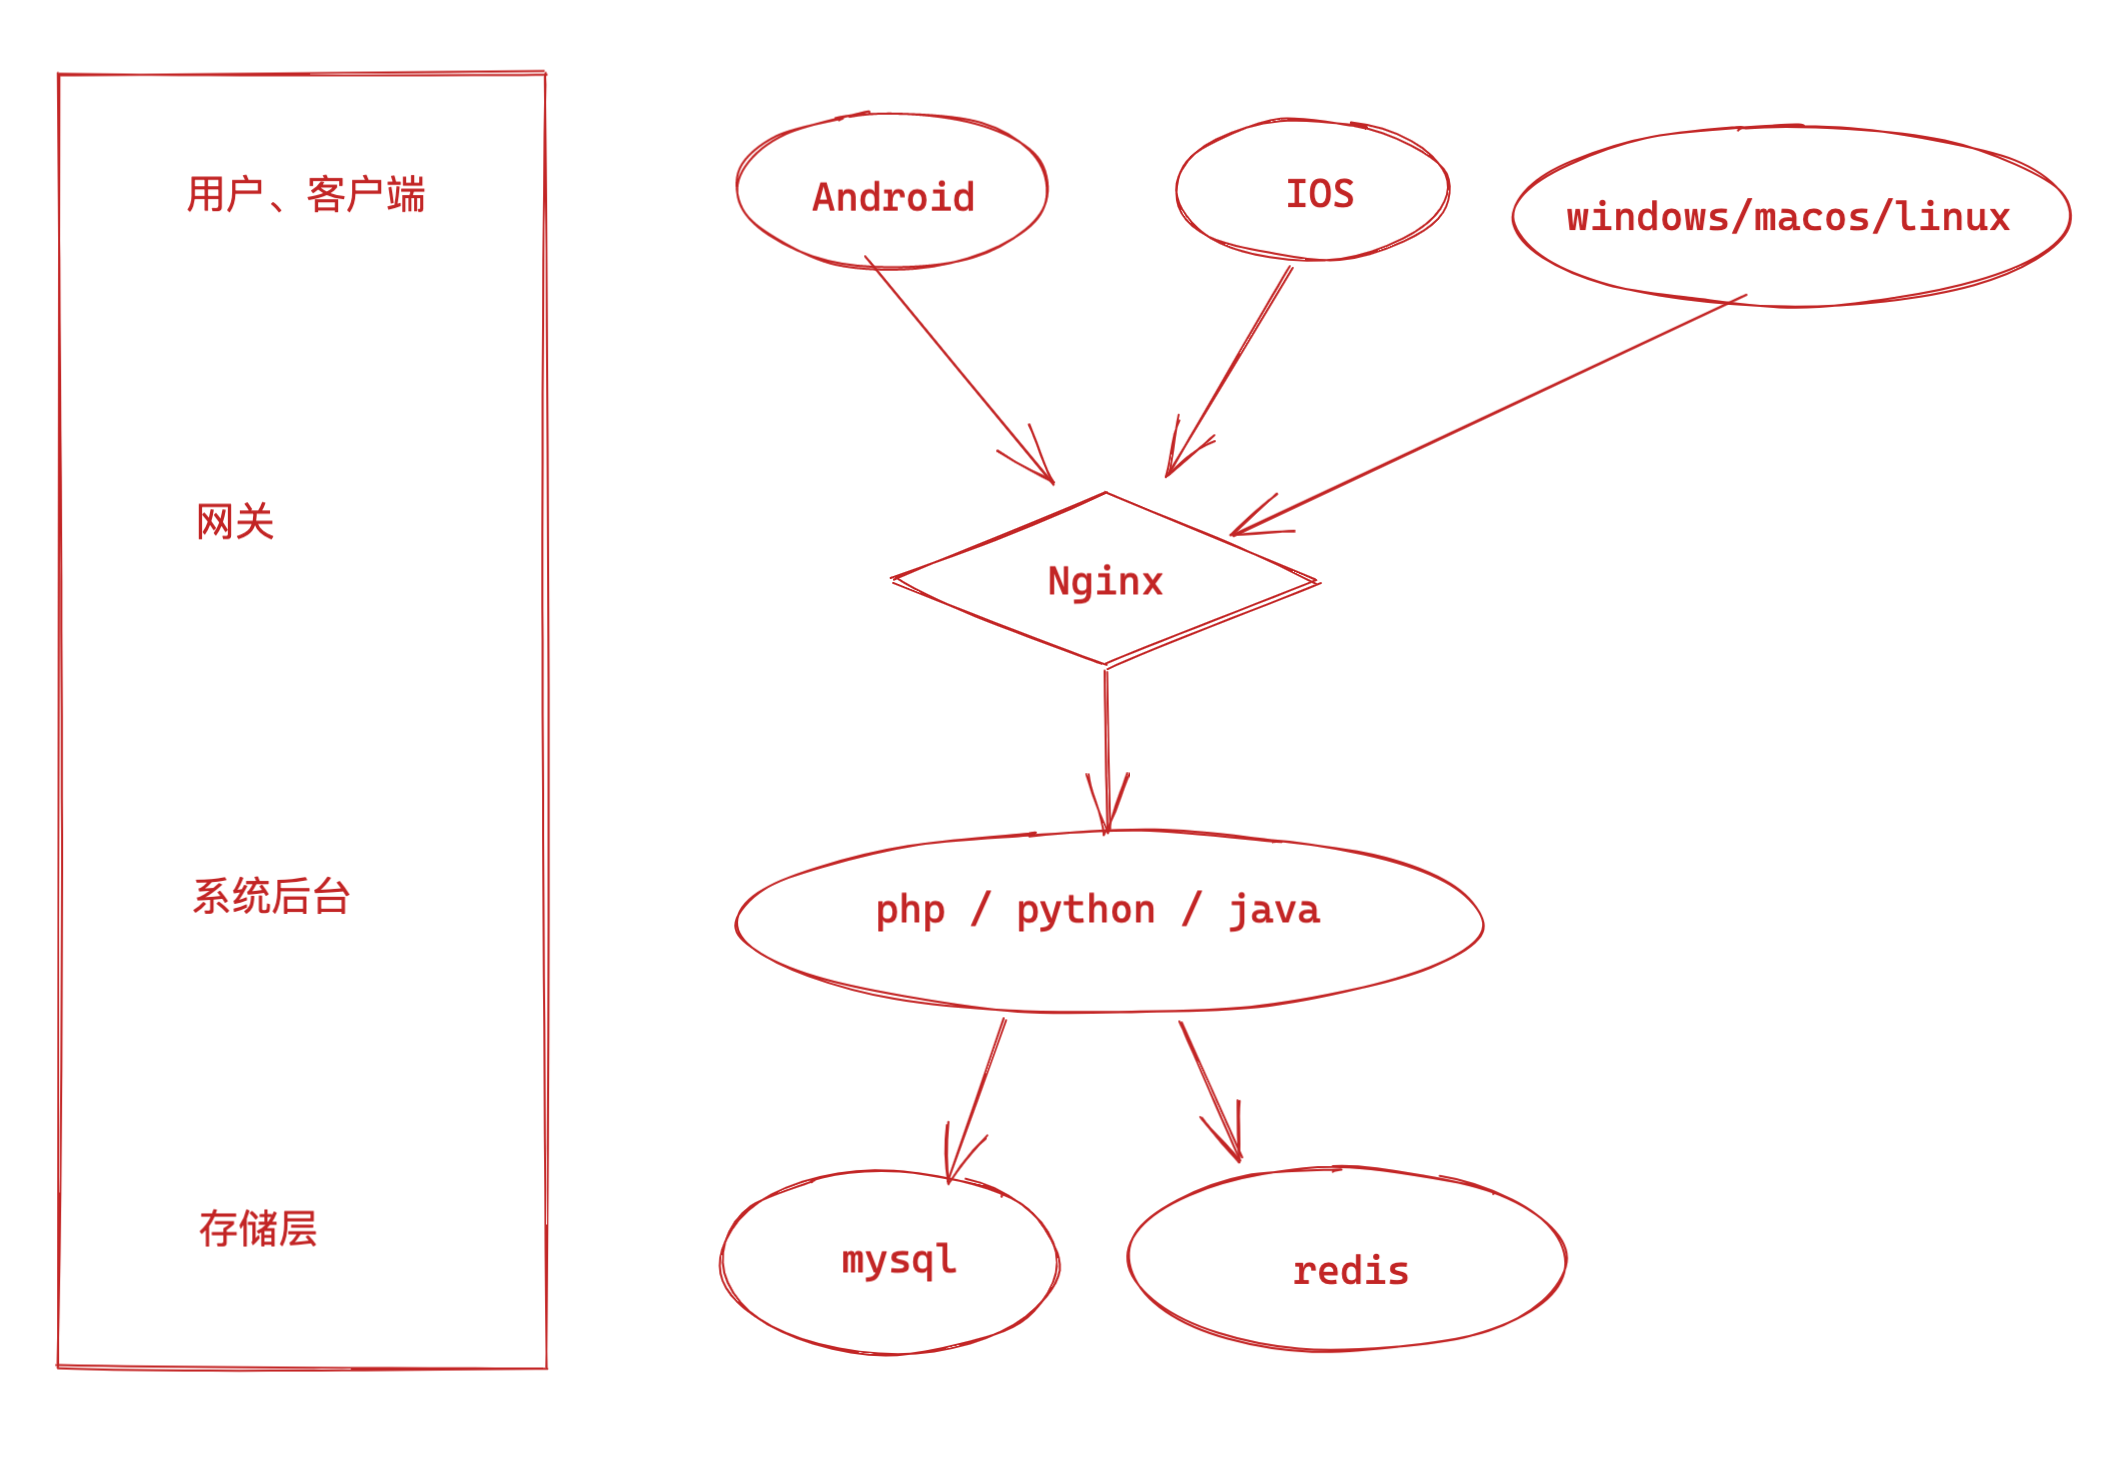
如此架构,一般三台服务器足以,Nginx与后台系统部署在一台机器,Mysql数据库单独服务器,redis缓存一台服务器。
这样的架构优势在于
- 单体架构,架构简单,清晰的分层结构;
- 可以快速研发,满足产品快速迭代要求;
- 没有复杂的技术,技术学习成本低,同时运维成本低,无需专业的运维(开发一般忙不过来,任何大小的公司,都至少得有一个运维,除非真的是一个很烂的小作坊),节省开支。
一、LNMP架构工作原理
1.nginx无法处理动态请求(需要编程语言去解析,PHP、python)
2.但是当用户发起动态请求时,nginx的location,进行规则判断,决定后续的动作
- 静态资源,直接返回(如读取nfs等资源)
- 动态资源,通过代理参数转发给后端框架。
二、LNMP架构原理
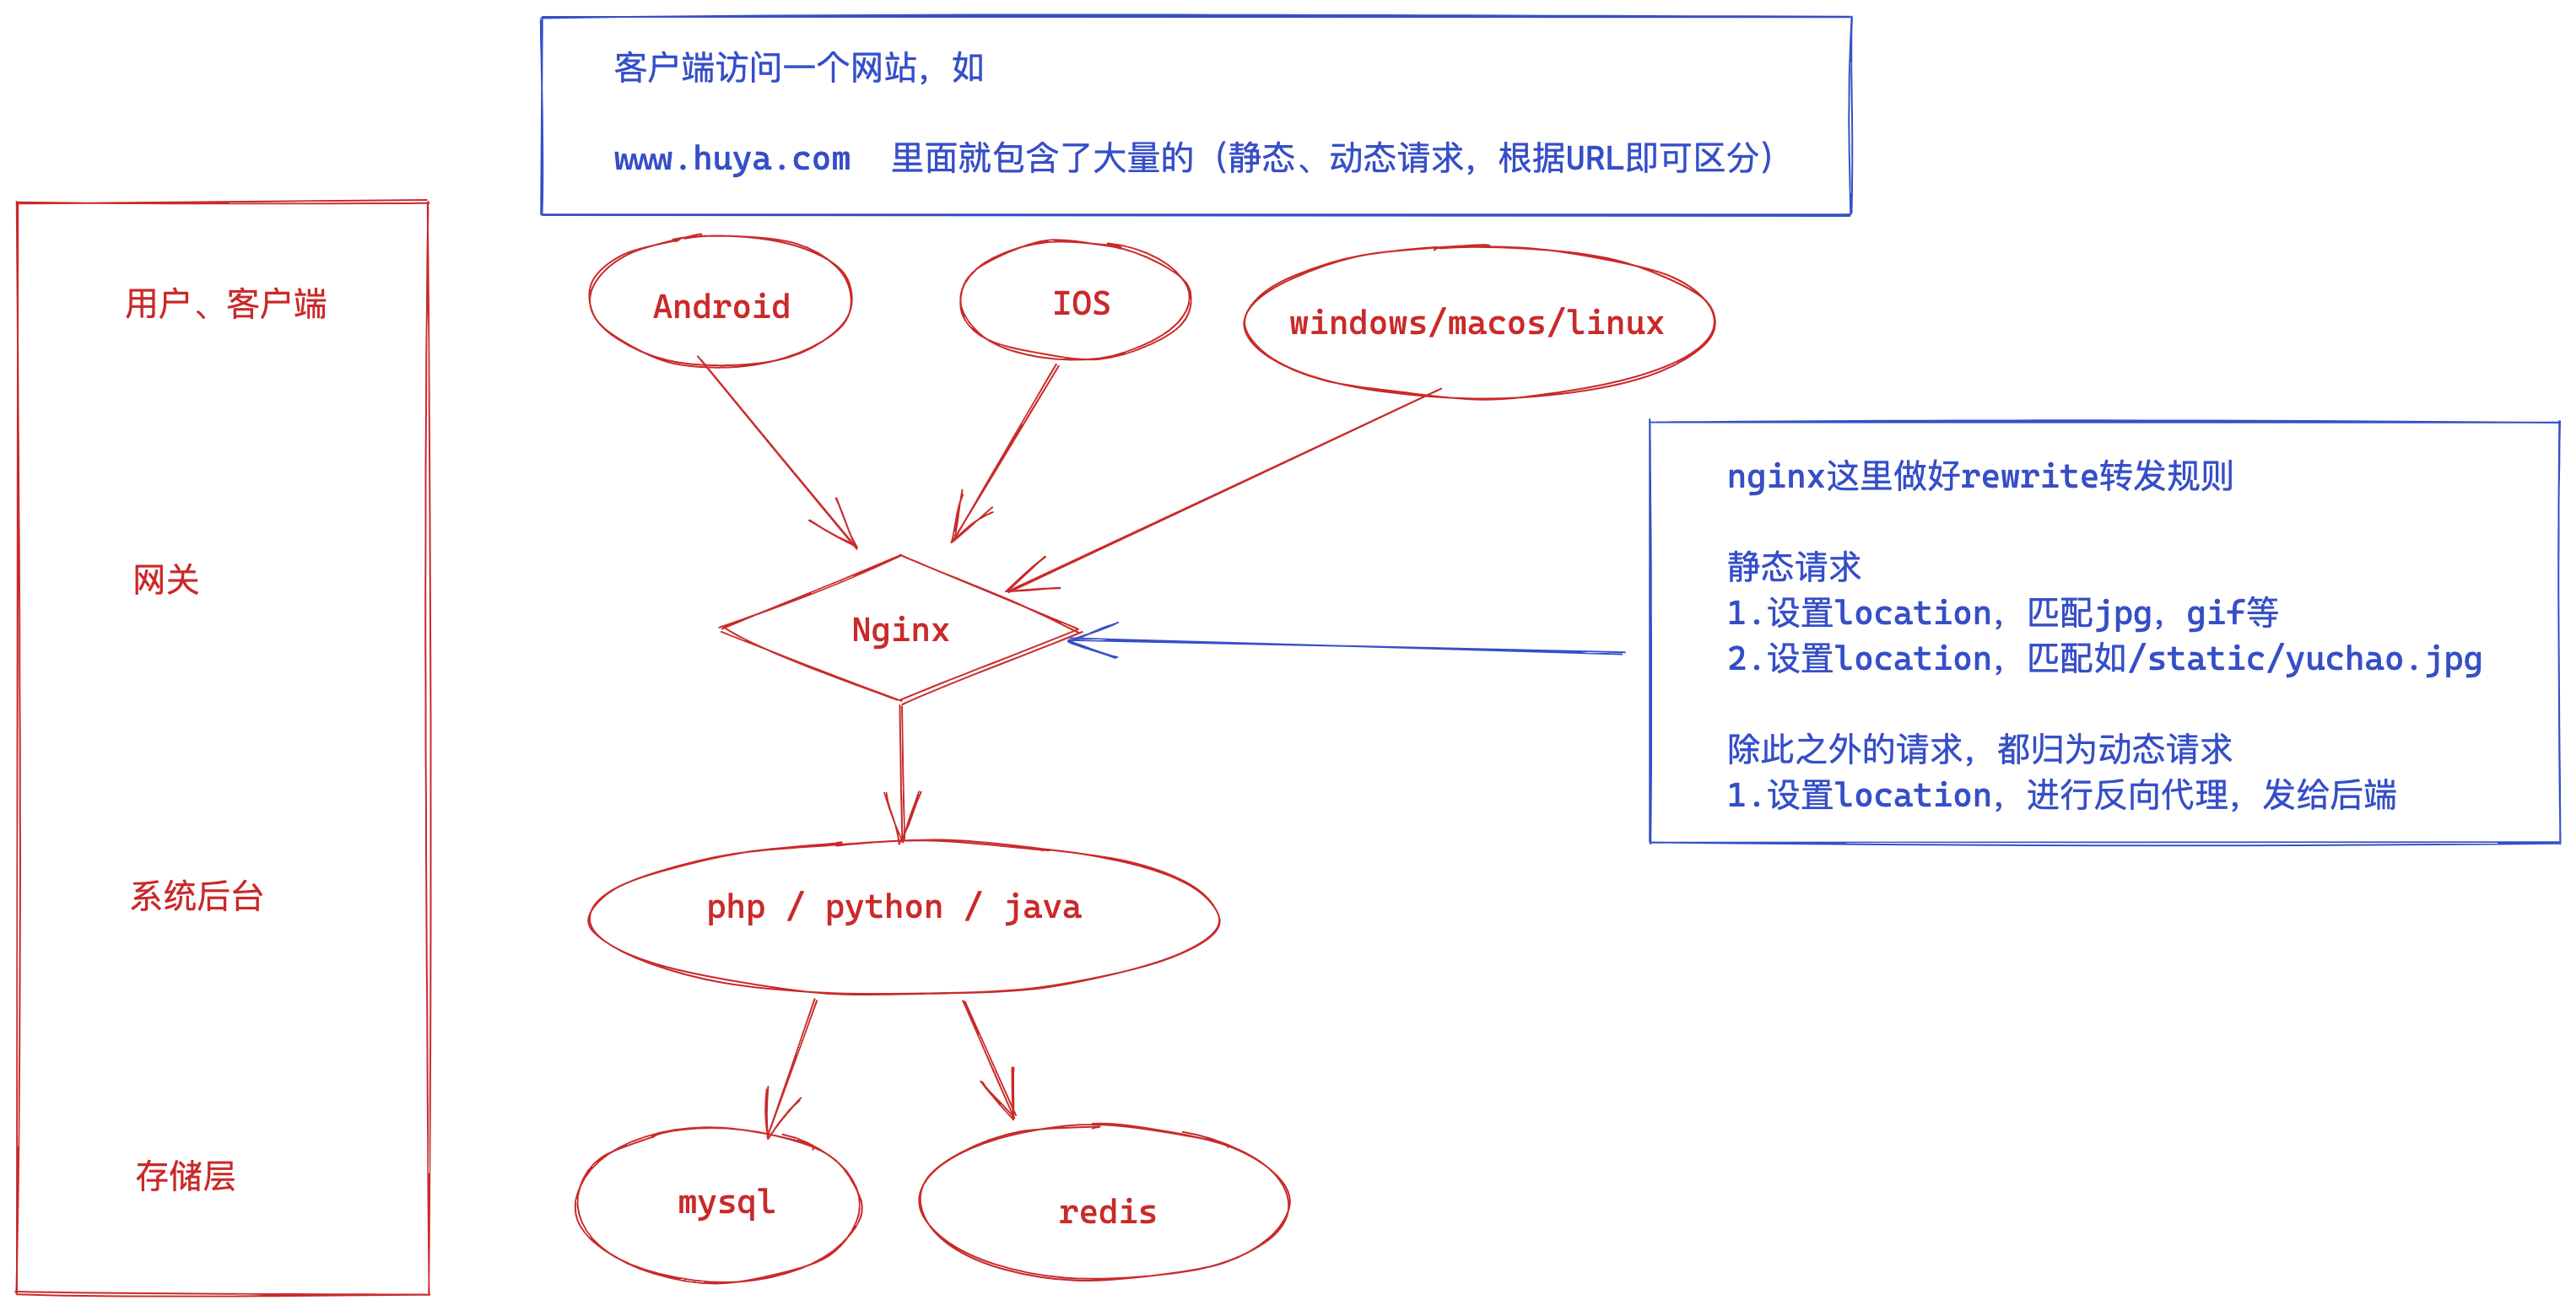
LNMP工作流是用户通过浏览器输入域名访问Nginx web服务,Nginx判断请求是静态请求则由Nginx返回给用户。
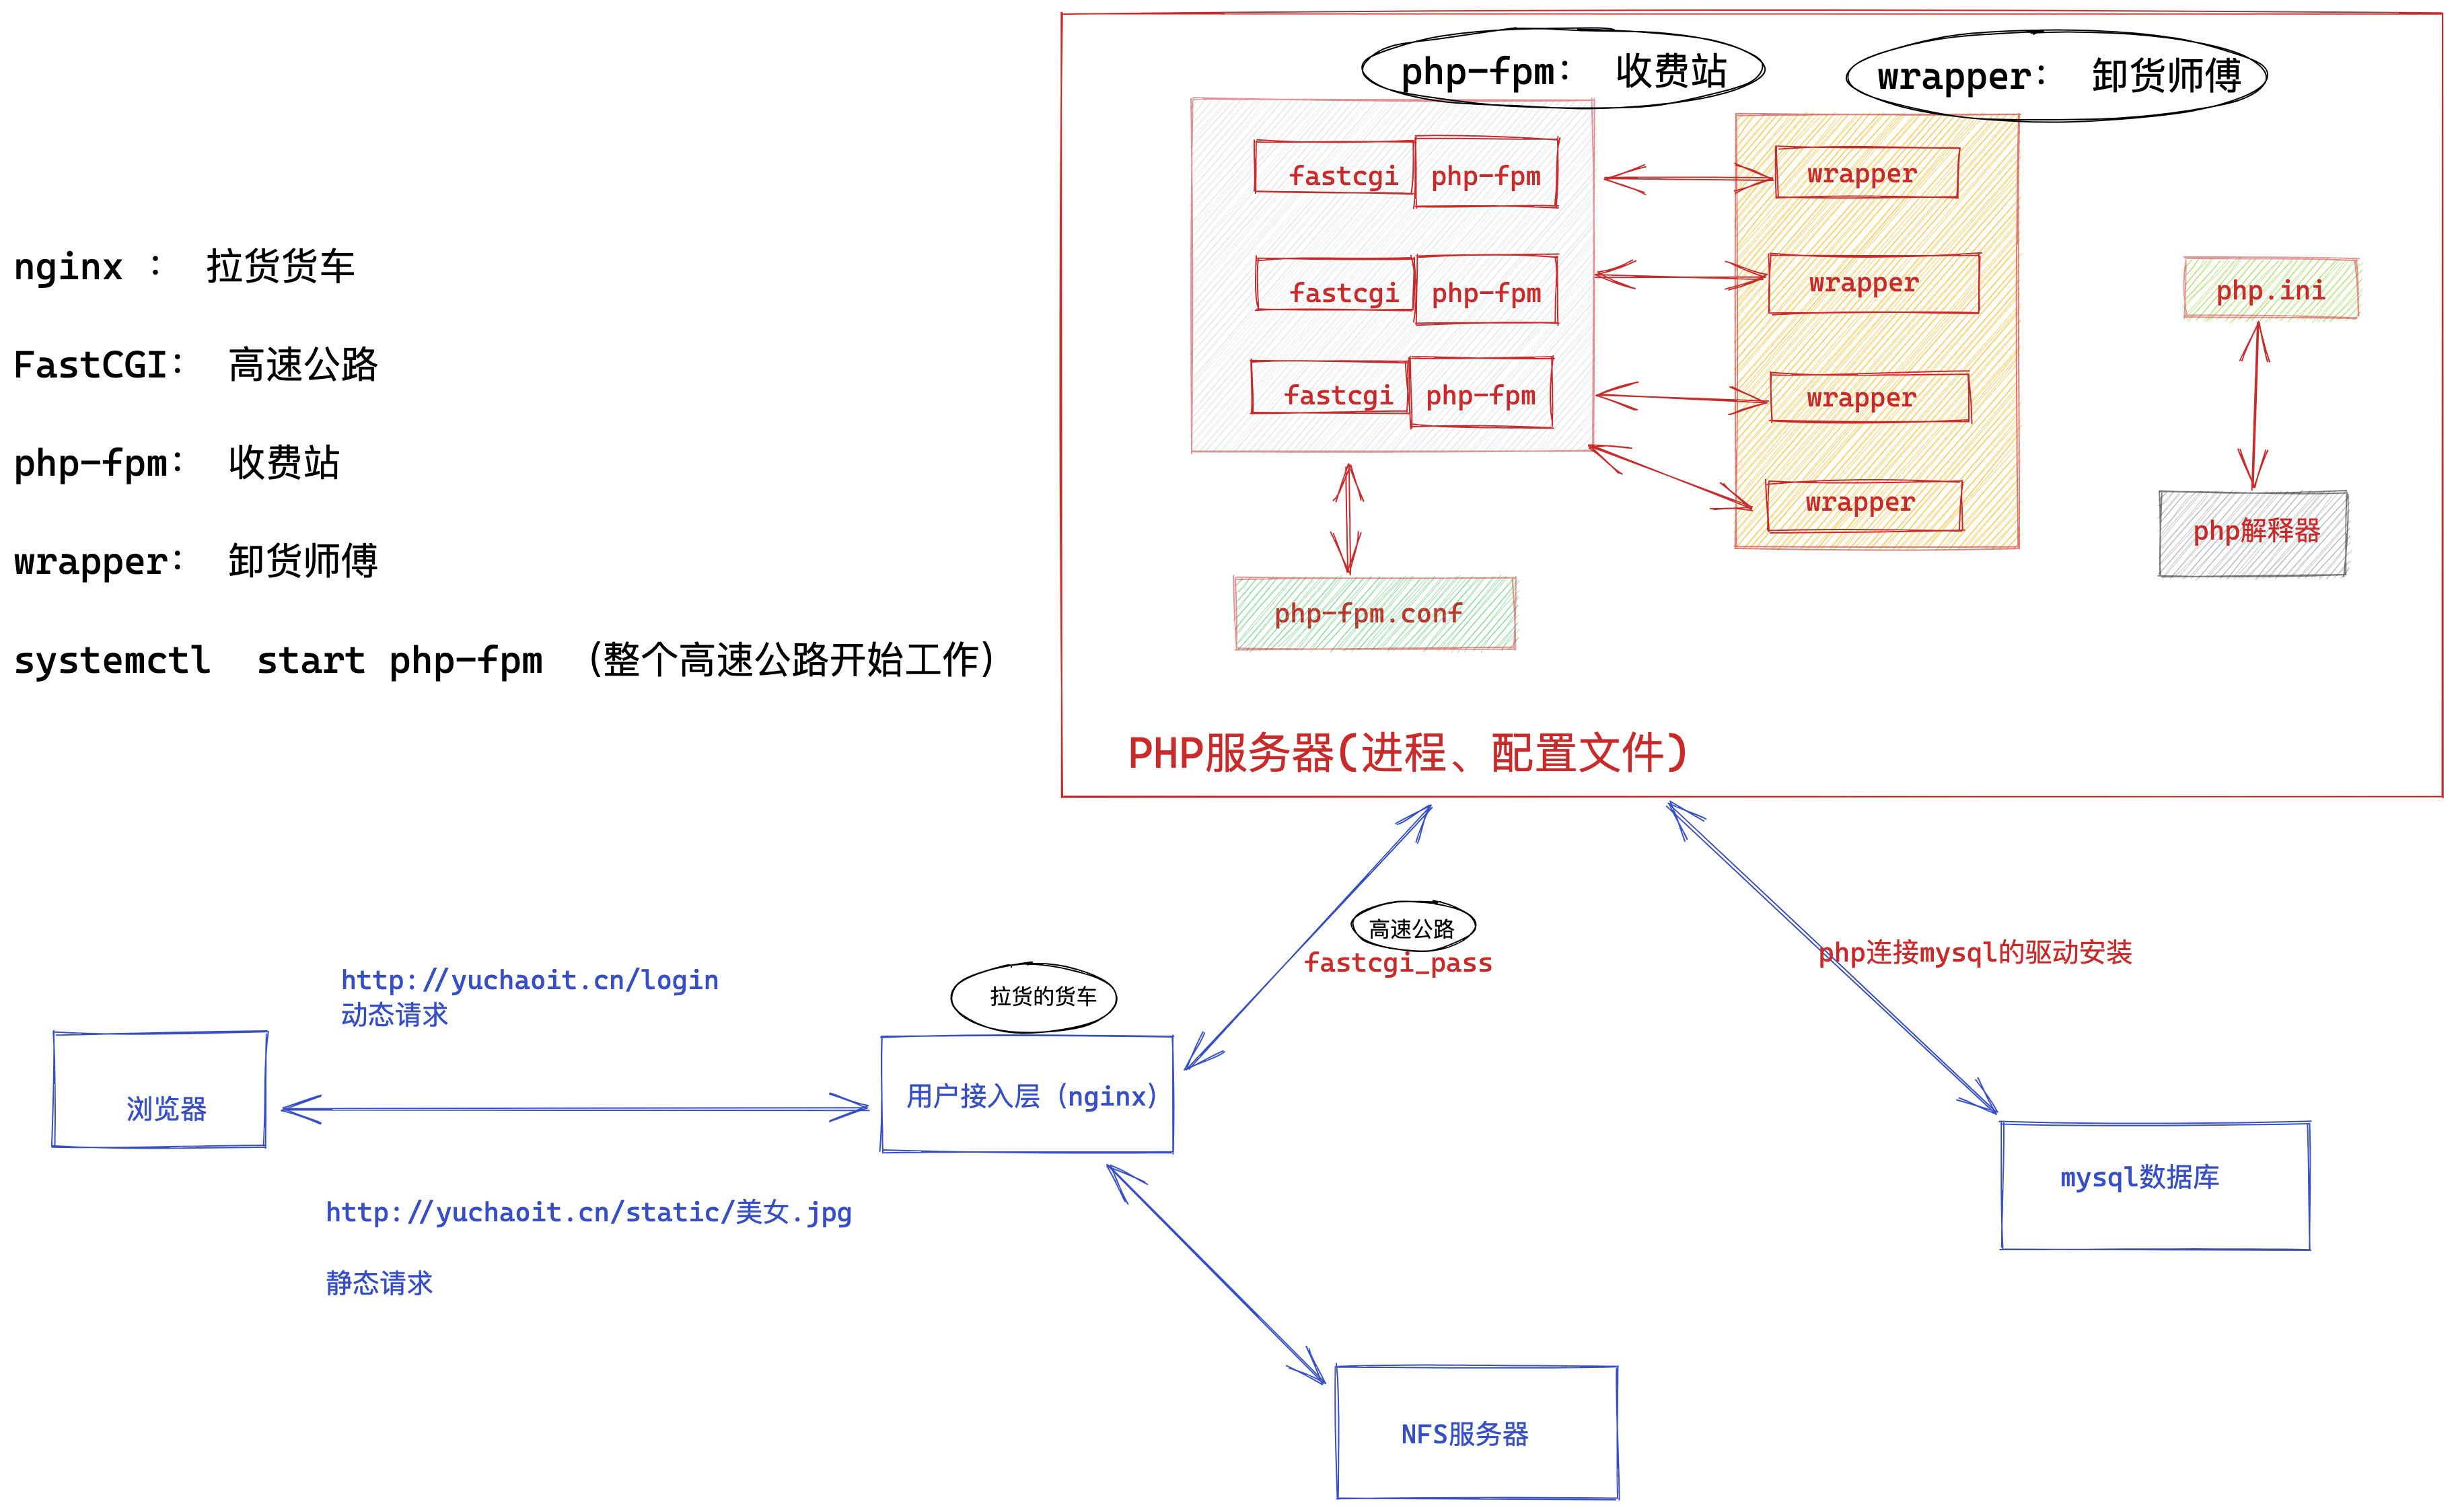
如果是动态请求(如.php结尾),那么Nginx会将该请求通过FastCGI接口发送给PHP引擎(php-fpm进程)进行解析。(在nginx的location中设置规则)
如果该动态请求需要读取mysql数据库,php会继续向后读取数据库,最终Nginx将获取的数据返回给用户。
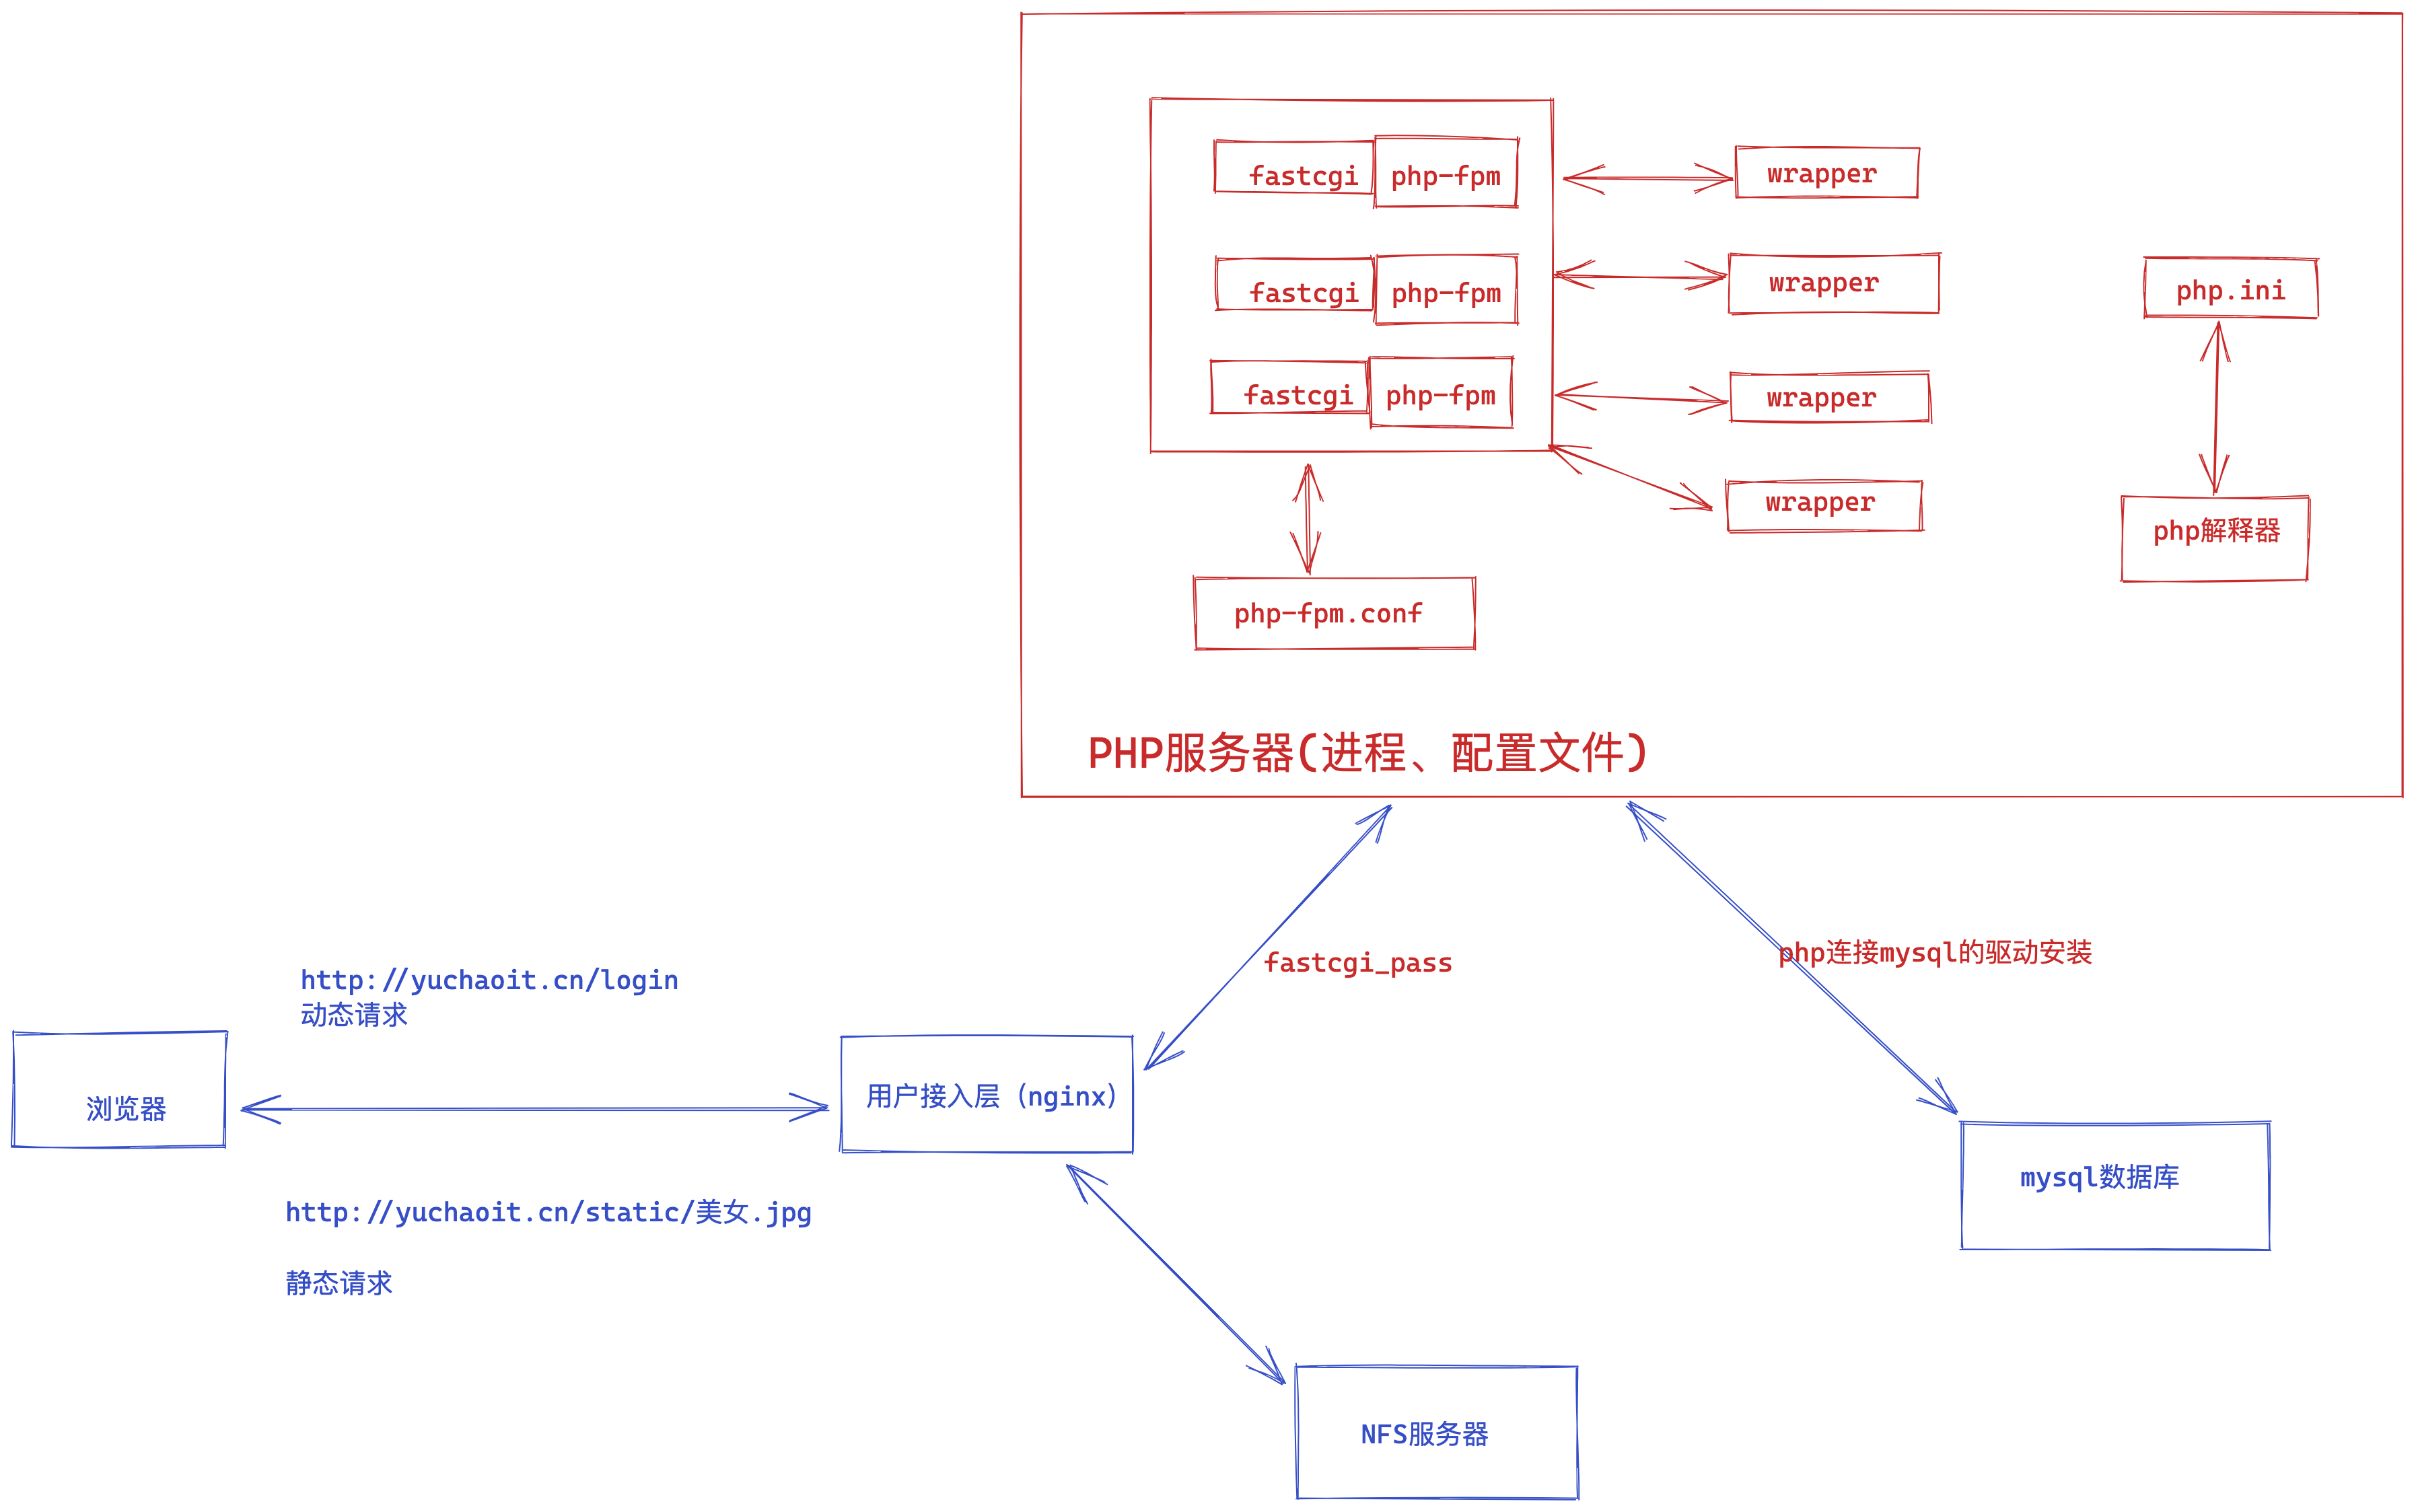
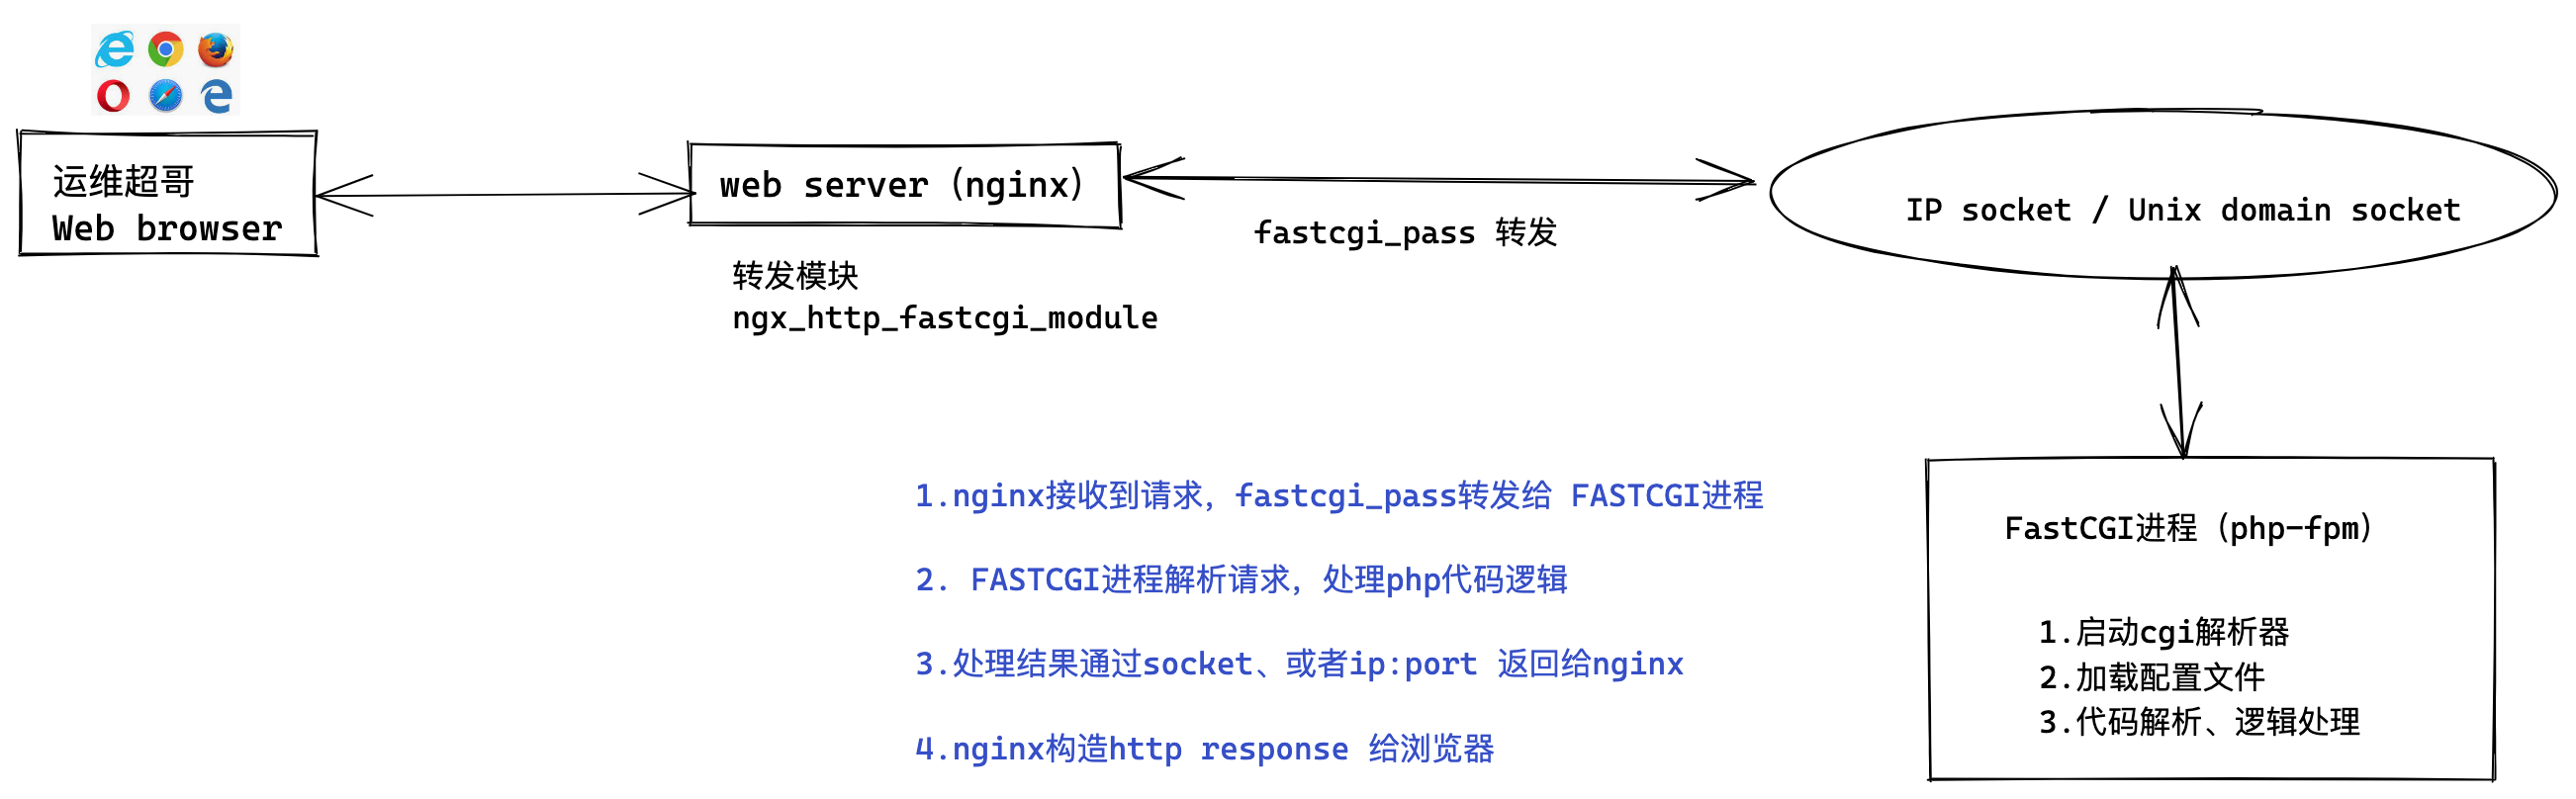
nginx结合php工作原理
这张图中,设计到如下几个知识点,文字描述工作流程是
1.用户发起http请求,请求到达LNMP中的nginx

2.nginx根据用户请求的url进行判断,通过location进行匹配

3.locaiton判断出url是静态请求,nginx直接查找静态资源,返回响应。

4.location判断出是动态请求,nginx反向代理转发给后端(这个架构里是fastcgi的php)程序

5.nginx通过fastcgi_pass模块把请求转发给php-fpm进程,php-fpm进行后续的处理
(php-fpm进程调用wrapper进程)

6.如果请求是xx.php文件,那么php解释器直接阅读程序,完成php脚本任务,然后返回结果。

7.如果请求需要调用数据库,php则会通过代码连接数据库,发起SQL操作。

8.最终数据库的内容返回流程。
mysql
↓
php
↓
php-fpm
↓
fastcgi
↓
nginx
↓
http
↓
浏览器
fastcgi是什么
FastCGI是一个可伸缩、高速的在HTTP服务器和动态脚本之间通信的接口(在Linux环境下,FastCGI接口就是socket,这个socket可以是文件socket,也可以是IP socket。
也就意味着本地通信,远程通信两种,主要优点是把动态语言(用sock进程运行)和HTTP服务器(nginx)分离开。
- 多数主流的web服务器都可接收、识别这个协议,如apache,nginx。
- 同时诸多脚本编程语言也都实现了该协议,如php。
- fastcgi接口,以c/s结构运行。
三、部署LNMP基础环境
1.创建www用户
降低nginx运行权限
[root@web-7 ~]#groupadd www -g 666
[root@web-7 ~]#useradd www -s /sbin/nologin -M -u 666 -g 666
[root@web-7 ~]#id www
uid=666(www) gid=666(www) groups=666(www)
2.官网nginx仓库
cat > /etc/yum.repos.d/nginx.repo << 'EOF'
[nginx-stable]
name=nginx stable repo
baseurl=http://nginx.org/packages/centos/$releasever/$basearch/
gpgcheck=1
enabled=1
gpgkey=https://nginx.org/keys/nginx_signing.key
EOF
3.安装、开机启动
# 安装
yum clean all

yum install nginx -y

# 启动,开机自启
systemctl start nginx
systemctl enable nginx
4.部署php环境(配置yum源,第三方源)
# 卸载旧环境
yum remove php-mysql-5.4 php php-fpm php-common -y

# 安装第三方epel源
rpm -Uvh https://dl.fedoraproject.org/pub/epel/epel-release-latest-7.noarch.rpm

rpm -Uvh https://mirror.webtatic.com/yum/el7/webtatic-release.rpm


yum install -y php71w-cli php71w-common php71w-devel php71w-embedded php71w-gd php71w-mcrypt php71w-mbstring php71w-pdo php71w-xml  php71w-fpm  php71w-mysqlnd  php71w-opcache php71w-pecl-memcached php71w-pecl-redis php71w-pecl-mongodb php71w-json php71w-pecl-apcu php71w-pecl-apcu-devel
5.配置php-fpm和nginx用户一致
修改php-fpm配置文件
[root@web-7 ~]#sed -i '/^user/c user = www' /etc/php-fpm.d/www.conf
[root@web-7 ~]#sed -i '/^group/c group = www' /etc/php-fpm.d/www.conf

[root@web-7 ~]#grep -E '^(user|group)' /etc/php-fpm.d/www.conf
user = www
group = www
6.启动php-fpm开机自启
[root@web-7 ~]#systemctl start php-fpm
[root@web-7 ~]#
[root@web-7 ~]#systemctl enable php-fpm
Created symlink from /etc/systemd/system/multi-user.target.wants/php-fpm.service to /usr/lib/systemd/system/php-fpm.service.
[root@web-7 ~]#
7.部署mysql(mariadb)
[root@web-7 ~]#yum install mariadb-server mariadb -y

[root@web-7 ~]#systemctl start mariadb

[root@web-7 ~]#
[root@web-7 ~]#systemctl enable mariadb
Created symlink from /etc/systemd/system/multi-user.target.wants/mariadb.service to /usr/lib/systemd/system/mariadb.service.
[root@web-7 ~]#
8.mysql光速入门
1.修改密码,将默认的空密码,改为 "yuchaoit.cn"
[root@web-7 ~]#mysqladmin password 'yuchaoit.cn'

2.登录测试
[root@web-7 ~]#mysql -uroot -pyuchaoit.cn
Welcome to the MariaDB monitor.  Commands end with ; or \g.
Your MariaDB connection id is 3
Server version: 5.5.68-MariaDB MariaDB Server

Copyright (c) 2000, 2018, Oracle, MariaDB Corporation Ab and others.

Type 'help;' or '\h' for help. Type '\c' to clear the current input statement.

MariaDB [(none)]>


3.查看mysql默认的用户,查询默认mysql库下的user表,且只查看user,host两个字段
MariaDB [(none)]> select user,host from mysql.user;
+------+-----------+
| user | host      |
+------+-----------+
| root | 127.0.0.1 |
| root | ::1       |
|      | localhost |
| root | localhost |
|      | web-7     |
| root | web-7     |
+------+-----------+
6 rows in set (0.00 sec)


4.指定账号、密码、服务端登录
[root@web-7 ~]#mysql -uroot -p'yuchaoit.cn' -h 127.0.0.1
Welcome to the MariaDB monitor.  Commands end with ; or \g.
Your MariaDB connection id is 5
Server version: 5.5.68-MariaDB MariaDB Server

Copyright (c) 2000, 2018, Oracle, MariaDB Corporation Ab and others.

Type 'help;' or '\h' for help. Type '\c' to clear the current input statement.

MariaDB [(none)]>

5.查看有多少库
MariaDB [(none)]> show databases;
+--------------------+
| Database           |
+--------------------+
| information_schema |
| mysql              |
| performance_schema |
| test               |
+--------------------+
4 rows in set (0.00 sec)

6.查看库下有多少张表,有24行记录,就是24张表
MariaDB [(none)]> show tables from mysql;
+---------------------------+
| Tables_in_mysql           |
+---------------------------+
| columns_priv              |
| db                        |
| event                     |
| func                      |
| general_log               |
| help_category             |
| help_keyword              |
| help_relation             |
| help_topic                |
| host                      |
| ndb_binlog_index          |
| plugin                    |
| proc                      |
| procs_priv                |
| proxies_priv              |
| servers                   |
| slow_log                  |
| tables_priv               |
| time_zone                 |
| time_zone_leap_second     |
| time_zone_name            |
| time_zone_transition      |
| time_zone_transition_type |
| user                      |
+---------------------------+
24 rows in set (0.00 sec)

7.查看数据表中有多少个字段(查看表结构)
语法1,直接查看  "库.表"
MariaDB [(none)]> desc mysql.user;

语法2
切换数据库
MariaDB [(none)]> use mysql;
查看库下的表
MariaDB [mysql]> desc user;
四、LNMP环境架构部署
1.部署nginx支持fastcgi
fastcgi_pass 请求转发
官网文档
https://nginx.org/en/docs/http/ngx_http_fastcgi_module.html#fastcgi_pass

Syntax:    fastcgi_pass address;
Default:    —
Context:    location, if in location
Sets the address of a FastCGI server. The address can be specified as a domain name or IP address, and a port:


用法1,转发给ip:port形式
fastcgi_pass localhost:9000;

用法2,转发给unix socket本地进程套接字
fastcgi_pass unix:/tmp/fastcgi.socket;
设置fastcgi首页,需要结合fastcgi_param。
https://nginx.org/en/docs/http/ngx_http_fastcgi_module.html#fastcgi_index

语法
fastcgi_index index.php;
fastcgi_param SCRIPT_FILENAME /home/www/scripts/php$fastcgi_script_name;
2.具体配置参考
[root@web-7 /etc/nginx/conf.d]#cat php.conf
server{
    listen 80;
    server_name www.yuchaoit.cn;
    # 静态请求,资源存放路径
    root /www;
    index index.php index.html;

    # 动态请求处理
    location ~ \.php$ {

        root /code;
        fastcgi_pass 127.0.0.1:9000;
        fastcgi_index index.php;
        fastcgi_param SCRIPT_FILENAME $document_root$fastcgi_script_name;
        include fastcgi_params;
    }
}
参数解释
参数文档
https://nginx.org/en/docs/http/ngx_http_fastcgi_module.html
$document_root  就表示当前locatin设置的root或是alias的目录
SCRIPT_FILENAME 用于在php中确定脚本名字
fastcgi_script_name 请求的URL

整体意思是,用户发来的php相关请求,包括请求中的所有参数,全部转发给127.0.0.1:9000的php程序。
3.创建php程序目录
在上述配置中,用户的php请求,会转发给127.0.0.1:9000处理,并且去/code目录下寻找index.php

[root@web-7 ~]#mkdir -p /code
[root@web-7 ~]#chown -R www.www /code
[root@web-7 ~]#vim /code/test-phpinfo.php
[root@web-7 ~]#cat /code/test-phpinfo.php
<?php
phpinfo();
echo "welcome to yuchaoit.cn"
?>
4.检查nginx语法且启动
[root@web-7 /etc/nginx/conf.d]#nginx -t
nginx: the configuration file /etc/nginx/nginx.conf syntax is ok
nginx: configuration file /etc/nginx/nginx.conf test is successful


启动
[root@web-7 ~]# systemctl start nginx
5.绑定hosts访问php页面。
C:\Windows\System32\drivers\etc\hosts
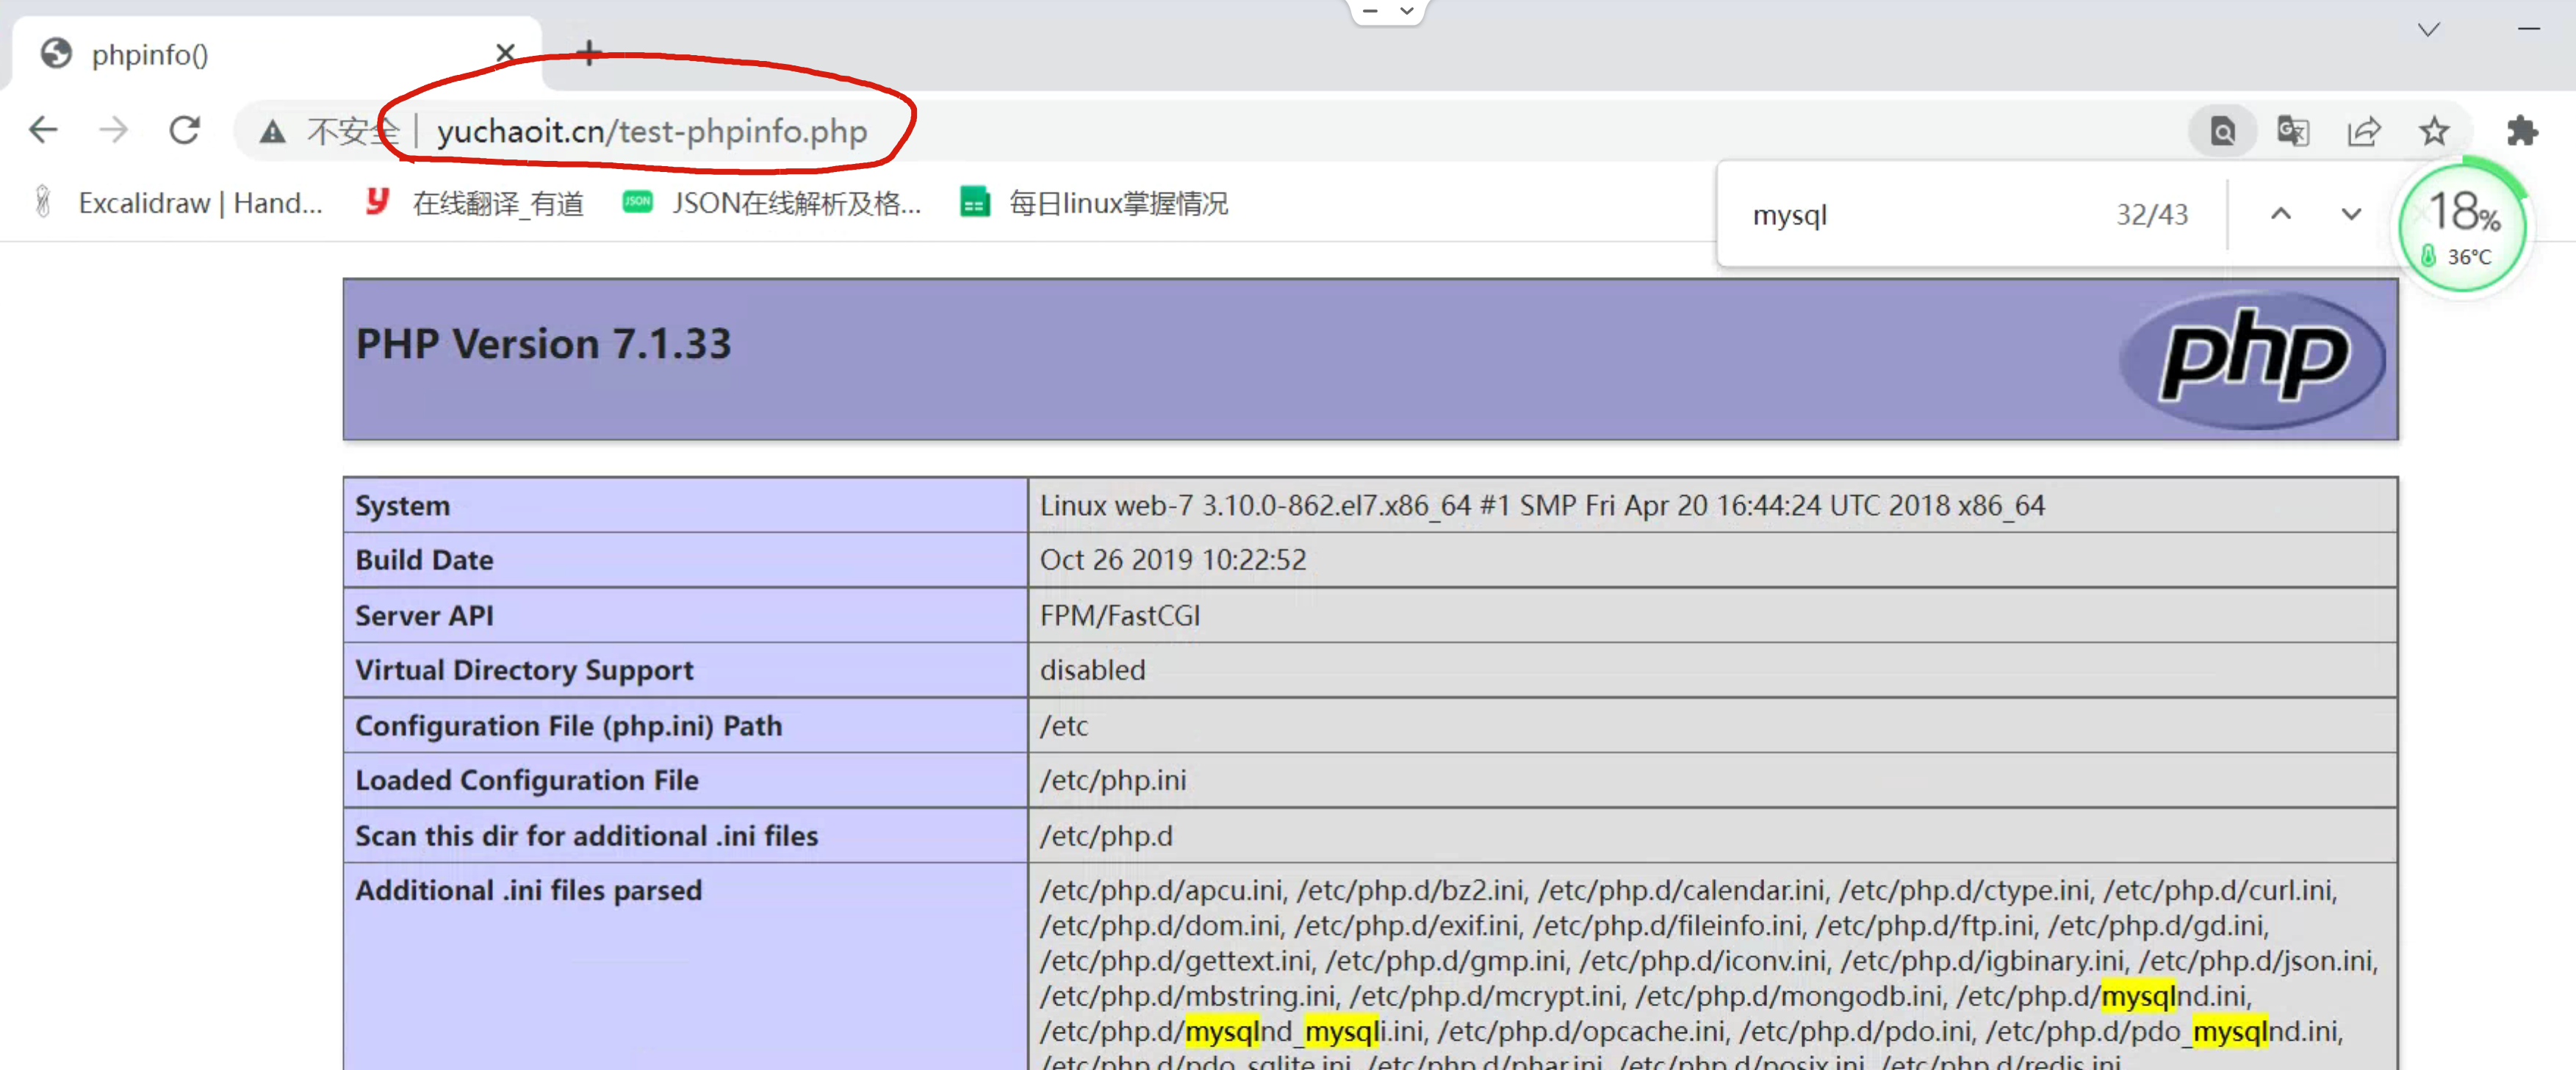
10.0.0.7 www.yuchaoit.cn访问页面,访问该php资源文件
www.yuchaoit.cn/test-phpinfo.php
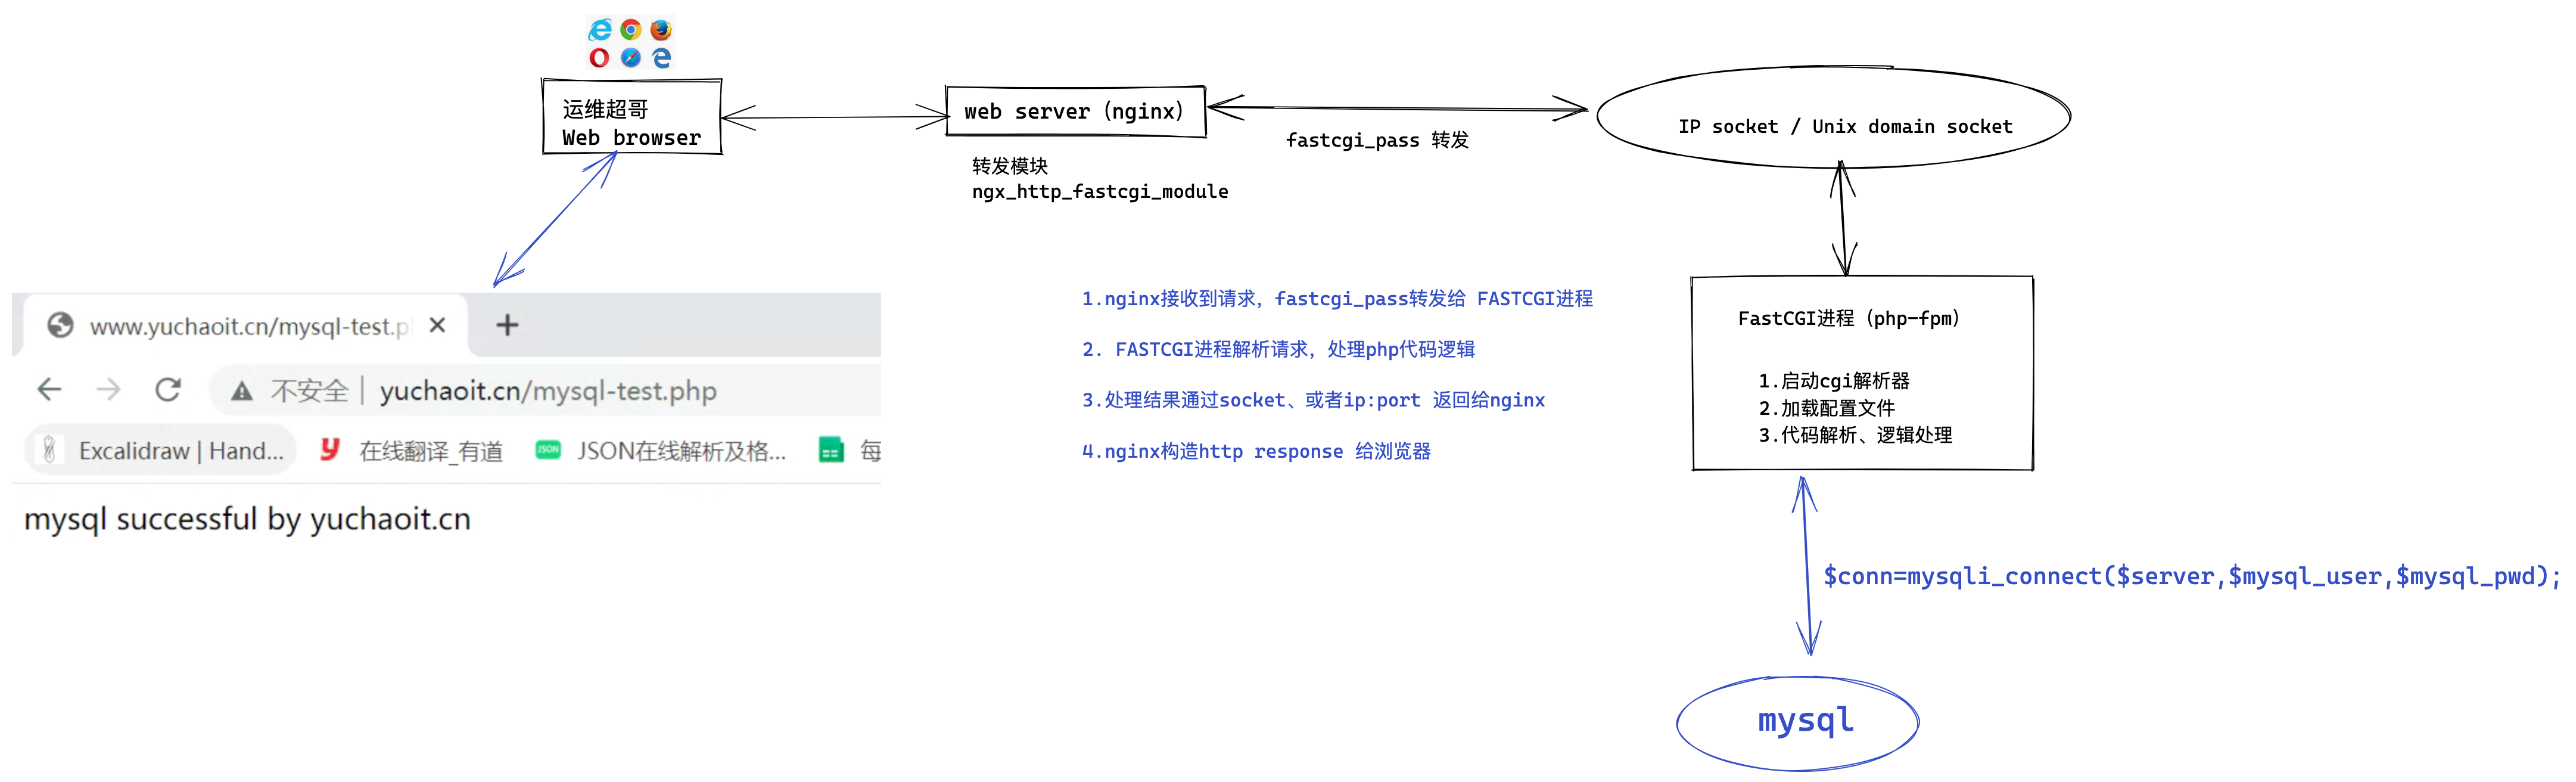
6.测试php和数据库的连通。
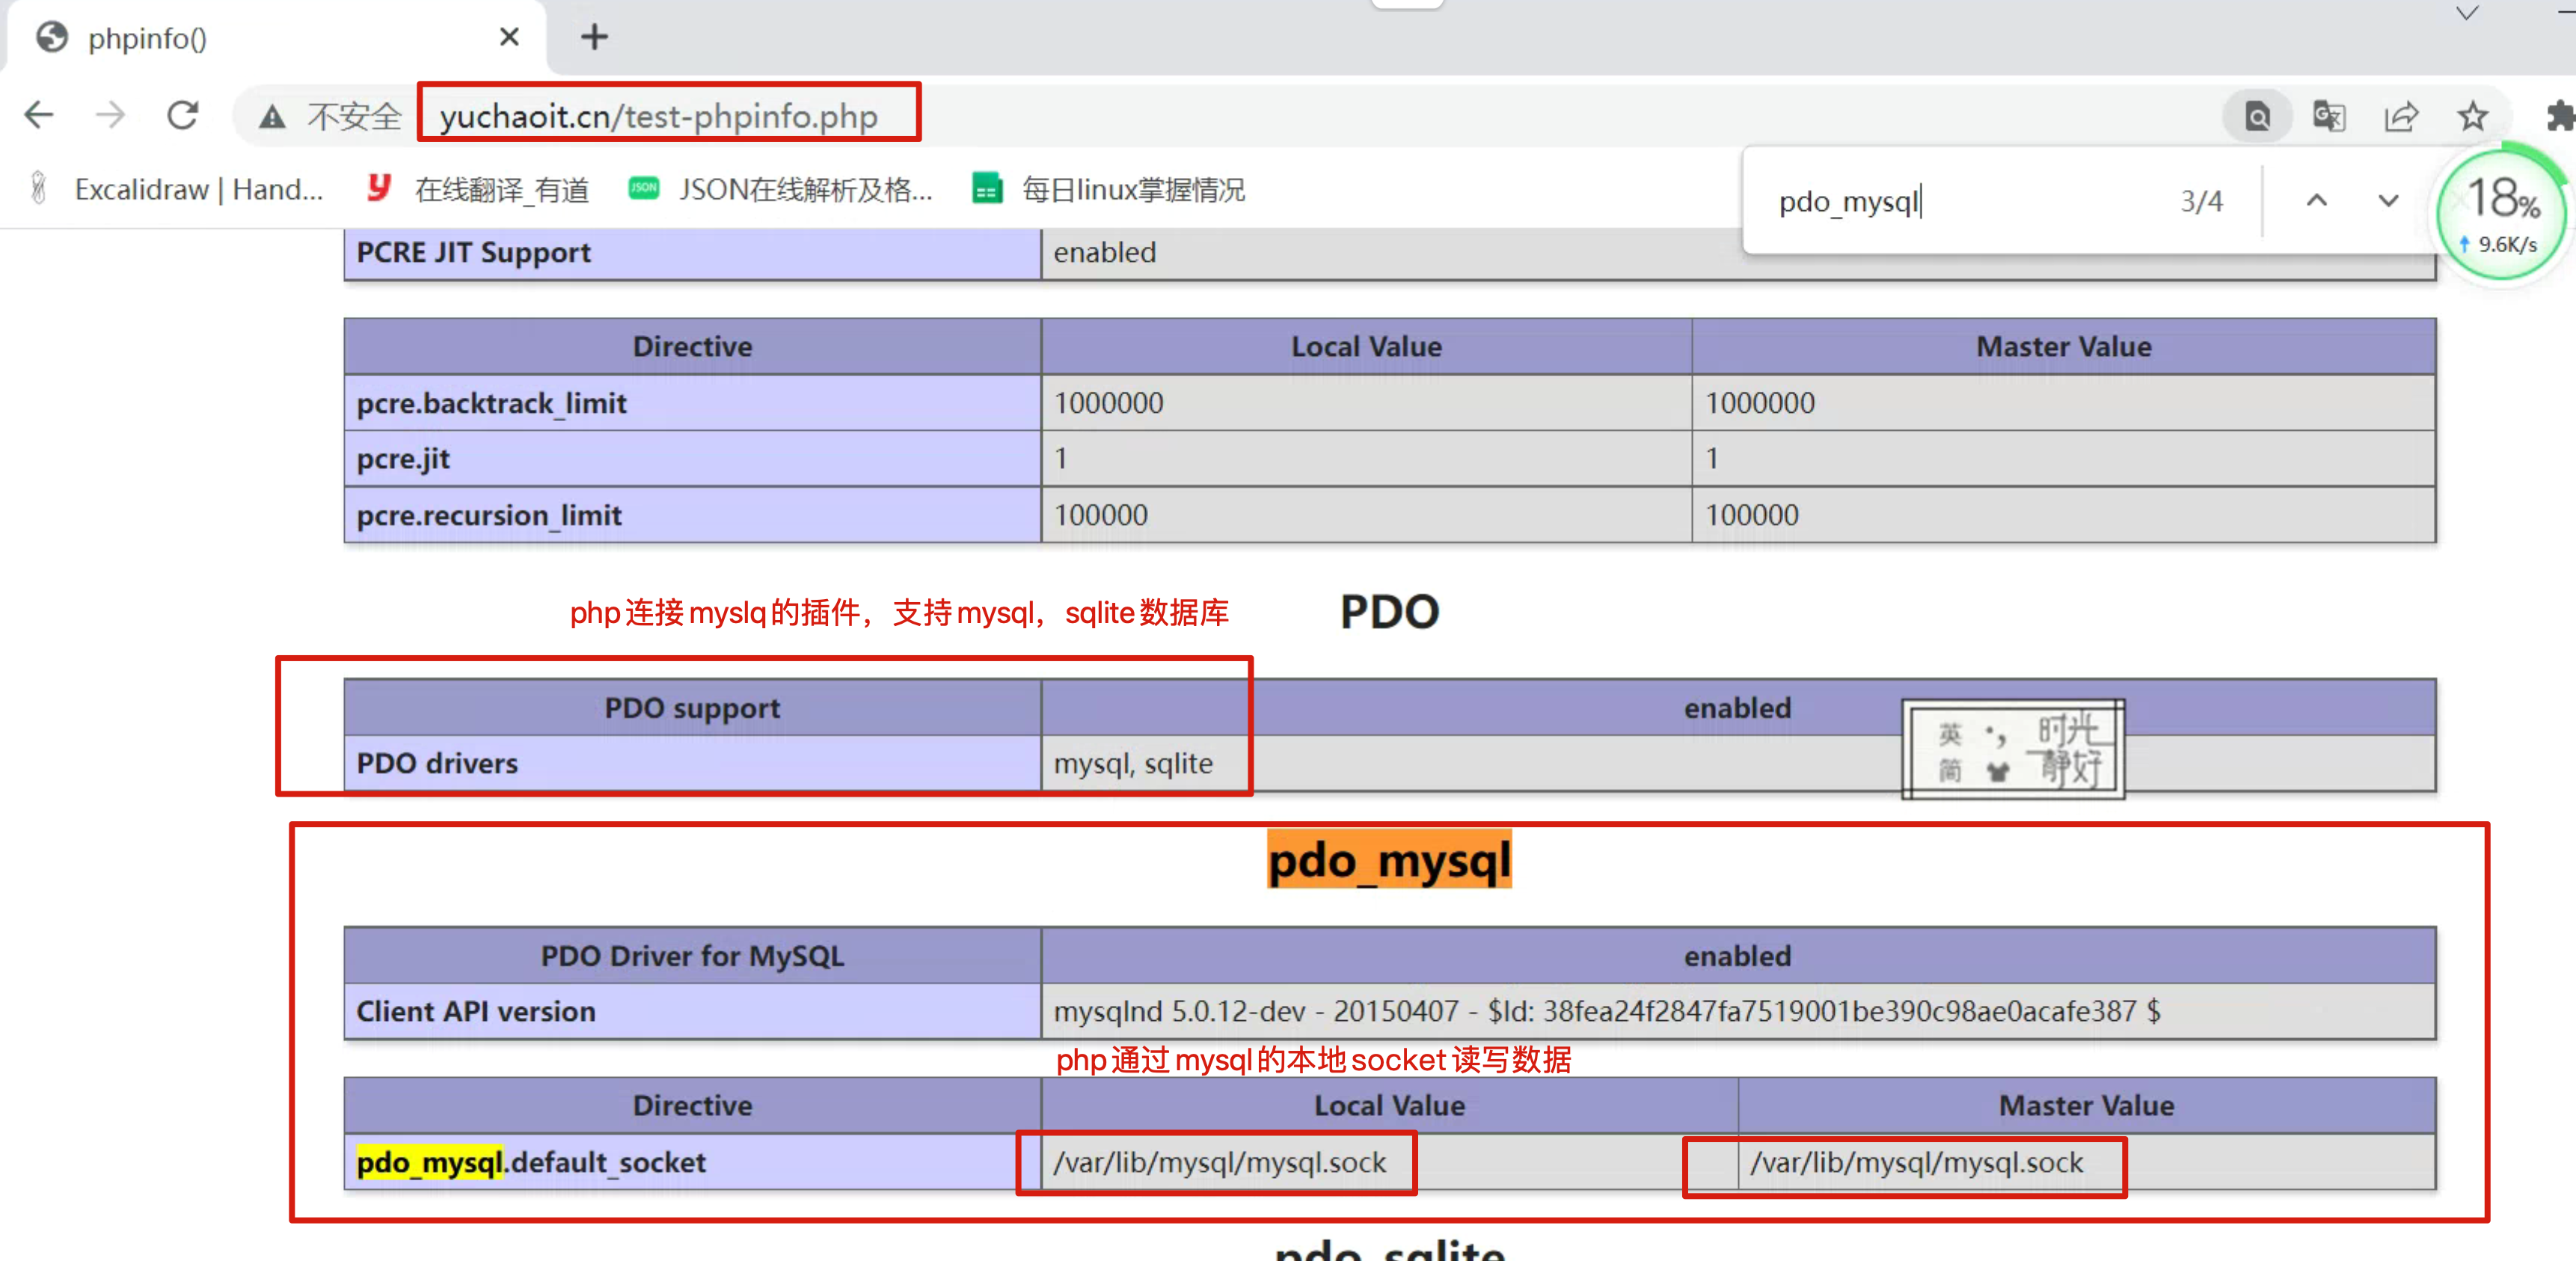
先检查驱动是否正常,通过php-info页面,查看php的详细信息。
如果php,mysql不在同一台服务器,是需要修改配置文件,填入远程mysql的 ip:port。
代码测试连接。
[root@web-7 /code]#cat /code/mysql-test.php

<?php

    $server="127.0.0.1";
    $mysql_user="root";
    $mysql_pwd="yuchaoit.cn";


    // 创建数据库连接
    $conn=mysqli_connect($server,$mysql_user,$mysql_pwd);

    // 检测连通性
    if($conn){
        echo "mysql successful by yuchaoit.cn \n";
    }else {
        die( "Connection failed:  "  .  mysqli_connect_error());
    }

?>
浏览器访问该php脚本试试。

最终的流程如下
五、部署知识社区网站
这里提供的开源php网站程序,基本都是静态文件和php文件放在了一起,因此nginx定义目录统一即可。
1.创建nginx虚拟主机
[root@web-7 /etc/nginx/conf.d]#cat wecenter.conf
server{
    listen 80;
    server_name wecenter.yuchaoit.cn;

    # 静态请求,资源存放路径
    root /code/wecenter;
    index index.php index.html;

    # 动态请求处理
    location ~ \.php$ {

        root /code/wecenter;
        fastcgi_pass 127.0.0.1:9000;
        fastcgi_index index.php;
        fastcgi_param SCRIPT_FILENAME $document_root$fastcgi_script_name;
        include fastcgi_params;
    }
}
测试语法
[root@web-7 /etc/nginx/conf.d]#nginx -t
nginx: the configuration file /etc/nginx/nginx.conf syntax is ok
nginx: configuration file /etc/nginx/nginx.conf test is successful
[root@web-7 /etc/nginx/conf.d]#

重启
[root@web-7 /etc/nginx/conf.d]#systemctl restart nginx
2.获取wecenter源码
1.下载地址
cd /code/wecenter && wget http://yuchaoit.cn/data/wecenter.zip
[root@web-7 /code/wecenter]#ls /code/wecenter/wecenter.zip
/code/wecenter/wecenter.zip
2.解压缩,授权,进入php代码目录
[root@web-7 /code/wecenter]#unzip wecenter.zip
3.授权
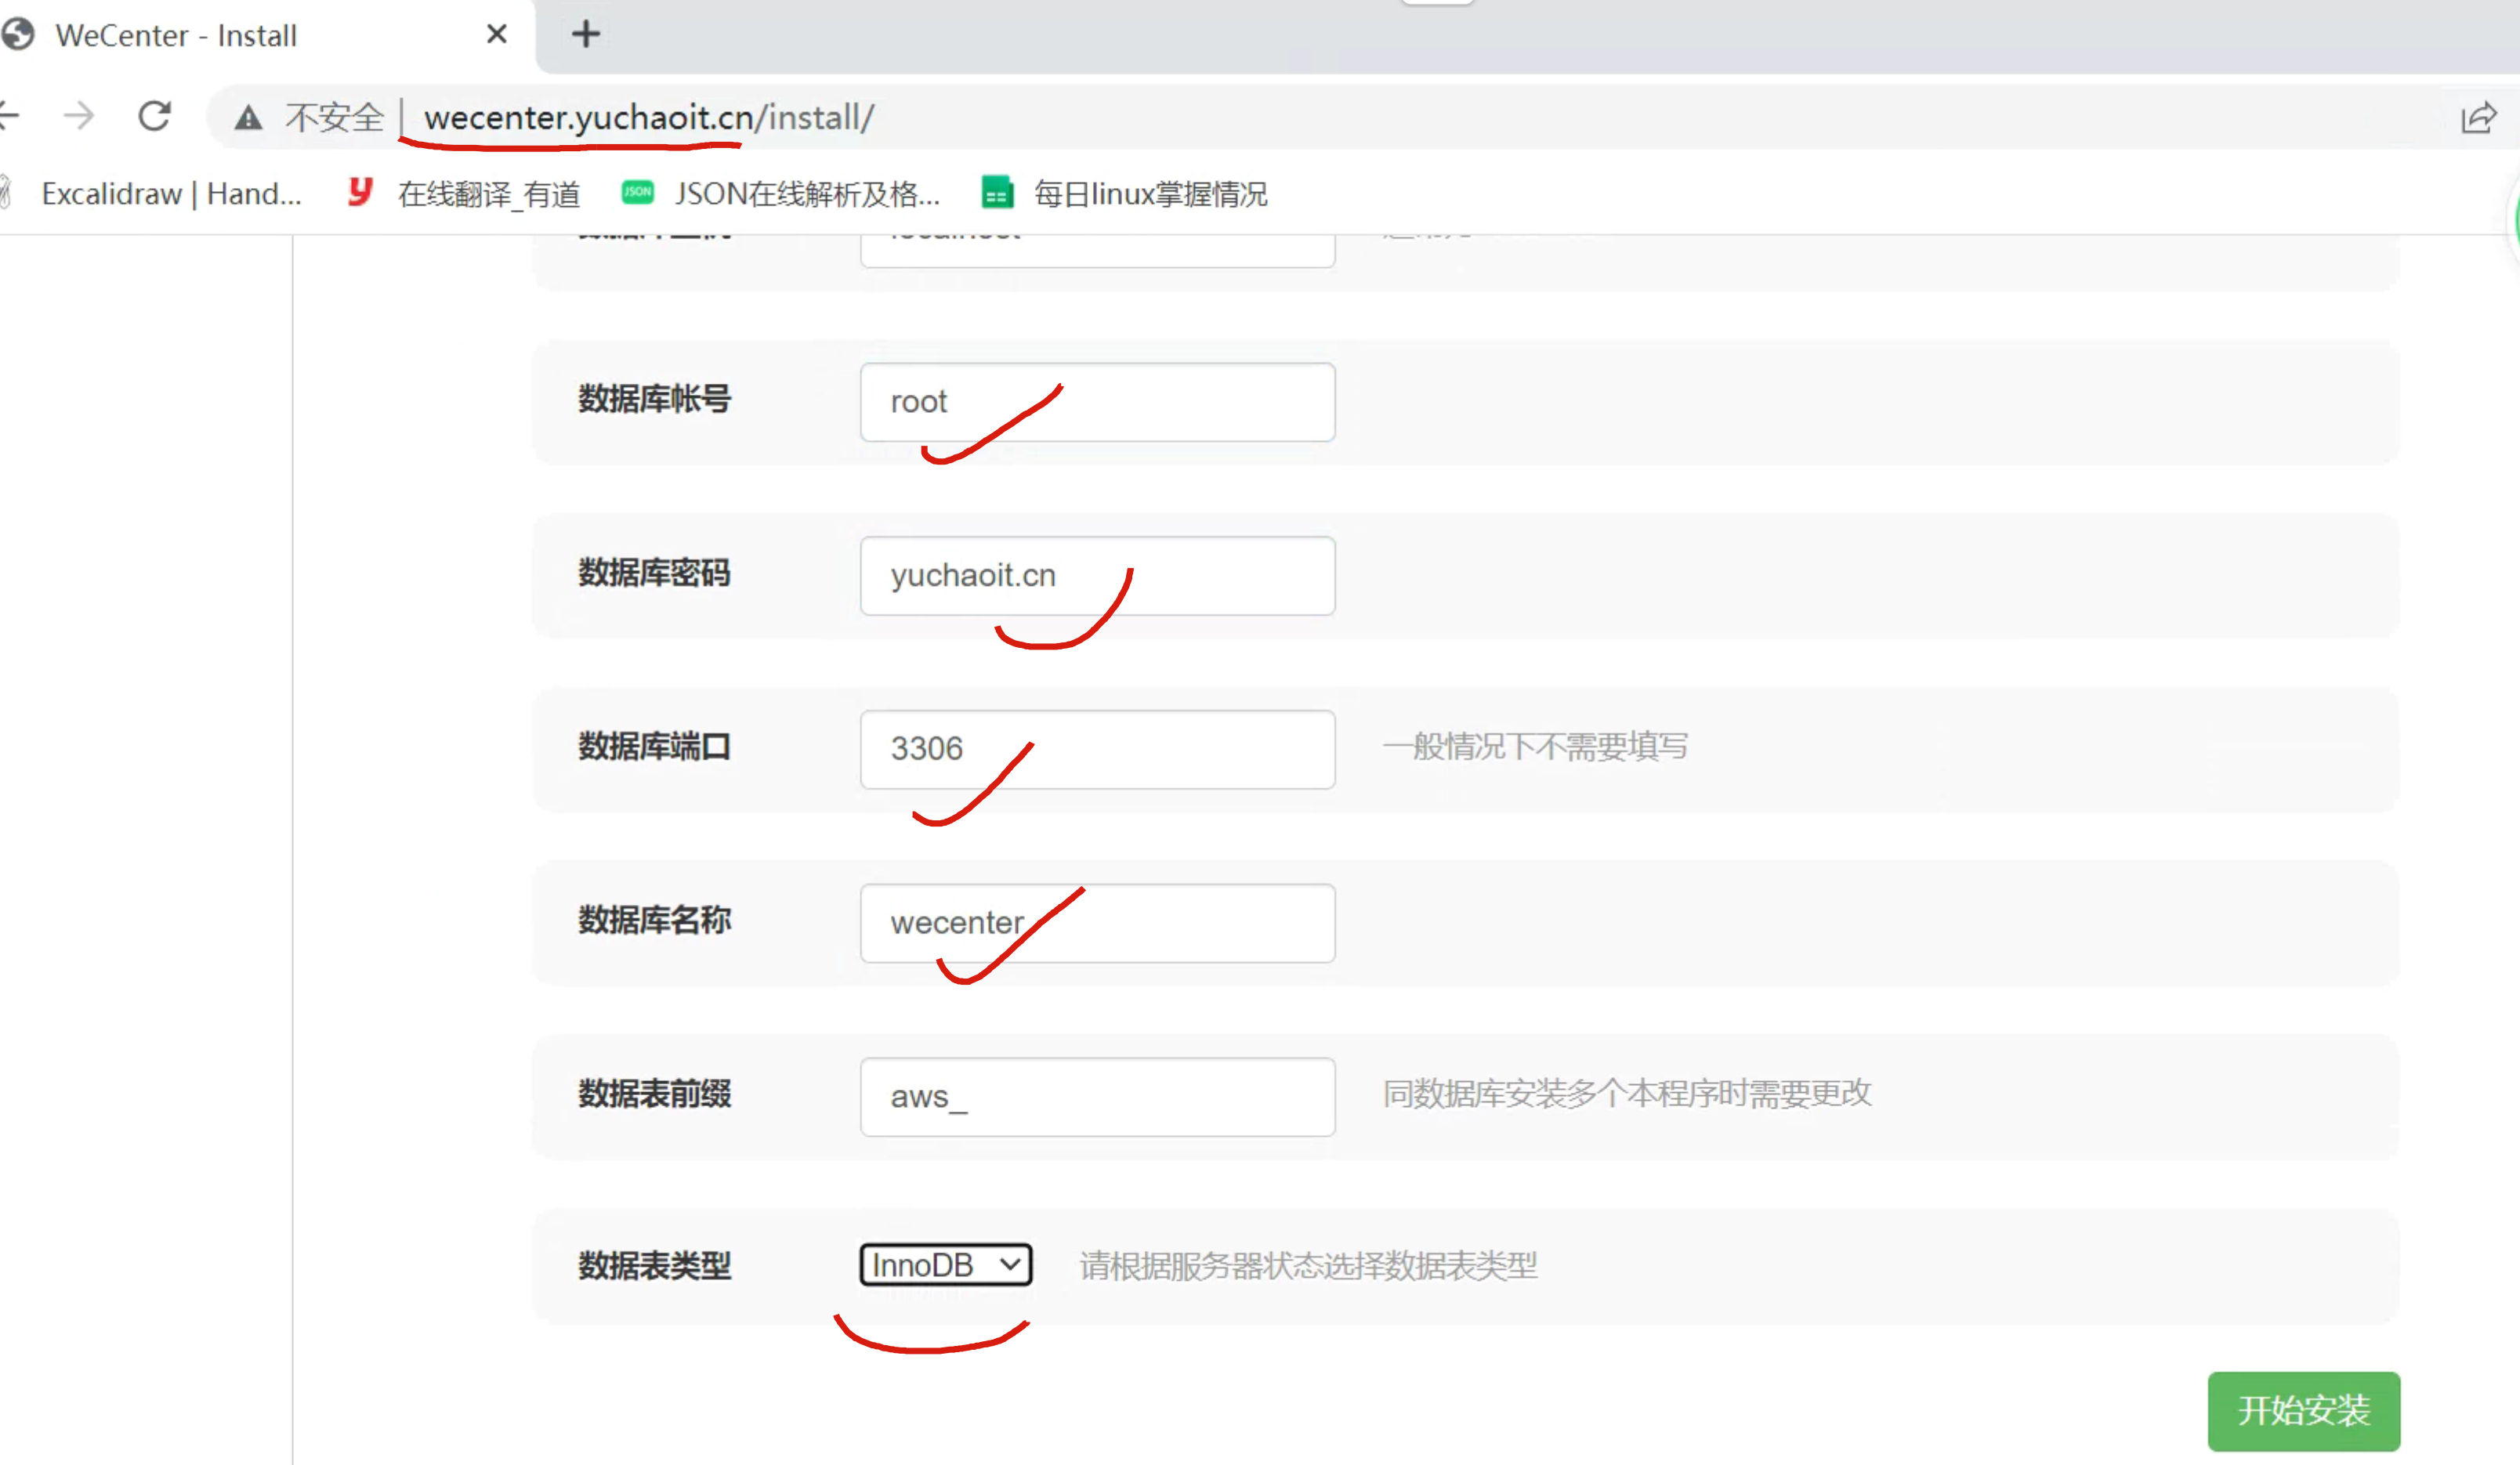
[root@web-7 /code/wecenter]#chown -R www.www /code/3.创建wecenter数据库
创建数据库,支持utf-8中文

MariaDB [(none)]> create database wecenter character set utf8 collate utf8_bin;
Query OK, 1 row affected (0.00 sec)
4.访问页面
新加了域名,就得做好解析
10.0.0.7 www.yuchaoit.cn wecenter.yuchaoit.cn
确保安装环境检查,全部是通过的。
填入数据库信息。
数据库导入成功后,可以进入数据库看看,是否生成了数据表。
mysql -uroot -pyuchaoit.cn
use wecenter;
show tables;
创建登录网站的管理员用户密码
yuchao01
chaoge666
yc_uuu@163.com
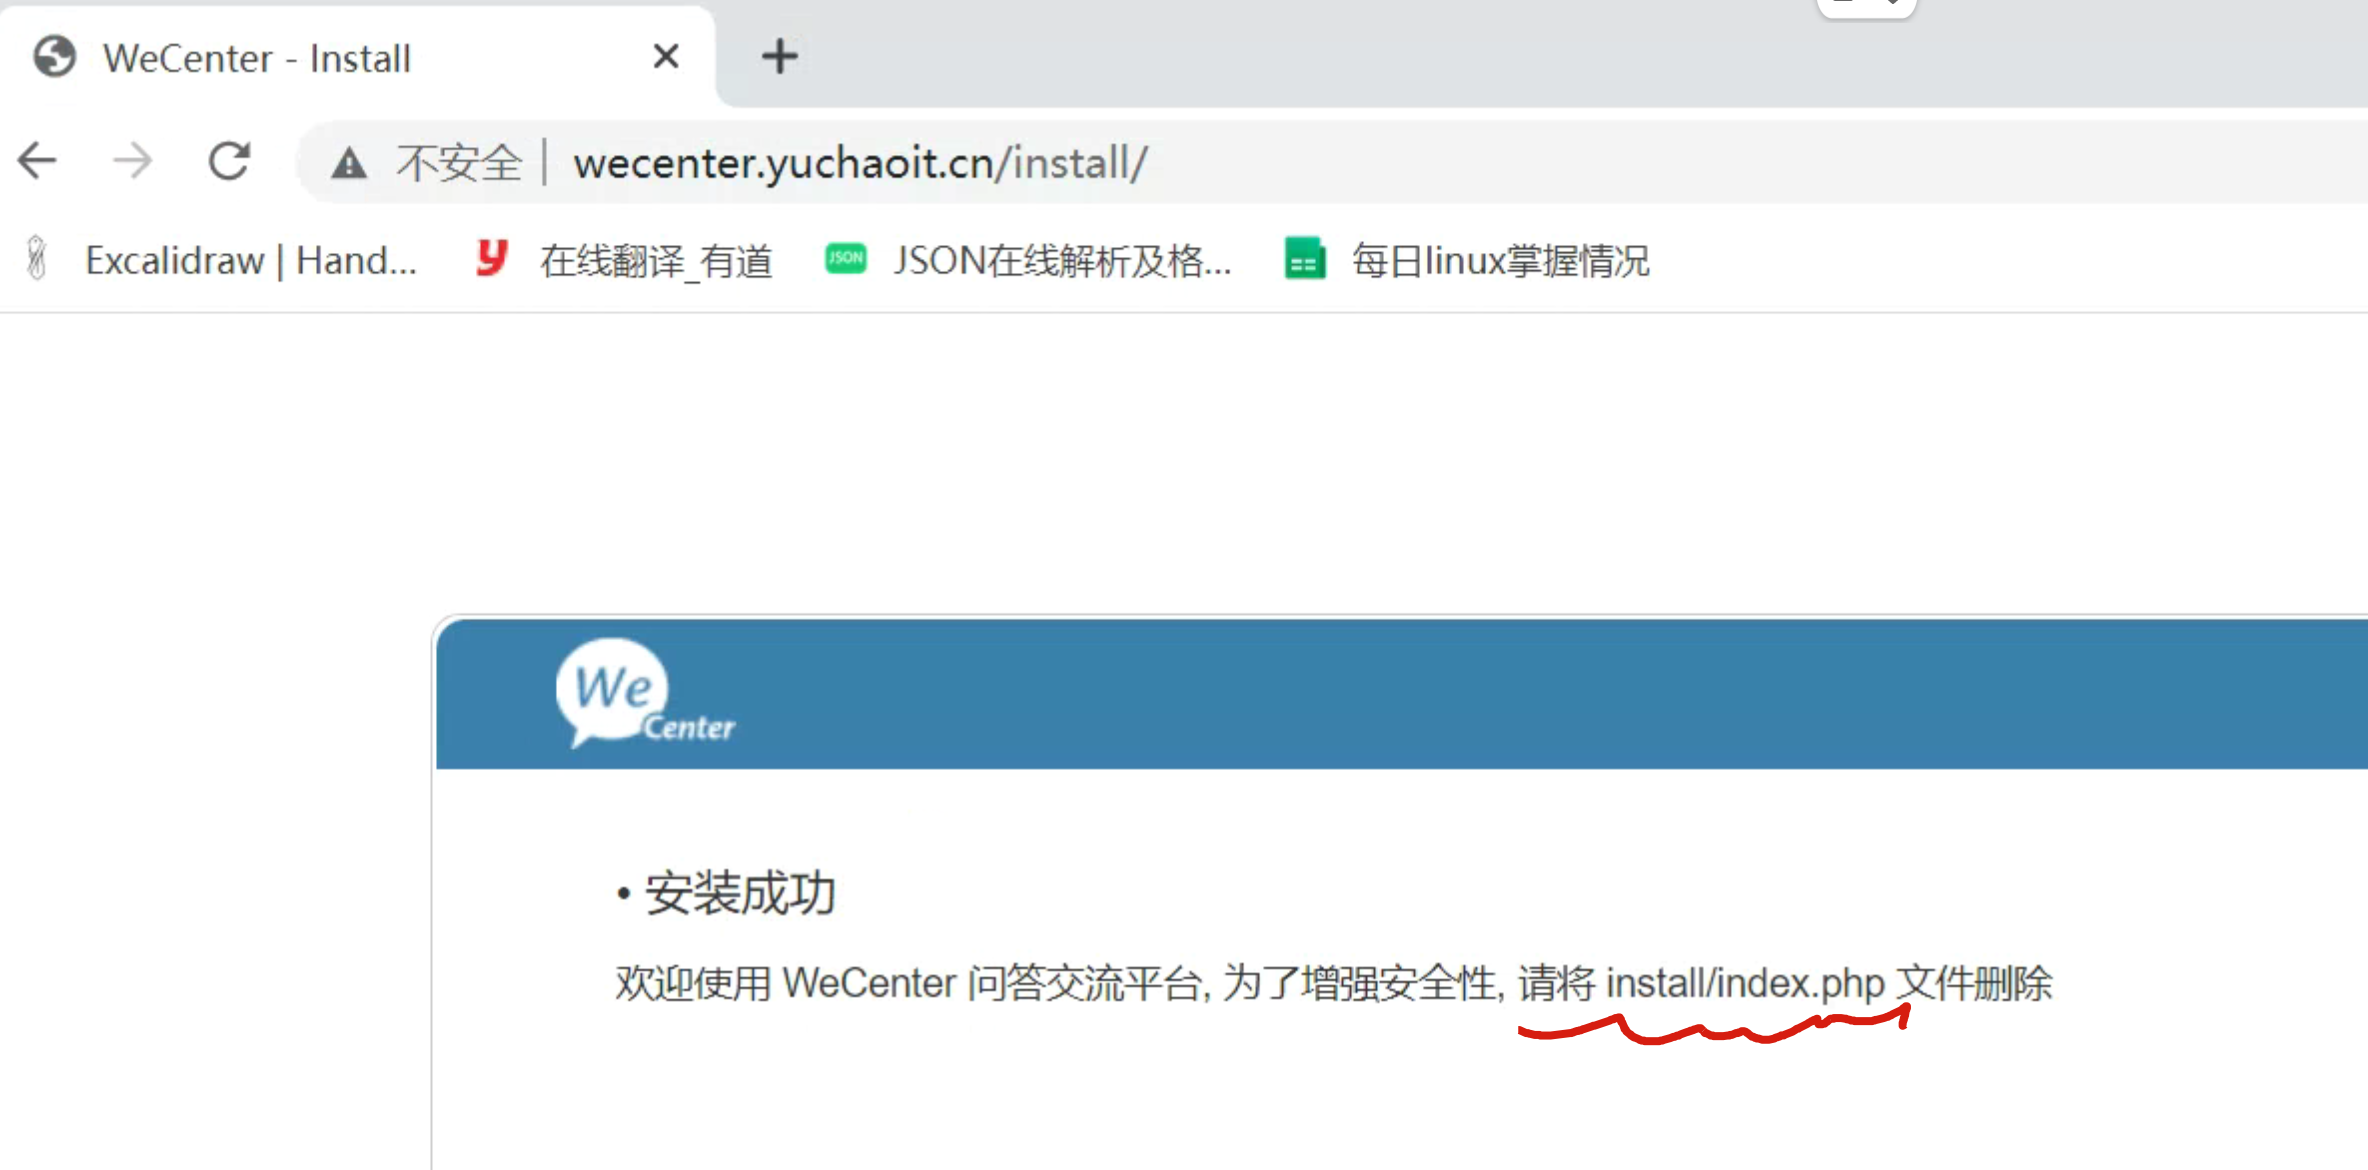
5.安装完毕后,删除安装程序
[root@web-7 /code/wecenter]#ls
app    changelog.txt  composer.lock  install   license.txt  nginx.htaccess  README.md   static  tmp      vendor       views
cache  composer.json  index.php      language  models       plugins         robots.txt  system  uploads  version.php  wecenter.zip


删除这个install安装目录即可
[root@web-7 /code/wecenter]#rm -rf install/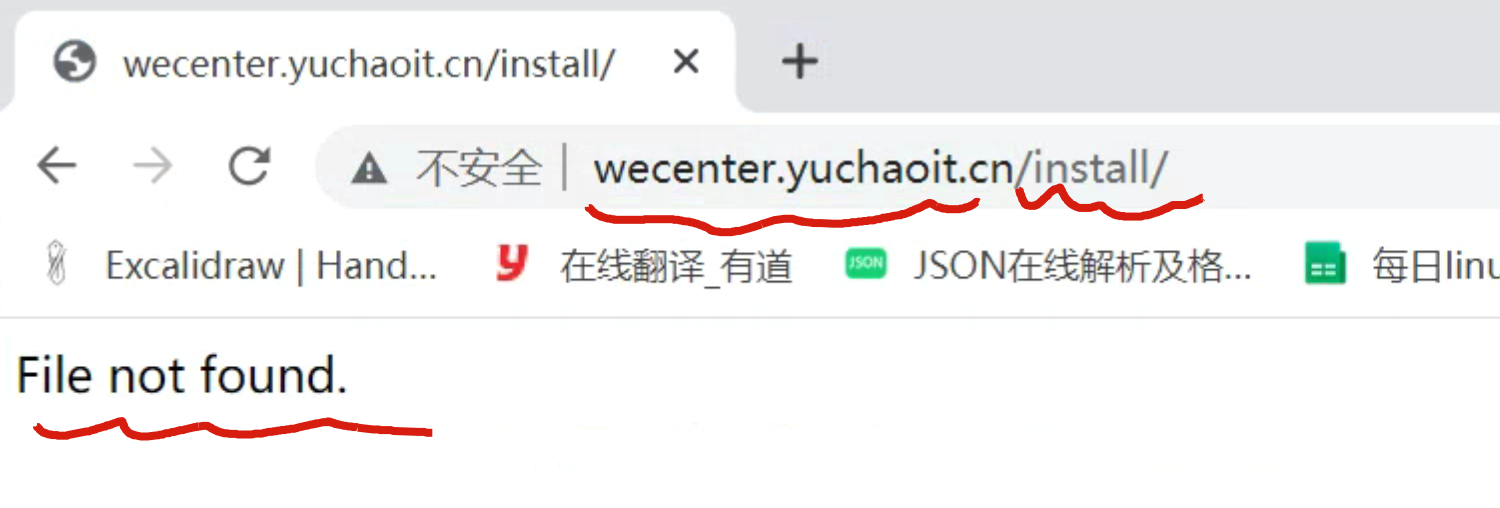
6.登录问答网站

7.可以在数据库中查询到用户信息。
MariaDB [wecenter]> select user_name,password from wecenter.aws_users;
+-----------+----------------------------------+
| user_name | password                         |
+-----------+----------------------------------+
| yuchao01  | 0fc98f3627b926536d42c02ecd8fae1f |
+-----------+----------------------------------+
1 row in set (0.00 sec)
六、部署wordpress
1.nginx环境搭建
1.创建虚拟主机文件
server{
    listen 80;
    server_name wordpress.yuchaoit.cn;

    # 静态请求,资源存放路径
    root /code/wordpress;
    index index.php index.html;

    # 动态请求处理
    location ~ \.php$ {

        root /code/wordpress;
        fastcgi_pass 127.0.0.1:9000;
        fastcgi_index index.php;
        fastcgi_param SCRIPT_FILENAME $document_root$fastcgi_script_name;
        include fastcgi_params;
    }
}

2.重启nginx
[root@web-7 /etc/nginx/conf.d]#systemctl restart nginx


3.下载wordpress代码
mkdir -p /code/wordpress ; cd /code/wordpress ; wget https://cn.wordpress.org/latest-zh_CN.zip

解压缩
[root@web-7 /code/wordpress]#unzip latest-zh_CN.zip
[root@web-7 /code/wordpress]#mv wordpress/* .

授权
[root@web-7 /code/wordpress]#chown -R www.www /code/

4.创建数据库
[root@web-7 /code/wordpress]#mysql -uroot -pyuchaoit.cn
MariaDB [(none)]> create database wordpress;
Query OK, 1 row affected (0.00 sec)
2.客户端访问
dns解析
10.0.0.7 www.yuchaoit.cn wecenter.yuchaoit.cn wordpress.yuchaoit.cn


http://wordpress.yuchaoit.cn/

运行信息
yuchao01
chaoge666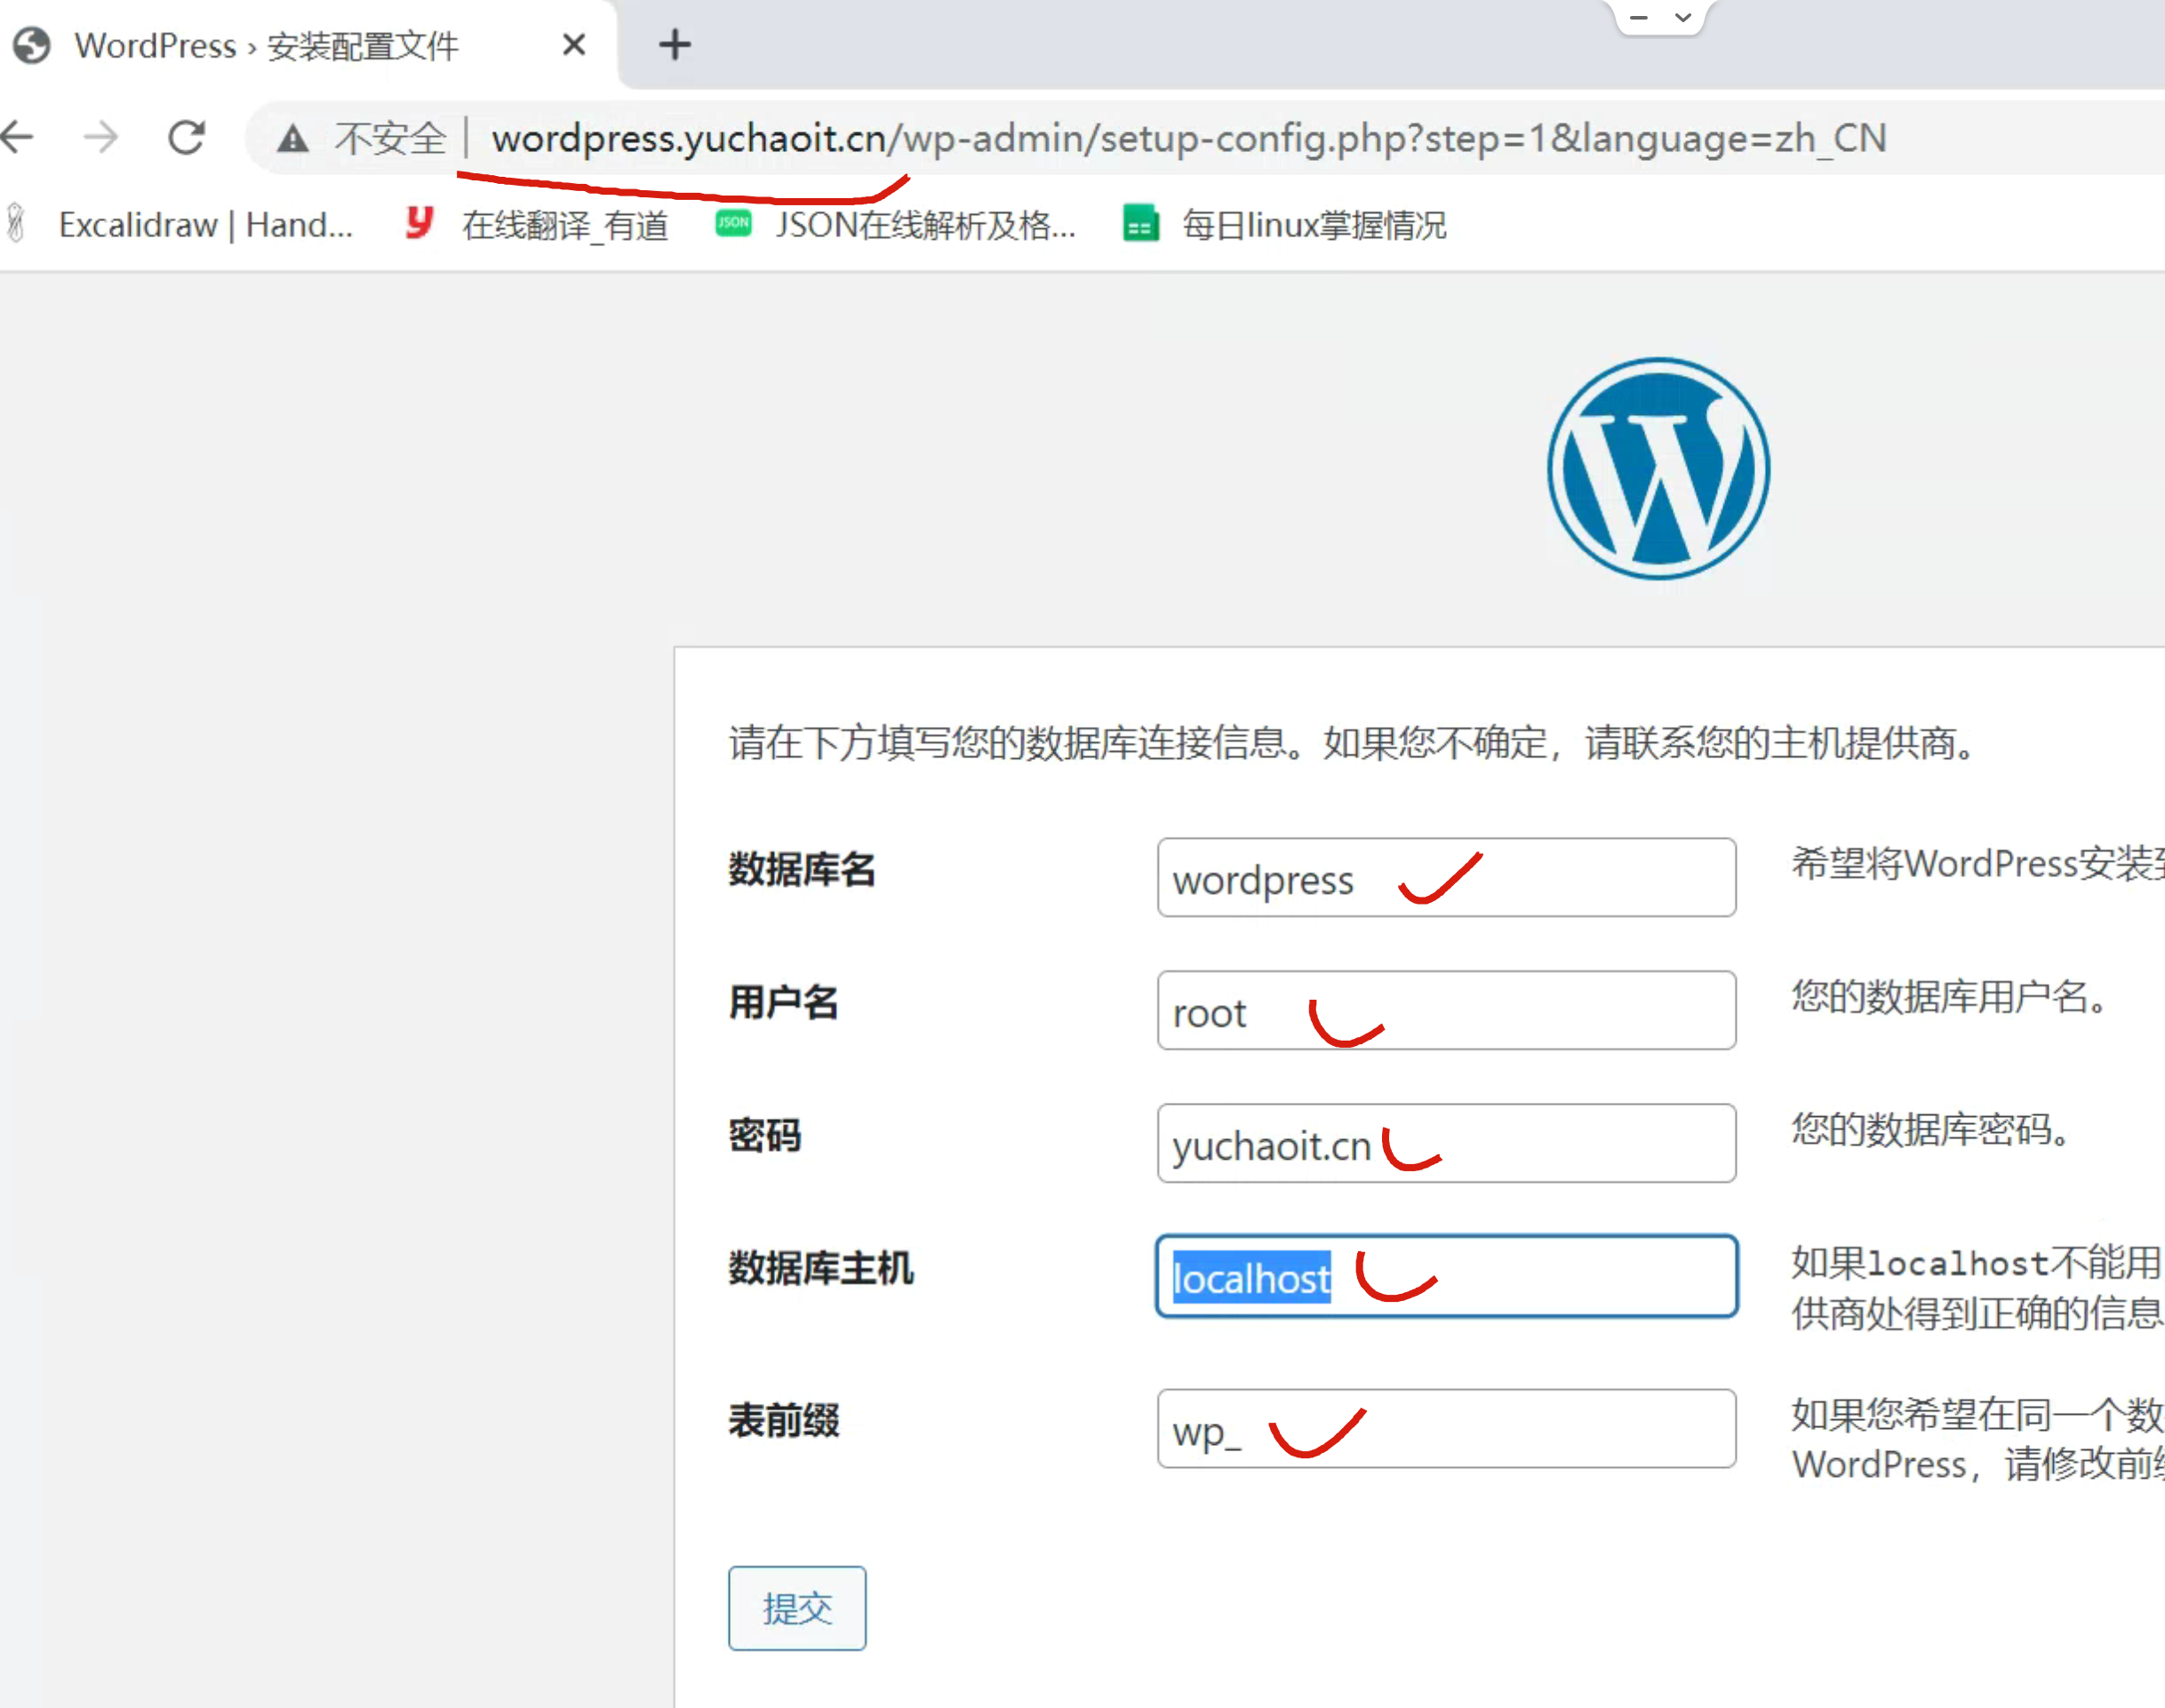
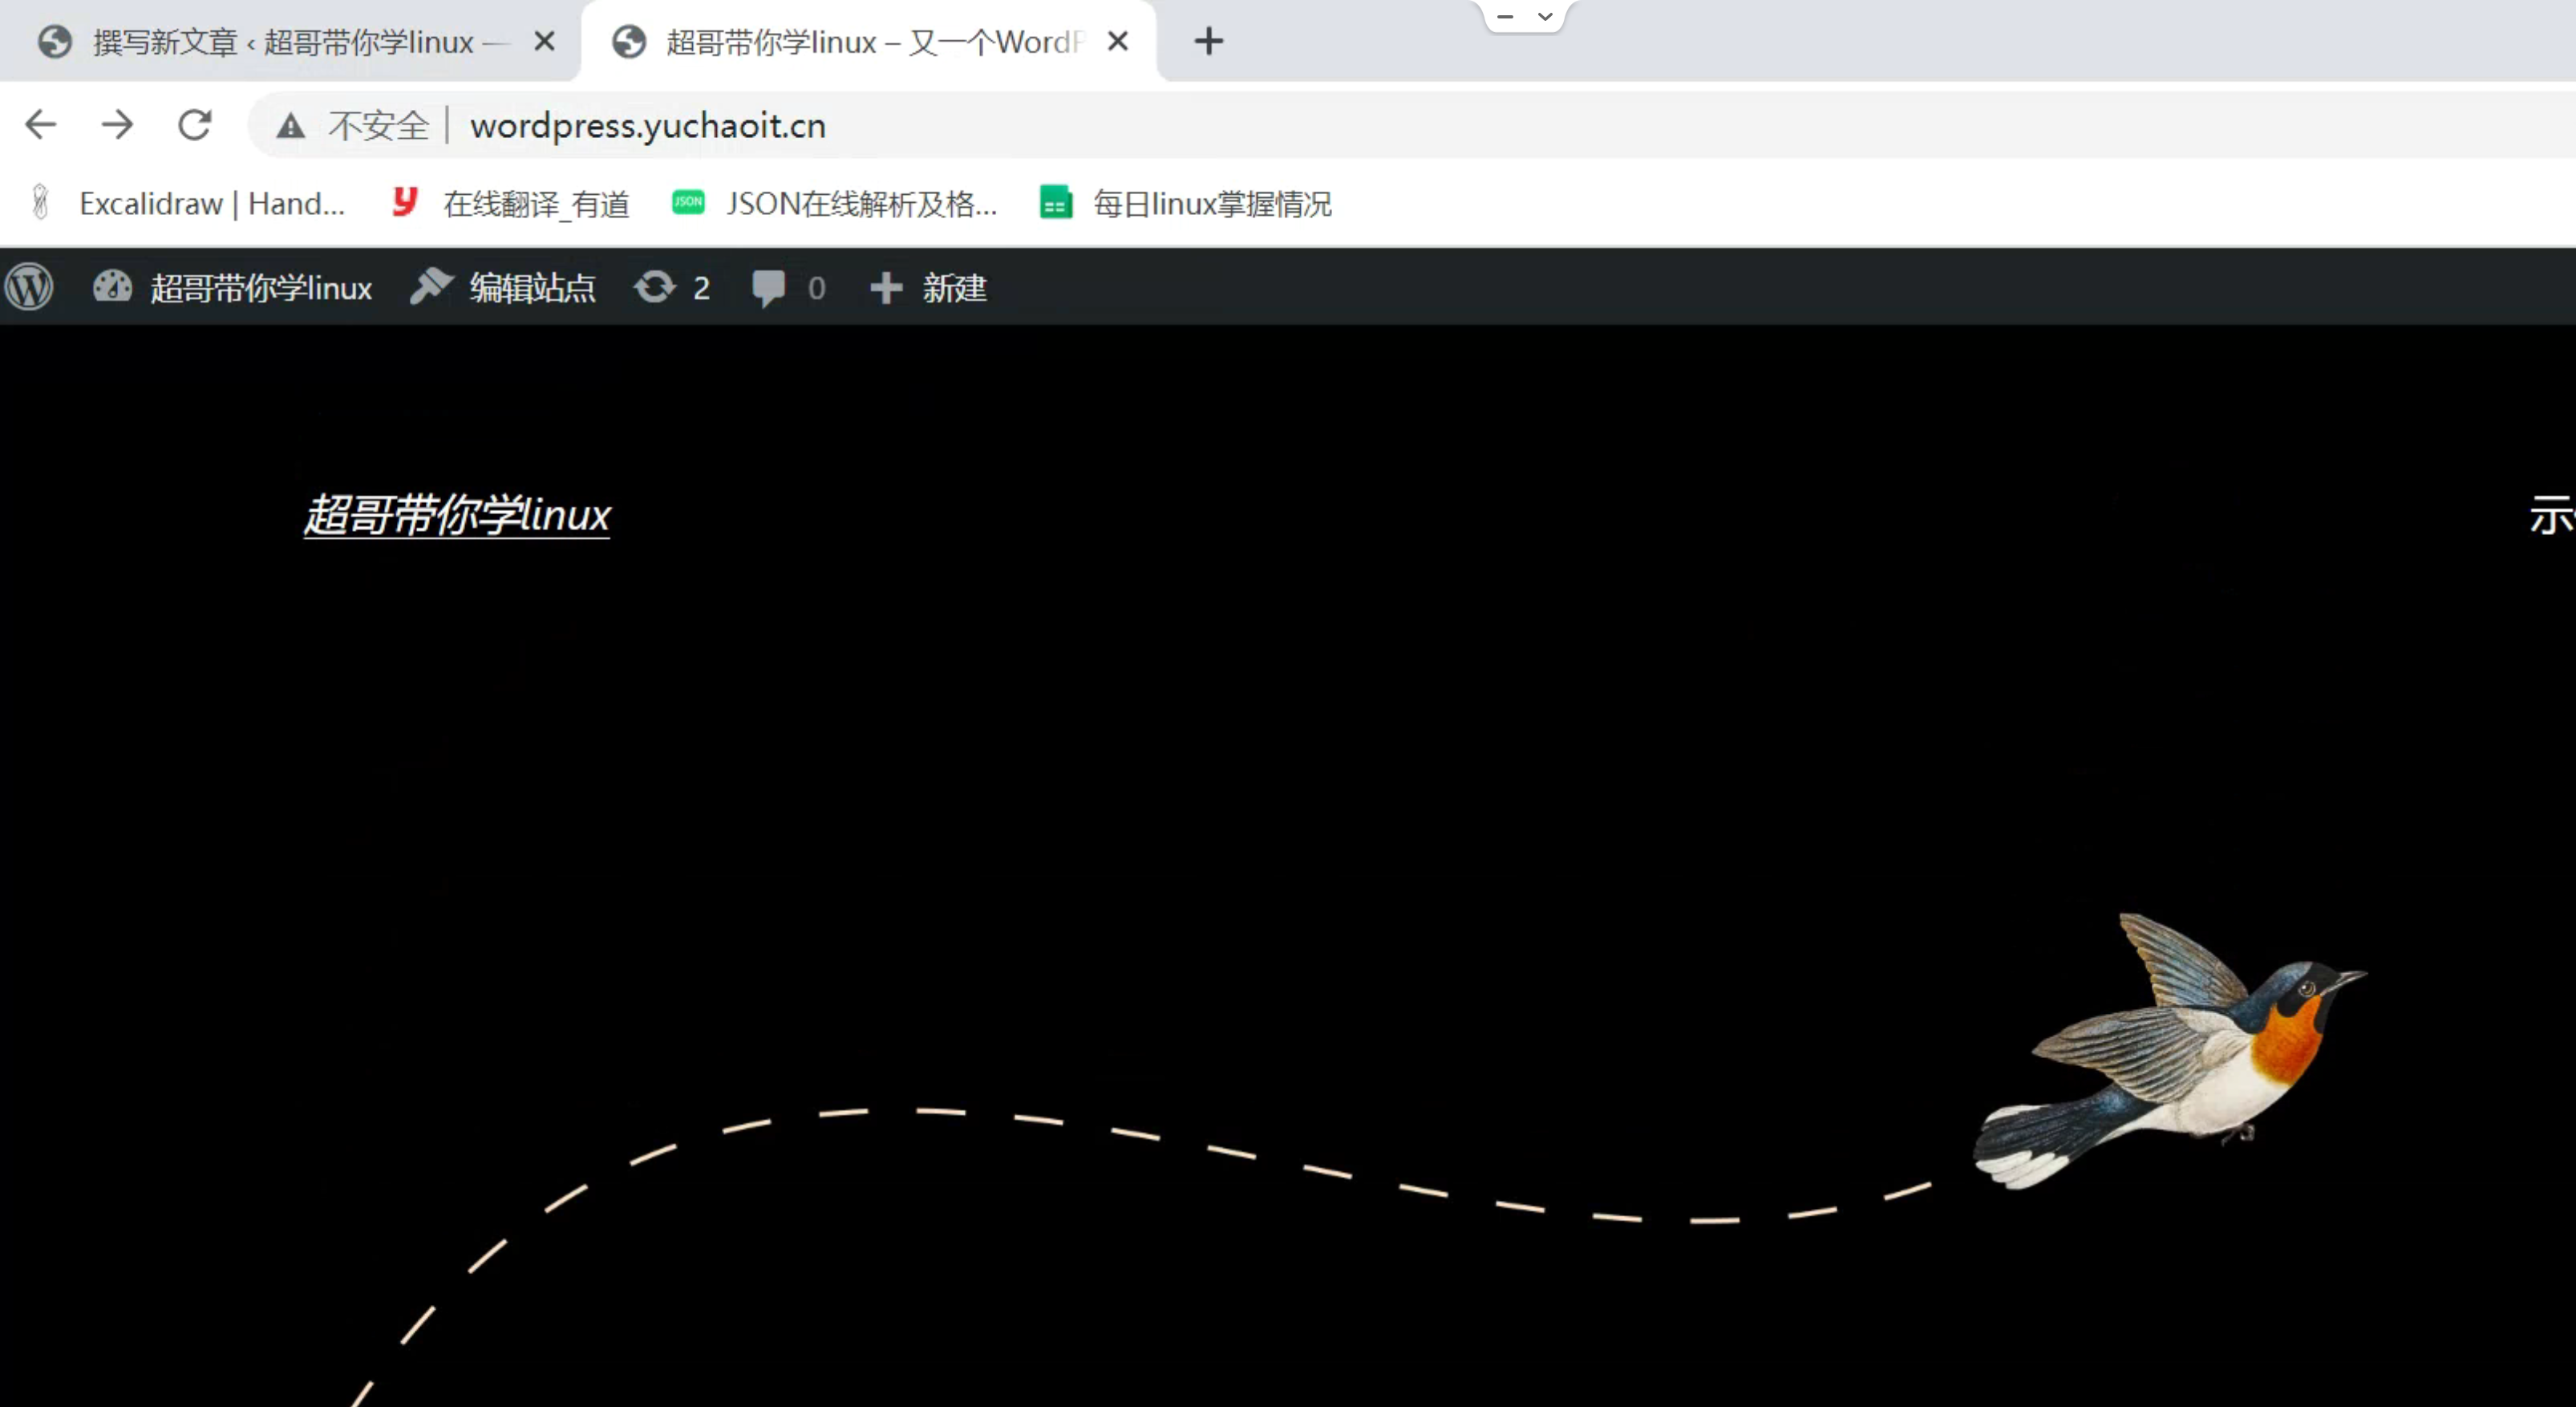
3.发表新文章
4.检查数据库
[root@web-7 /code/wordpress]#!mysql
mysql -uroot -pyuchaoit.cn
Welcome to the MariaDB monitor.  Commands end with ; or \g.
Your MariaDB connection id is 148
Server version: 5.5.68-MariaDB MariaDB Server

Copyright (c) 2000, 2018, Oracle, MariaDB Corporation Ab and others.

Type 'help;' or '\h' for help. Type '\c' to clear the current input statement.

MariaDB [(none)]>
MariaDB [(none)]> show databases;
+--------------------+
| Database           |
+--------------------+
| information_schema |
| mysql              |
| performance_schema |
| test               |
| wecenter           |
| wordpress          |
+--------------------+
6 rows in set (0.00 sec)

MariaDB [(none)]>

查看数据表
MariaDB [wordpress]> show tables;

查看文章表
MariaDB [wordpress]> desc wp_posts;

查看文章数据
MariaDB [wordpress]> select post_content from wp_posts;