一、简介
二、实操内容
三、问题
一、简介
Supervisor 是一个客户端/服务器系统,允许用户控制类 UNIX 操作系统上的多个进程。
可以管控服务器发生错误停止时自动重启,远程打开关闭。
CeSi 是 Supervisor 官方推荐的集中化管理 Supervisor 实例的 Web UI,而Superviosr 自带的 Web UI 不支持跨机器管理,可以通过 CeSi 集中管理各个服务器节点的进程,在 Web 界面就可以轻松管理各个服务的启动、关闭、重启等,很方便使用。
CeSi git 地址:https://github.com/GulsahKose/cesi
二、实操内容
1. Supervisor
1.1 Supervisor安装
1.1.1 windows
由于我是在linux服务器上使用,所以没试过在windows安装,但是可以参考这里: window安装
1.1.2 linux
我使用的是ubuntu系统,可以用下面的命令
apt 直接安装,这个最简单干脆,但是有个问题,就是会跟你的ubuntu系统走,如果系统版本较低,那么 supervisor 的版本会很低
sudo apt update && sudo apt install supervisor
官方推荐使用python的 pip 安装,可以安装最新版本的。(这里的pip是python3版本的)
pip install supervisor
1.2 Supervisor配置
可参考这: 去看看
1.2.1 Supervisor配置文件地址
一般配置地址为:
vi /etc/supervisor/supervisord.conf
1.2.2 配置项
默认配置文件里只有几个选项
; the below section must remain in the config file for RPC
; (supervisorctl/web interface) to work, additional interfaces may be
; added by defining them in separate rpcinterface: sections
[rpcinterface:supervisor]
supervisor.rpcinterface_factory = supervisor.rpcinterface:make_main_rpcinterface

[supervisorctl]
serverurl=unix:///var/run/supervisor.sock ; use a unix:// URL  for a unix socket

; The [include] section can just contain the "files" setting.  This
; setting can list multiple files (separated by whitespace or
; newlines).  It can also contain wildcards.  The filenames are
; interpreted as relative to this file.  Included files *cannot*
; include files themselves.

[include]
files = /etc/supervisor/conf.d/*.conf
1.2.3supervisord.conf 详细配置项
有很多是非必填的,详细可取官方文档查看。
[unix_http_server]
file=/tmp/supervisor.sock   #UNIX socket 文件,supervisorctl 会使用
chmod=0700                  #socket文件的mode,默认是0700
chown=nobody:nogroup        #socket文件的owner,格式:uid:gid
username=user              # 认证账户
password=123               # 认证密码

[inet_http_server]         #HTTP服务器,提供web管理界面,默认未开启,启用后可以通过web界面的方式查看、管理子进程
port=127.0.0.1:9001        #Web管理后台的IP和端口,如果开放到公网,需要注意安全性
username=user              #登录管理后台的用户名
password=123               #登录管理后台的密码

[supervisord]
logfile = /tmp/supervisord.log  #日志文件,默认是 $CWD/supervisord.log
logfile_maxbytes = 50MB #日志文件大小,超出会rotate,默认 50MB,如果设成0,表示不限制大小
logfile_backups=10 #日志文件保留备份数量默认10,设为0表示不备份
loglevel = info  #日志级别,默认info,其它: debug,warn,trace
pidfile = /tmp/supervisord.pid  #pid 文件
nodaemon = false  #是否在前台启动,默认是false,即以 daemon 的方式启动
minfds = 1024  #可以打开的文件描述符的最小值,默认 1024
minprocs = 200   #可以打开的进程数的最小值,默认 200
umask = 022   # Supervisord 进程的umask。默认022
user = chrism  # 指示supervisord在进行任何有意义的处理之前将用户切换到此UNIX 用户帐户。仅当supervisord以 root 用户身份启动时才能切换用户。不切换用户
identifier = supervisor  # 该管理进程的标识符字符串,由 RPC 接口使用。默认值:supervisor
directory = /tmp  #  当supervisord守护进程时,切换到该目录。此选项可以包含值,该值扩展为在其中找到supervisor%(here)s配置文件的目录。默认:不 CD
nocleanup = true  # 防止supervisord 在启动时清除任何现有的AUTO 子日志文件。对于调试很有用。默认值:false
childlogdir = /tmp  #AUTO用于子日志文件的目录。此选项可以包含值,该值扩展为在其中找到supervisor  %(here)s配置文件的目录。默认值:value of Python’s tempfile.gettempdir()
strip_ansi = false  # 从子日志文件中删除所有 ANSI 转义序列。默认值:false
environment = KEY1="value1",KEY2="value2" # KEY="val",KEY2="val2"将放置在所有子进程的环境中的表单中的键/值对列表。这不会改变supervisord本身的环境。此选项可以包含值%(here)s,该值扩展为在其中找到主管配置文件的目录。包含非字母数字字符的值应加引号(例如KEY="val:123",KEY2="val,456")。否则,引用这些值是可选的,但建议这样做。要转义百分比字符,只需使用两个即可。(例如URI="/first%%20name")请注意,子进程将继承用于启动supervisord的shell 的环境变量,但此处和程序environment选项中覆盖的变量除外。请参阅 子进程环境。默认值:no values


[supervisorctl]
serverurl=unix:///tmp/supervisor.sock #通过UNIX socket连接supervisord,路径与unix_http_server部分的file一致
serverurl=http://127.0.0.1:9001       #通过HTTP的方式连接supervisord 默认:http://localhost:9001

username = chris # 传递到 Supervisord 服务器以用于身份验证的用户名。username这应该与您尝试访问的端口或 UNIX 域套接字的 Supervisord 服务器配置相同。
password = 123  # 同上
prompt = mysupervisor  # 用作supervisorctl提示符的字符串。默认:supervisor

#包含其它配置文件
[include]
files = relative/directory/*.ini      #可以指定一个或多个以.ini结束的配置文件  必填
1.2.4 子进程配置项
下面举例部分,详细可以查看:http://supervisord.org/configuration.html#program-x-section-settings
# 子进程的名称,也即web界面中展示的进程名称
[program:blog]
#脚本目录
directory=/opt/bin
#脚本执行命令
command=/usr/bin/python /opt/bin/test.py

#supervisor启动的时候是否随着同时启动,默认True
autostart=true
#设置子进程挂掉后自动重启的情况,有三个选项,false,unexpected和true。
# false 表示无论什么情况下,都不会重新启动
#  unexpected 表示只有当进程的退出码不在下面的exitcodes里面定义的时候,才进行重启
# true 表示只要异常退出就自动重启
autorestart=false
#这个选项是子进程启动多少秒之后,此时状态如果是running,则我们认为启动成功了。默认值为1
startsecs=1
startretries=3 ;最大失败重启次数

#脚本运行的用户身份
user = test

#日志输出
stderr_logfile=/tmp/blog_stderr.log
stdout_logfile=/tmp/blog_stdout.log
#把stderr重定向到stdout,默认 false
redirect_stderr = true
#stdout日志文件大小,默认 50MB
stdout_logfile_maxbytes = 20MB
#stdout日志文件备份数
stdout_logfile_backups = 20

# 如果为 true,则该标志会导致主管向整个进程组发送停止信号,并暗示killasgroup为 true。这对于程序(例如调试模式下的 Flask)非常有用,这些程序不会将停止信号传播给其子进程,从而使它们成为孤立的。 默认:false
# uwsgi 需要设定为true ,不然端口会被占用。
stopasgroup=false
配置文件路径时请注意权限问题,不然有可能会报错。
1.3 命令
1.3.1 supervisorctl命令
# supervisorctl status # 查看supervisord当前管理的所有进程的状态
# supervisorctl start usercenter # 启动单个进程
# supervisorctl start all # 启动所有进程
# supervisorctl stop usercenter # 停止进程
# supervisorctl stop all  # 停止所有
# supervisorctl restart usercenter # 或者使用supervisorctl reload: 重启
# supervisorctl restart all  # 重启所有
# supervisorctl reread # 读取有更新(增加)的配置文件,不会启动新添加的程序
# supervisorctl update # 将配置文件里新增的子进程加入进程组,如果设置了autostart=true则会启动新新增的子进程
2 CeSi
2.1 下载
2.1.1 安装 CeSi 有三个依赖:Python,sqlite
sudo apt-get install sqlite,python
要是有就可以不用装了
由于代码在git 上,最好也安装上git ,自行下载解压也行。
git地址:https://github.com/gamegos/cesi/
这个内容跟上面是一样的。
可以直接clone
git clone git clone https://github.com/GulsahKose/cesi
也可以下载
wget https://github.com/gamegos/cesi/releases/download/v2.7.1/cesi-extended.tar.gz -O cesi.tar.gz
tar -xvf cesi.tar.gz
2.2 安装
2.2.1 说明
下载完成后,cd 到cesi 目录下


里面有三个文件,
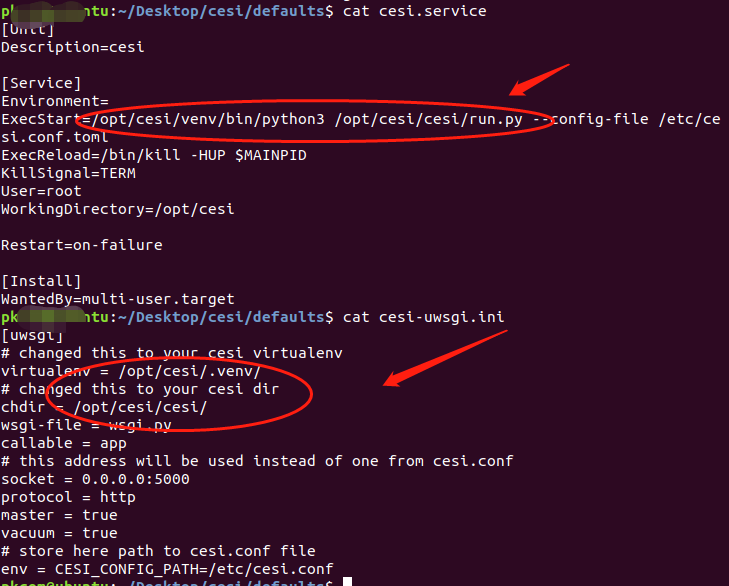
第一个是cesi 的配置文件, 第二个是配置 systemd 服务的配置文件,第三个是uwsgi 配置文件。
配置文件地址里面是在 、/opt/ 文件夹下面的。
如果你需要开服务,并且不懂配置这些文件,请严格按照官方的说明文档去操作,一下是官方的操作
$ # If you want to change CESI_SETUP_PATH, you must change the configurations in the cesi.service file.
$ export CESI_SETUP_PATH=/opt/cesi
$ mkdir ${CESI_SETUP_PATH}
$ cd ${CESI_SETUP_PATH}

$ # Download the project to CESI_SETUP_PATH directory
$ wget https://github.com/gamegos/cesi/releases/download/v2.7.1/cesi-extended.tar.gz -O cesi.tar.gz
$ tar -xvf cesi.tar.gz

$ # Create virtual environment and install requirement packages
$ python3 -m venv venv
$ source venv/bin/activate
(venv) $ pip3 install -r requirements.txt
(venv) $ deactivate   # Deactivate virtual environment

$ # Build ui (First you must install dependencies for ui -> yarn) - Optional
$ cd ${CESI_SETUP_PATH}/cesi/ui
$ yarn install
$ yarn build

$ # Create cesi.conf.toml file and update cesi.conf.toml for your environment.
$ # Config file documentation can be found inside default file.
$ # (You must create cesi.conf in the etc directory for cesi.service)
$ sudo cp ${CESI_SETUP_PATH}/defaults/cesi.conf.toml /etc/cesi.conf.toml

$ # Run as a service
$ sudo cp ${CESI_SETUP_PATH}/defaults/cesi.service /etc/systemd/system/cesi.service
$ sudo systemctl daemon-reload
$ sudo systemctl start cesi
这个操作是使用systemd 去管理服务的。还有一个是uwsgi,我刚好懂那么一点点。
2.3 配置
2.3.1 cesi 配置
编辑配置文件
vim /etc/cesi.conf
# supervisord information to connect

# This is the CeSI's own configuration.
[cesi]
# Database Uri
database = "sqlite:///users.db"                         # Relative path
# Etc
#database = "sqlite:////opt/cesi/< version >/users.db"  # Absolute path
#database = "postgres://<user>:<password>@localhost:5432/<database_name>"
#database = "mysql+pymysql://<user>:<password>@localhost:3306/<database_name>"
activity_log = "activity.log"   # File path for CeSI logs  日志地址
admin_username = "admin"        # Username of admin user   管理员账号
admin_password = "admin"        # Password of admin user   管理员密码

# This is the definition section for new supervisord node.
# [[nodes]]
# name = "api"          # (String) Unique name for supervisord node.
# environment = ""      # (String) The environment name provides logical grouping of supervisord nodes. It can be used as filtering option in the UI.
# username = ""         # (String) Username of the XML-RPC interface of supervisord Set nothing if no username is configured
# password = ""         # (String) Password of the XML-RPC interface of supervisord. Set nothing if no username is configured
# host = "127.0.0.1"    # (String) Host of the XML-RPC interface of supervisord
# port = "9001"         # (String) Port of the XML-RPC interface of supervisord

# Default supervisord nodes
[[nodes]]
name = "local-server"     # 服务名 ,自己起名字
environment = ""          # 环境变量,可以不填
username = "admin"        # 远程账号
password = "admin"        # 远程密码
host = "127.0.0.1"     # 地址
port = "9001"        # 端口
我这把本地的supervisor 配置进去了,本地测试下
venv/bin/python cesi/run.py --config-file /etc/cesi.conf

使用浏览器打开

使用账号密码登录
(如果登录遇到 Cesi运行报错AttributeError: can‘t set attribute, 请往下看问题中的5)
像这样子就是成功了。
3 将cesi 加入 supervisor 管理。
3.1 cesi 的supervisor 的配置文件
vim /etc/supervisor/conf.d/cesi.conf
[program:cesi]
directory=/home/pkcom/Desktop/cesi
command=/home/pkcom/Desktop/cesi/venv/bin/python3 /home/pkcom/Desktop/cesi/cesi/run.py --config-file /etc/cesi.conf
autostart=true
startsecs=10
starttries=3
priority=996
redirect_stderr=false
stdout_logfile=/home/pkcom/Desktop/cesi/cesi.log
stderr_logfile=/home/pkcom/Desktop/cesi/cesi-err.log
stopasgroup=false
killasgroup=true
3.2 更新supervisor
supervisorctl reread
supervisorctl update
或者
supervisorctl reload
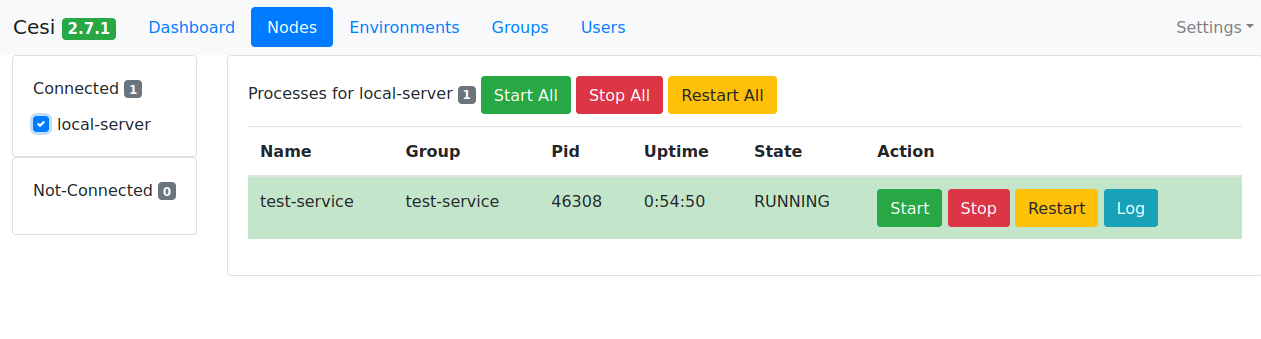
查看supervisor

已经跑起来了
再看看cesi
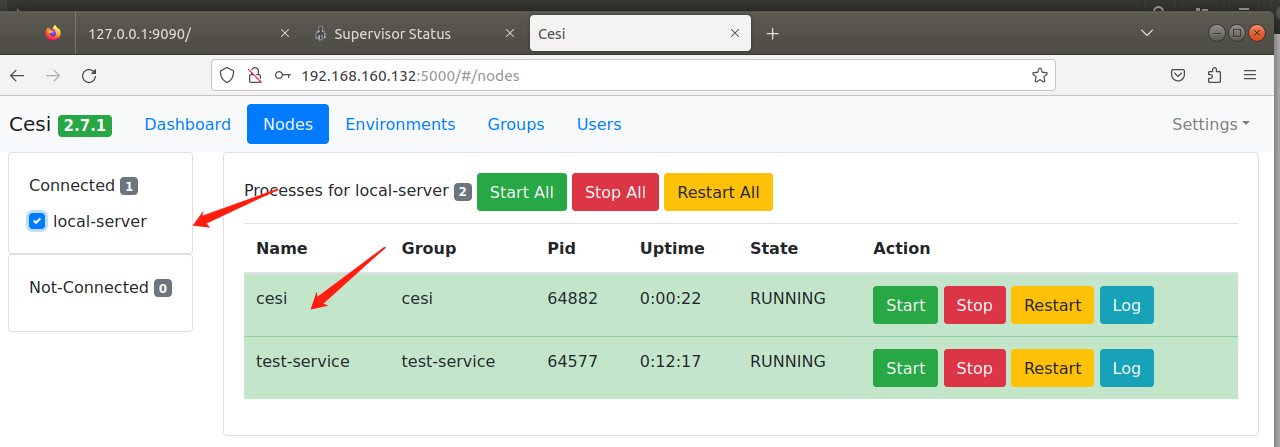
成功。
三、问题
supervisor常见问题: 参考地址
1. pip 安装 supervisor 后遇到命令没有的问题。我是没配置PATH。如果你遇到下图,就可以使用这个方法解决


配置PATH
vi ~/.bashrc
将上面提示的地址填入到下面。

然后更新下,就可以了。
source ~/.bashrc
2. 报文件权限问题 IOError: [Errno 13] Permission denied: '/var/log/supervisor/supervisord.log'
sudo chmod -R 777 /var/log/supervisor/supervisord.log
3.开启HTTP Server错误 Error: Cannot open an HTTP server: socket.error reported errno.EACCES (13)
一般情况下,我们可以用 root 用户启动 supervisord 进程,然后在其所管理的进程中,再具体指定需要以那个用户启动这些进程。如果不是root 会报这个错
sudo chmod 777 /run
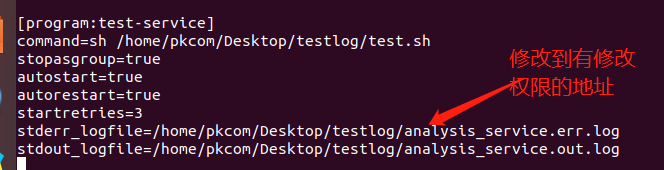
4.运行日志权限问题 'INFO spawnerr: unknown error making dispatchers for 'app_name': EACCES'
一般是你配置日志文件时在没权限的文件夹,要么改文件地址,要么改权限。
sudo chmod 777 /usr/log/supervisor/supervisor.log
5. Cesi运行报错AttributeError: can‘t set attribute
可参考至这: 去看看
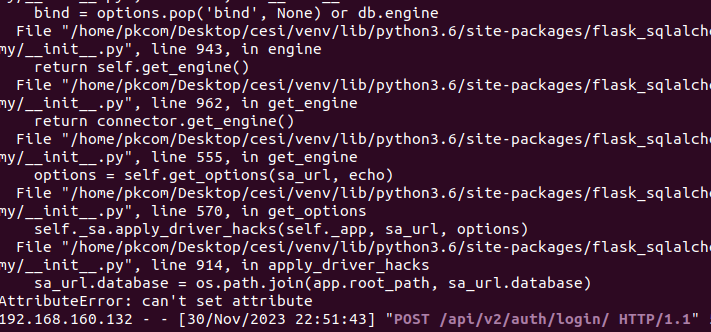
这是由于 flask-sqlalchemy 与当前python 不兼容导致的,
进入虚拟环境,卸载后重装适配就好了
source venv/bin/activate
pip uninstall flask-sqlalchemy
pip install flask-sqlalchemy
重新运行就可以了。