[Maven] maven插件系列之maven-shade-plugin
1 插件简述/Plugin Overview
1.1 定义与目的/Definition & Goals
- Official Definition
Apache Maven : maven-shade-plugin
This plugin provides the capability to package the artifact in an uber-jar, including its dependencies and to shade - i.e. rename - the packages of some of the dependencies.(该插件提供了将工件打包到uber jar中的功能,包括其依赖项,并对一些依赖项的包进行着色(即重命名)。)
- Goals Overview
The Shade Plugin has a single goal: (Shade插件只有一个目标:)
shade:shade is bound to the package phase and is used to create a shaded jar. (shade:shade绑定到封装阶段,用于创建一个shaded jar。)
- Sample Explain/简单解释:
maven-plugin-shade 插件提供了2个能力:
把整个项目(包含它的依赖)都打包到一个 “uber-jar” 中 shade - 即重命名某些依赖的包。也由此引出了两个问题:
+ 什么是 uber-jar ?
+ 这中打包后带依赖的 Jar 包一般称为uber-jar或fat-jar或者jar-with-dependencies;意思就是包含依赖的 jar。
+ 什么是 shade ?
+ shade 意为遮挡,在此处可理解为:对依赖的 jar 包的重定向(主要通过重命名的方式)。
shade
	n. 灯罩;阴凉处;(树)荫;色度;痕迹,影子,遗风;一点;差别;背阴;暗部;阴魂;浓淡深浅
	vt. 给…遮挡(光线);画阴影;加灯罩;把…涂暗;险胜

uber
	adj.超级的;极其的;最好的;
1.2 Version/版本
If you like to use minimizeJar this means you have to use JDK8+. This is based on a required upgrade of dependencies.
如果你喜欢使用minimizeJar,这意味着你必须使用JDK8+。这是基于所需的依赖项升级。
Latest version(最新版本) = 3.5.0

https://mvnrepository.com/artifact/org.apache.maven.plugins/maven-shade-plugin
2 实践与使用/Usage
2.1 官方插件说明
Official Document/官方文档
General instructions on how to use the Shade Plugin can be found on the usage page. Some more specific use cases are described in the examples given below.
有关如何使用Shade插件的一般说明可以在使用页面上找到。下面给出的示例中描述了一些更具体的用例。

In case you still have questions regarding the plugin's usage, please feel free to contact the user mailing list. The posts to the mailing list are archived and could already contain the answer to your question as part of an older thread. Hence, it is also worth browsing/searching the mail archive.
如果您对插件的使用仍有疑问,请随时联系用户邮件列表。邮件列表中的帖子已存档,可能已经包含了您问题的答案,作为旧线程的一部分。因此,浏览/搜索邮件档案也是值得的。

If you feel like the plugin is missing a feature or has a defect, you can fill a feature request or bug report in our issue tracker. When creating a new issue, please provide a comprehensive description of your concern. Especially for fixing bugs it is crucial that the developers can reproduce your problem. For this reason, entire debug logs, POMs or most preferably little demo projects attached to the issue are very much appreciated. Of course, patches are welcome, too. Contributors can check out the project from our source repository and will find supplementary information in the guide to helping with Maven.
如果你觉得插件缺少功能或有缺陷,你可以在我们的问题跟踪器中填写功能请求或错误报告。创建新问题时,请对您关心的问题进行全面描述。特别是对于修复错误,开发人员能够重现您的问题是至关重要的。出于这个原因,非常感谢整个调试日志、POM,或者最好是附加到该问题的小演示项目。当然,补丁也是受欢迎的。参与者可以从我们的源代码库中查看该项目,并在帮助使用Maven的指南中找到补充信息。
2.2 基本使用 : build>plugin
2.2.0 maven-shade-plguin 的基本使用
- maven-plugin-shade 必须和 Maven 构建生命周期中的 package 阶段绑定。
也就是说,当执行
mvn package时会自动触发shade。
- 要使用
maven-shade-plugin,只需要在pom.xml的<plugins>标签下添加它的配置即可,示例如下:
<project>
    //...

    <build>
        <plugins>
            <plugin>
                <groupId>org.apache.maven.plugins</groupId>
                <artifactId>maven-shade-plugin</artifactId>
                <version>3.2.4</version>
                <configuration>
                    <!-- 此处按需编写更具体的配置 -->
                </configuration>
                <executions>
                    <execution>
                        <!-- 和 package 阶段绑定 -->
                        <phase>package</phase>
                        <goals>
                            <goal>shade</goal>
                        </goals>
                    </execution>
                </executions>
            </plugin>
        </plugins>
    </build>

    // ...
</project>
默认情况下,会把项目所有的依赖都包含进最终的 jar 包中。当然,我们也可在 <configuration> 标签内配置更具体的规则。
2.2.1 测试验证(maven-shade-plugin)
- pom.xml
<?xml version="1.0" encoding="UTF-8"?>
<project xmlns="http://maven.apache.org/POM/4.0.0"
         xmlns:xsi="http://www.w3.org/2001/XMLSchema-instance"
         xsi:schemaLocation="http://maven.apache.org/POM/4.0.0 http://maven.apache.org/xsd/maven-4.0.0.xsd">
<!--
    <parent>
        <artifactId>johnny-webapp-quickstart</artifactId>
        <groupId>cn.johnnyzen</groupId>
        <version>1.0.0-SNAPSHOT</version>
    </parent>
-->
    <modelVersion>4.0.0</modelVersion>

    <version>1.0.0-SNAPSHOT</version>
    <groupId>cn.johnnyzen</groupId>
    <artifactId>study-maven</artifactId>

    <properties>
        <maven.compiler.source>8</maven.compiler.source>
        <maven.compiler.target>8</maven.compiler.target>
        <project.build.sourceEncoding>UTF-8</project.build.sourceEncoding>
        <maven-shade-plugin.version>3.5.0</maven-shade-plugin.version>

        <fastjson.version>2.0.3</fastjson.version>
    </properties>

    <dependencies>
        <dependency>
            <groupId>com.alibaba</groupId>
            <artifactId>fastjson</artifactId>
            <version>${fastjson.version}</version>
        </dependency>
    </dependencies>

    <build>
        <plugins>
            <plugin>
                <groupId>org.apache.maven.plugins</groupId>
                <artifactId>maven-shade-plugin</artifactId>
                <version>${maven-shade-plugin.version}</version>
                <configuration>
                    <!-- 此处按需编写更具体的配置 -->
                </configuration>
                <executions>
                    <execution>
                        <!-- 和 package 阶段绑定 -->
                        <phase>package</phase>
                        <goals>
                            <goal>shade</goal>
                        </goals>
                    </execution>
                </executions>
            </plugin>
        </plugins>
    </build>
</project>
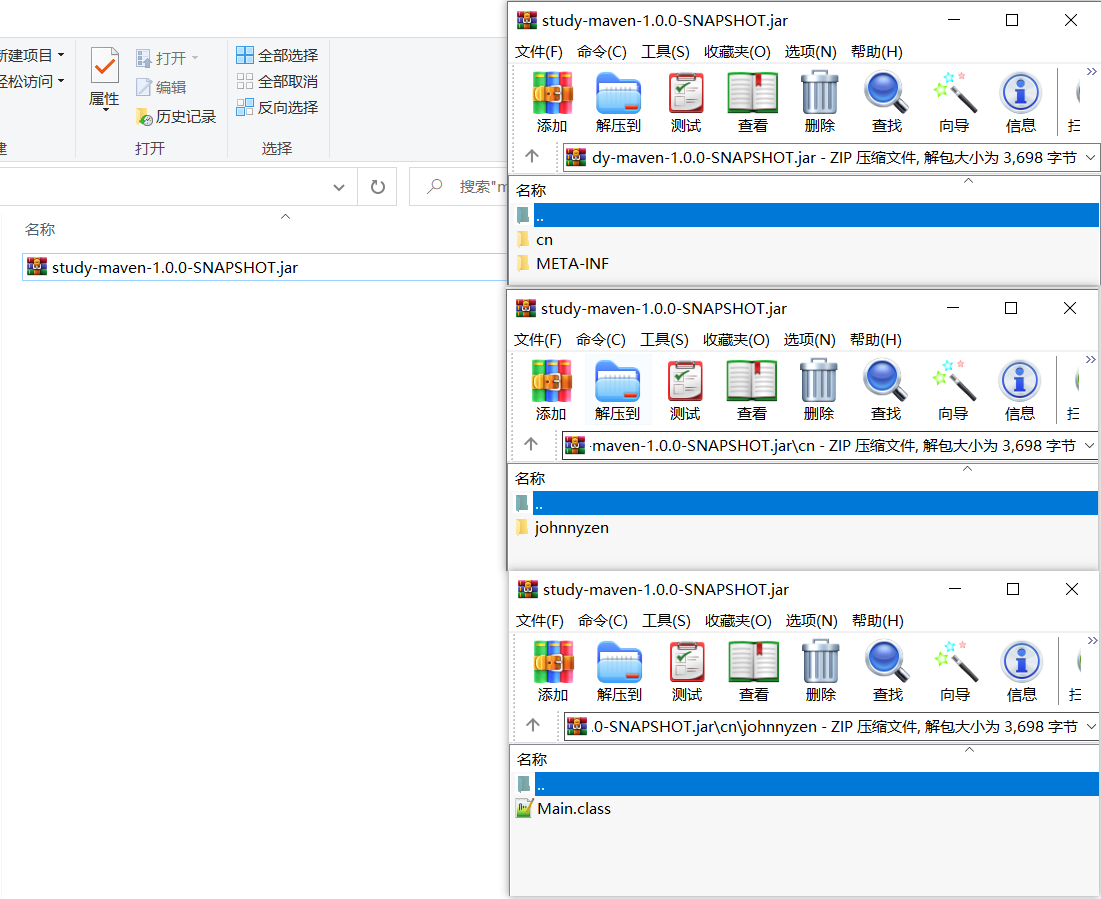
- 打包结果
mvn clean install


2.2.2 测试验证(maven-compile-plugin)
- pom.xml
<?xml version="1.0" encoding="UTF-8"?>
<project xmlns="http://maven.apache.org/POM/4.0.0"
         xmlns:xsi="http://www.w3.org/2001/XMLSchema-instance"
         xsi:schemaLocation="http://maven.apache.org/POM/4.0.0 http://maven.apache.org/xsd/maven-4.0.0.xsd">
<!--
    <parent>
        <artifactId>johnny-webapp-quickstart</artifactId>
        <groupId>cn.johnnyzen</groupId>
        <version>1.0.0-SNAPSHOT</version>
    </parent>
-->
    <modelVersion>4.0.0</modelVersion>

    <version>1.0.0-SNAPSHOT</version>
    <groupId>cn.johnnyzen</groupId>
    <artifactId>study-maven</artifactId>

    <properties>
        <java.jdk.version>1.8</java.jdk.version>
        <maven.compiler.source>8</maven.compiler.source>
        <maven.compiler.target>8</maven.compiler.target>
        <project.build.sourceEncoding>UTF-8</project.build.sourceEncoding>

        <maven-shade-plugin.version>3.5.0</maven-shade-plugin.version>
        <maven-compiler-plugin.version>3.8.0</maven-compiler-plugin.version>
        <fastjson.version>2.0.3</fastjson.version>
    </properties>

    <dependencies>
        <dependency>
            <groupId>com.alibaba</groupId>
            <artifactId>fastjson</artifactId>
            <version>${fastjson.version}</version>
        </dependency>
    </dependencies>

    <build>
        <plugins>
            <plugin>
                <groupId>org.apache.maven.plugins</groupId>
                <artifactId>maven-compiler-plugin</artifactId>
                <version>${maven-compiler-plugin.version}</version>
                <configuration>
                    <source>${java.jdk.version}</source>
                    <target>${java.jdk.version}</target>
                    <!--<encoding>${project.build.outputEncoding}</encoding>-->
                    <!-- <skipTests>true</skipTests> --><!-- 跳过测试 -->
                    <!--<verbose>true</verbose>-->                    <!--<showWarnings>true</showWarnings>-->                    <!--<fork>true</fork>--><!-- 要使compilerVersion标签生效,还需要将fork设为true,用于明确表示编译版本配置的可用 -->
                    <!--<executable>--><!-- path-to-javac --><!--</executable>--><!-- 使用指定的javac命令,例如:<executable>${JAVA_1_4_HOME}/bin/javac</executable> -->
                    <!--<compilerVersion>${java.version}</compilerVersion>--><!-- 指定插件将使用的编译器的版本 -->
                    <!--<meminitial>128m</meminitial>--><!-- 编译器使用的初始内存 -->
                    <!--<maxmem>512m</maxmem>--><!-- 编译器使用的最大内存 -->
                    <!--<compilerArgument>-verbose -bootclasspath ${java.home}\lib\rt.jar</compilerArgument>--><!-- 这个选项用来传递编译器自身不包含但是却支持的参数选项 -->
                </configuration>
            </plugin>
        </plugins>
    </build>
</project>
- 打包效果
mvn clean install


2.2.3 测试验证(build is empty)
- pom.xml
<?xml version="1.0" encoding="UTF-8"?>
<project xmlns="http://maven.apache.org/POM/4.0.0"
         xmlns:xsi="http://www.w3.org/2001/XMLSchema-instance"
         xsi:schemaLocation="http://maven.apache.org/POM/4.0.0 http://maven.apache.org/xsd/maven-4.0.0.xsd">
<!--
    <parent>
        <artifactId>johnny-webapp-quickstart</artifactId>
        <groupId>cn.johnnyzen</groupId>
        <version>1.0.0-SNAPSHOT</version>
    </parent>
-->
    <modelVersion>4.0.0</modelVersion>

    <version>1.0.0-SNAPSHOT</version>
    <groupId>cn.johnnyzen</groupId>
    <artifactId>study-maven</artifactId>

    <properties>
        <java.jdk.version>1.8</java.jdk.version>
        <maven.compiler.source>8</maven.compiler.source>
        <maven.compiler.target>8</maven.compiler.target>
        <project.build.sourceEncoding>UTF-8</project.build.sourceEncoding>

        <maven-shade-plugin.version>3.5.0</maven-shade-plugin.version>
        <maven-compiler-plugin.version>3.8.0</maven-compiler-plugin.version>
        <fastjson.version>2.0.3</fastjson.version>
    </properties>

    <dependencies>
        <dependency>
            <groupId>com.alibaba</groupId>
            <artifactId>fastjson</artifactId>
            <version>${fastjson.version}</version>
        </dependency>
    </dependencies>

    <build>
    </build>
</project>
- 打包效果
mvn clean install

2.3 扩展配置: build>plugin>configuration
2.3.1 include/exclude : 按需选择要添加到最终 jar 包中依赖
- 支持
include/exclude2 种操作 - 支持执行通配符匹配目标依赖JAR包:
'*' 、'?' - 配置格式:
groupId:artifactId[[:type]:classfier]
- 样例配置
<configuration>
    <artifactSet>
        <excludes>
            <exclude>classworlds:classworlds</exclude>
            <exclude>junit:junit</exclude>
            <exclude>jmock:*</exclude>
            <exclude>*:xml-apis</exclude>
            <exclude>org.apache.maven:lib:tests</exclude>
            <exclude>log4j:log4j:jar:</exclude>
        </excludes>
    </artifactSet>
</configuration>
2.3.2 filter : 过滤
- 使用
<filters>结合<includes>&<excludes>标签可实现更灵活的依赖选择。 - 样例配置:
<configuration>
    <filters>
        <filter>
            <artifact>junit:junit</artifact>
            <includes>
                <include>junit/framework/**</include>
                <include>org/junit/**</include>
            </includes>
            <excludes>
                <exclude>org/junit/experimental/**</exclude>
                <exclude>org/junit/runners/**</exclude>
            </excludes>
        </filter>
        <filter>
            <artifact>*:*</artifact>
            <excludes>
                <exclude>META-INF/*.SF</exclude>
                <exclude>META-INF/*.DSA</exclude>
                <exclude>META-INF/*.RSA</exclude>
            </excludes>
        </filter>
    </filters>
</configuration>
2.3.3 minimizeJar : 最小化JAR包体积
- 除了可以通过自定义的 filters 来过滤依赖,此插件还支持自动移除项目中没有使用到的依赖,以此来最小化 jar 包的体积,只需要添加一项配置即可。示例如下:
<configuration>
    <minimizeJar>true</minimizeJar>
</configuration>
2.3.4 relocations : 重定位 class 文件
如果最终的 jar 包被其他的项目所依赖的话,直接地引用此 jar 包中的类可能会导致类加载冲突,这是因为 classpath 中可能存在重复的 class 文件。为了解决这个问题,我们可以使用 shade 提供的重定位功能,把部分类移动到一个全新的包中。示例如下:
<configuration>
    <relocations>
        <relocation>
            <pattern>org.codehaus.plexus.util</pattern>
            <shadedPattern>org.shaded.plexus.util</shadedPattern>
            <excludes>
                <exclude>org.codehaus.plexus.util.xml.Xpp3Dom</exclude>
                <exclude>org.codehaus.plexus.util.xml.pull.*</exclude>
            </excludes>
        </relocation>
    </relocations>
</configuration>
涉及标签:
	<pattern>:原始包名
	<shadedPattern>:重命名后的包名
	<excludes>:原始包内不需要重定位的类,类名支持通配符

例如,在上述示例中,我们把 org.codehaus.plexus.util 包内的所有子包及 class 文件(除了 ~.xml.Xpp3Dom 和 ~.xml.pull 包下的所有 class 文件)重定位到了 org.shaded.plexus.util 包内。
当然,如果包内的大部分类我们都不需要,一个个排除就显得很繁琐了。
此时我们也可以使用 <includes> 标签来指定我们仅需要的类,示例如下:
<project>
    ...
    <relocation>
        <pattern>org.codehaus.plexus.util</pattern>
        <shadedPattern>org.shaded.plexus.util</shadedPattern>
        <includes>
            <include>org.codehaud.plexus.util.io.*</include>
        </includes>
    </relocation>
    ...
</project>
2.3.5 mainClass:生成可执行 jar 包
- 使用 maven-shade-plugin 后,最终生成的 jar 包可以包含所有项目所需要的依赖。
我们会想,能不能直接运行这个 uber-jar 呢?答案是当然可以,并且十分简单,只需要指定<mainClass>启动类就可以了。 - 示例如下:
<project>
    ...
    <configuration>
        <transformers>
            <transformer implementation="org.apache.maven.plugins.shade.resource.ManifestResourceTransformer">
                <mainClass>org.sonatype.haven.HavenCli</mainClass>
            </transformer>
        </transformers>
    </configuration>
    ...
</project>
熟悉 jar 包的朋友们都知道,jar 包中默认会包含一个 MANIFEST.MF 文件,里面描述了一些 jar 包的信息。
使用 java 自带的 jar 命令打包的时候可以指定 MANIFEST.MF,其中也可以指定 Main-Class 来使得 jar 包可运行。
那么使用 shade 来指定和直接在 MANIFEST.MF 文件中指定有什么区别呢?
答案是没有区别,细心的读者会发现 <mainClass> 标签的父标签是 <transformer> 有一个 implementation 属性,其值为 “~.ManifestResourceTransformer”,意思是 Manifest 资源文件转换器。
上述示例只自指定了启动类,因此 shade 会为我们自动生成一个包含 Main-Class 的 MANIFEST.MF 文件,然后在打 jar 包时指定这个文件。
那如果我们想要完全定制 MANIFEST.MF 文件内容怎么办呢?我们可以使用 <manifestEntries> 标签,示例如下:
<project>
    ...
    <configuration>
        <transformers>
            <transformer implementation="org.apache.maven.plugins.shade.resource.ManifestResourceTransformer">
                <manifestEntries>
                    <Main-Class>org.sonatype.haven.ExodusCli</Main-Class>
                    <Build-Number>123</Build-Number>
                </manifestEntries>
            </transformer>
        </transformers>
    </configuration>
    ...
</project>
可执行jar包通过 java -jar 命令启动
2.3.6 生成资源文件
项目中涉及到的依赖可能会有它们所必需的资源文件,使用 shade 可以把它们聚合在同一个 jar 包中。
默认地,shade 为我们提供了 12 个 ResourceTransformer 类:
| 类名 | 作用 |
|---|---|
| ApacheLicenseResourceTransformer | 防止 LICENSE 文件重复 |
| ApacheNoticeResourceTransformer | 准备合并的 NOTICE |
| AppendingTransformer | 为某个资源文件附加内容 |
| ComponentsXmlResourceTransformer | 聚合 Plexus components.xml |
| DontIncludeResourceTransformer | 防止包含指定的资源 |
| GroovyResourceTransformer | 合并 Apache Groovy 的扩展模块 |
| IncludeResourceTransformer | 添加项目中的文件为资源文件 |
| ManifestResourceTransformer | 自定义 MANIFEST 文件 |
| PluginXmlResourceTransformer | 聚合 Maven 的 plugin.xml 配置 |
| ResourceBundleAppendingTransformer | 合并 ResourceBundles |
| ServicesResourceTransformer | 重定位且合并 META-INF/services 资源文件中的 class 文件 |
| XmlAppendingTransformer | 为 XML 资源文件附加内容 |
如果上述 12 个类都不能够满足我们的需求,我们可以实现 shade 提供的接口,按需自定义一个 ResourceTransformer,实现方法详见官网 Using your own Shader implementation。
X 参考文献/Reference Document
- Apache Maven:maven-shade-plugin
- maven-plugin-shade 详解 - CSDN
- maven maven-shade-plugin 插件 plugin Mavenmaven maven-shade-plugin插件plugin maven-shade-plugin插件uber-jar plugin maven-shade-plugin plugin maven maven-assembly-plugin maven-shade-plugin maven-shade-plugin springboot项目plugin maven-jar-plugin插件plugin maven spring-boot-maven-plugin插件spring plugin spring-boot-maven-plugin插件uber-jar spring jaxb2-maven-plugin插件javabean plugin maven-plugin-shade清单 插件 属性