简介
- 分层 common公共层 data数据层 test层+main文件
- 其中pytest框架使用pytest.ini全局配置和conftest.py夹具
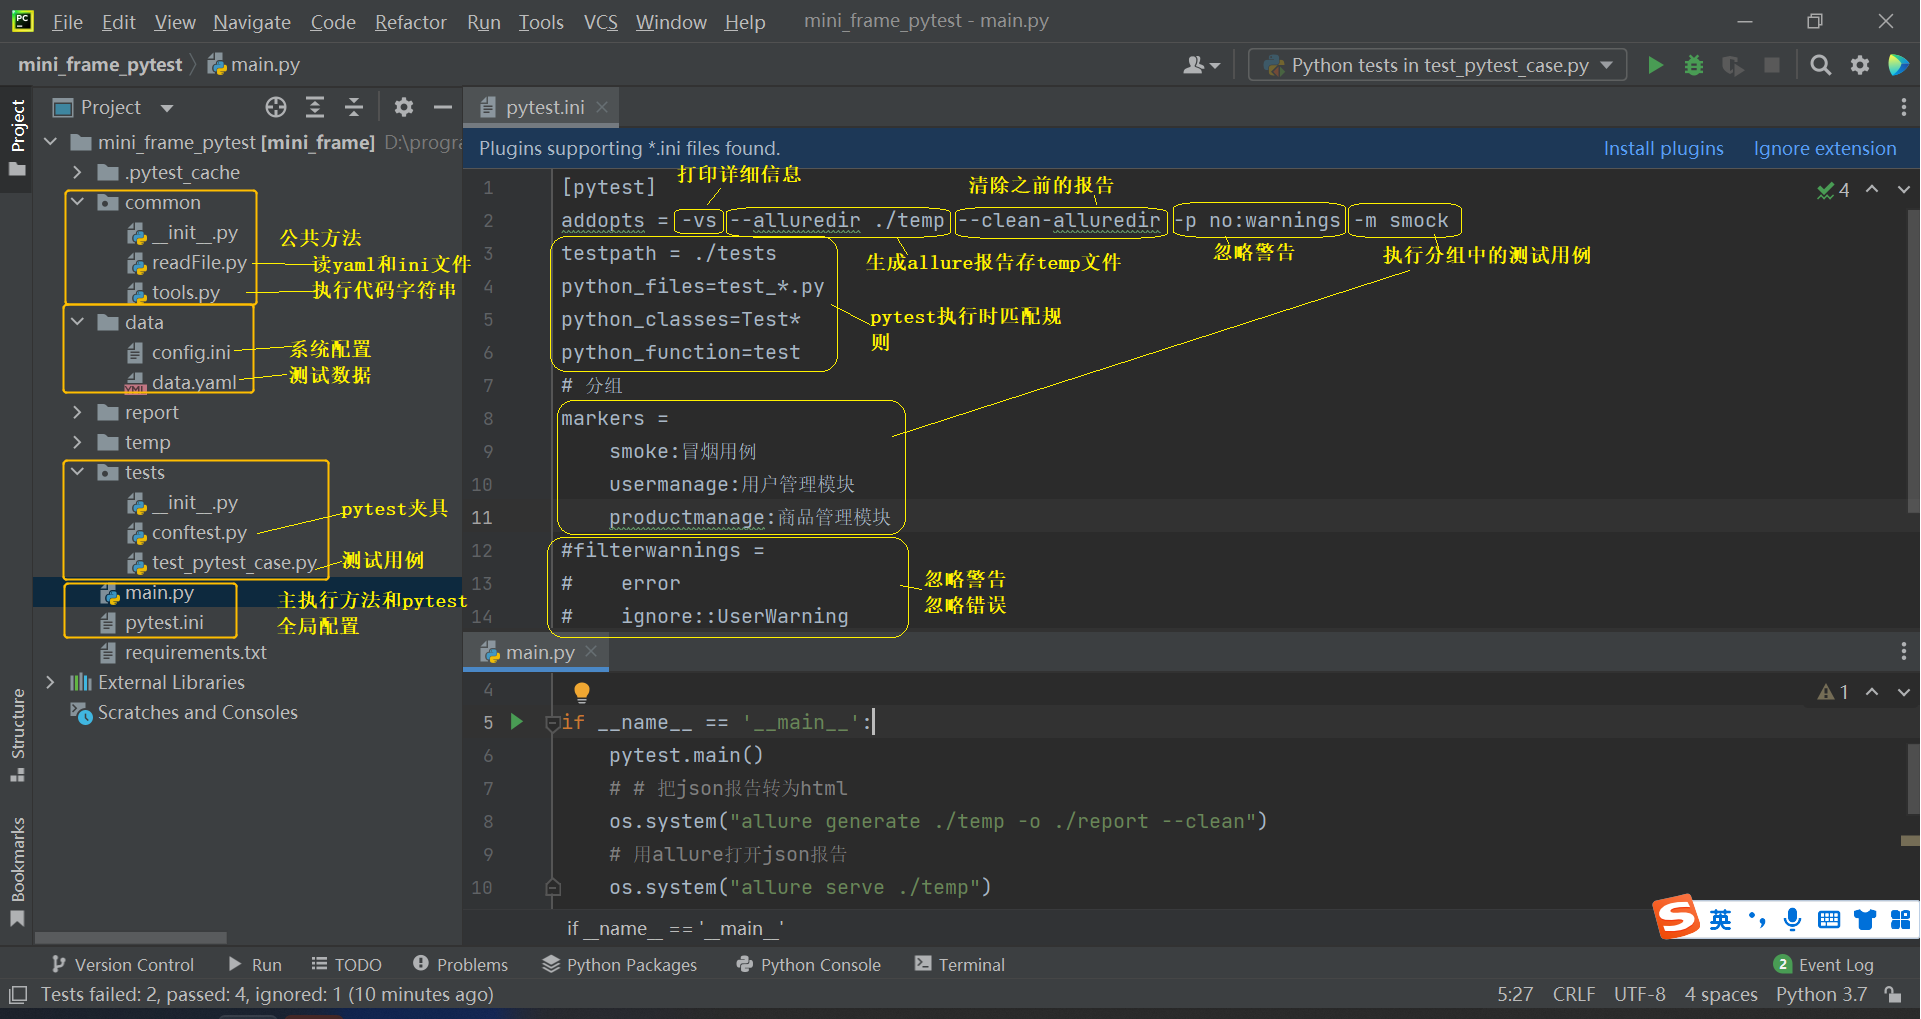
test层
- 下载对于的安装包
- 编写对于的用例
- 实现参数化
- 编写对于的fixture和pytest全局配置
常用pytest执行方法
main方法: pytest.main(['-vs','-n 2'])
console: pytest -vs -n 2
pytest.ini文件: addopts = -vs -n 2
常用命令
-v 详细信息
-s 输出打印信息
-n 多线程跑
--reruns 失败重跑
-m 执行分组
-k 执行包含该字符串的
下载对于的依赖
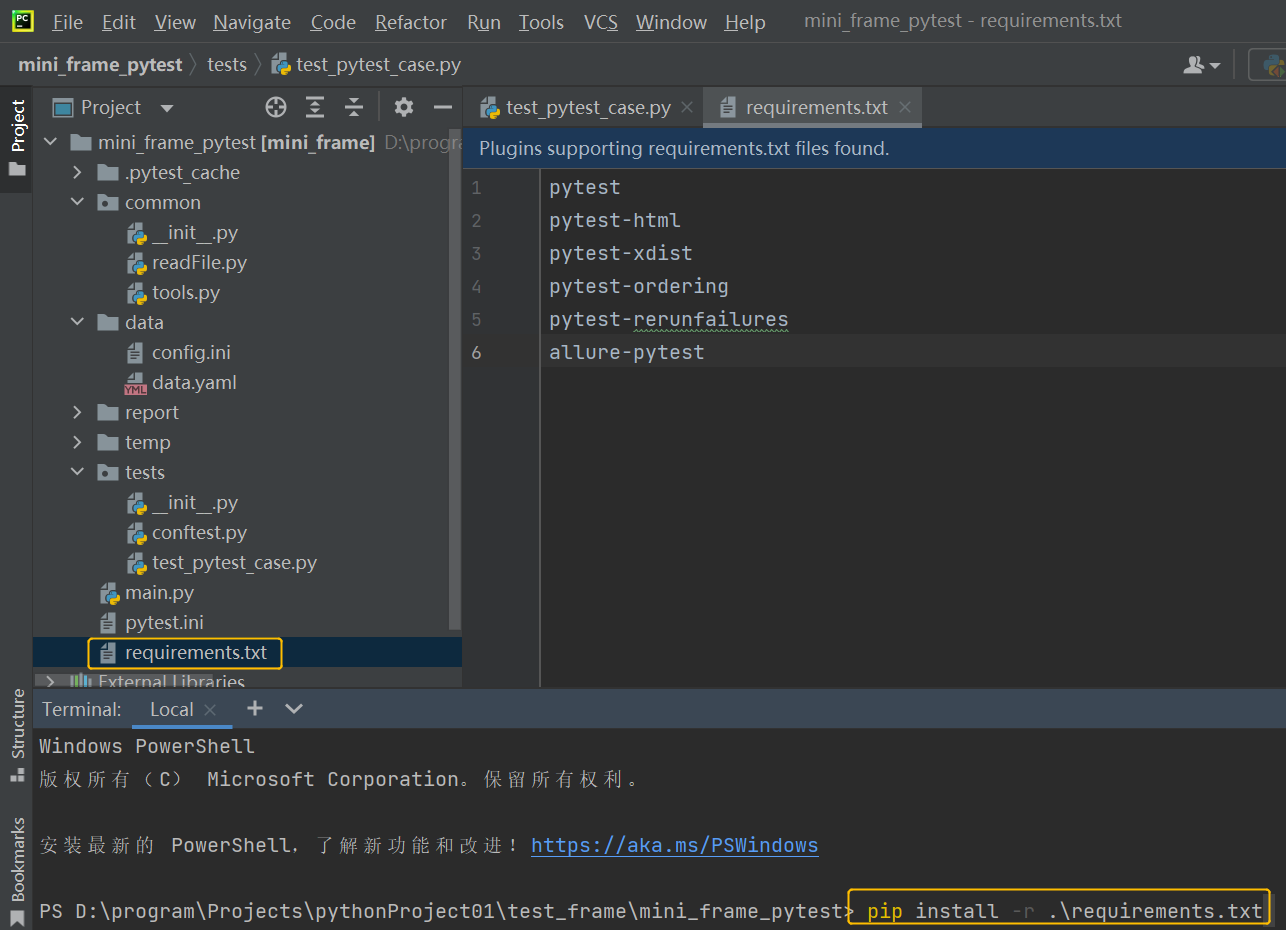
代码展示
import pytest
import requests

from common.readFile import re_yaml
from common.tools import dic_execute
from common.readFile import re_conf


class TestCase:
    # 分组--参数化
    @pytest.mark.smock
    @pytest.mark.parametrize("dic", re_yaml())
    def test_demo1(self, get_csrf, get_config, dic):
        # 获取基础配置
        base_url = get_config
        # 用夹具获取cookie和token
        cookie, token = get_csrf
        # 测试标题
        print(dic['description'])
        # 拿测试数据,发请求
        info = dic_execute(dic['data'])
        url = base_url + "users"

        data = {
            "id": 11,
            "name": info['date'],
            "username": info['user'],
            "datetime": info['pwd'],
            "token" :token
        }

        res = requests.request('post', url, data=data, cookies={'cookie': cookie})
        print(res.text)
        assert res.status_code == info['assert']

    # 排序
    @pytest.mark.run(order=1)
    def test_demo2(self, get_config):
        print('测试pytest demo2')
        assert 1 == 2

    # 跳过
    @pytest.mark.skip("版本原因跳--过")
    def test_demo3(self, get_config):
        print('测试pytest demo3')

    #分组
    @pytest.mark.smock
    def test_demo4(self, get_config):
        print('测试pytest demo4')


if __name__ == '__main__':
    pytest.main()
夹具conftest.py文件
import re

import pytest

from common.readFile import re_conf


@pytest.fixture(scope="class")
def get_config():
    """
    读取配置信息
    """
    print("setup_class 读取config.ini文件信息")
    base_url = re_conf("http", "baseUrl")
    return base_url


@pytest.fixture(scope="class")
def get_csrf():
    print("get_csrf get请求,获取响应页面")
    mock_response_text = '''
    <html>
        <head>
        </head>
        <body>
        .....'name'='crsf' token='token123abcdefg123'
        </body>
    </html>
    '''
    cookie = "ADFBE response.cookie()"
    token = re.search("'name'='crsf' token='(.*?)'", mock_response_text).group(1)
    return cookie, token
外层的pytest.ini全局配置
[pytest]
addopts = -vs --alluredir ./temp --clean-alluredir -p no:warnings -m smock -n 2
testpath = ./tests
python_files=test_*.py
python_classes=Test*
python_function=test
# 分组
markers =
    smoke:冒烟用例
    usermanage:用户管理模块
    productmanage:商品管理模块
#filterwarnings =
#    error
#    ignore::UserWarning
common层
读文件方法
import configparser
import os

import yaml

path = os.path.dirname(__file__)
config_path = os.path.join(path, '../', "data/config.ini")
yaml_path = os.path.join(path, '../', 'data/data.yaml')


# 从ini文件中读取参数
def re_conf(title, key=None, file=config_path):
    conf = configparser.ConfigParser()
    conf.read(file, encoding='utf-8')

    if key is None:
        # 读取字段到Section对象
        return conf[title]
    else:
        # 读取具体的值
        return conf.get(title, key)


# 读取yaml文件
def re_yaml(file=yaml_path):
    with open(file, 'r', encoding='utf-8') as f:
        test_data = yaml.safe_load(f)
    return test_data


if __name__ == '__main__':
    # 方式一
    confObj = re_conf(title="http", file="../data/config.ini")
    print(confObj)
    print("方式一 " + confObj.get("baseUrl"))
    # 方式二
    data = re_conf(title="http", key="baseUrl", file="../data/config.ini")
    print("方式二 " + data)
    # 读yaml
    print(re_yaml(), type(re_yaml()))
执行字符串代码
import datetime


# 读取文件数据后,把可执行代码执行
def dic_execute(dic: dict):
    for k, v in dic.items():
        if isinstance(v, str):
            if v.startswith('<') and v.endswith('>'):
                dic[k] = eval(v[1:-1])

    return dic


if __name__ == '__main__':
    pass
主执行方法
import os
import pytest as pytest

if __name__ == '__main__':
    pytest.main()
    # # 把json报告转为html
    os.system("allure generate ./temp -o ./report --clean")
    # 用allure打开json报告
    os.system("allure serve ./temp")
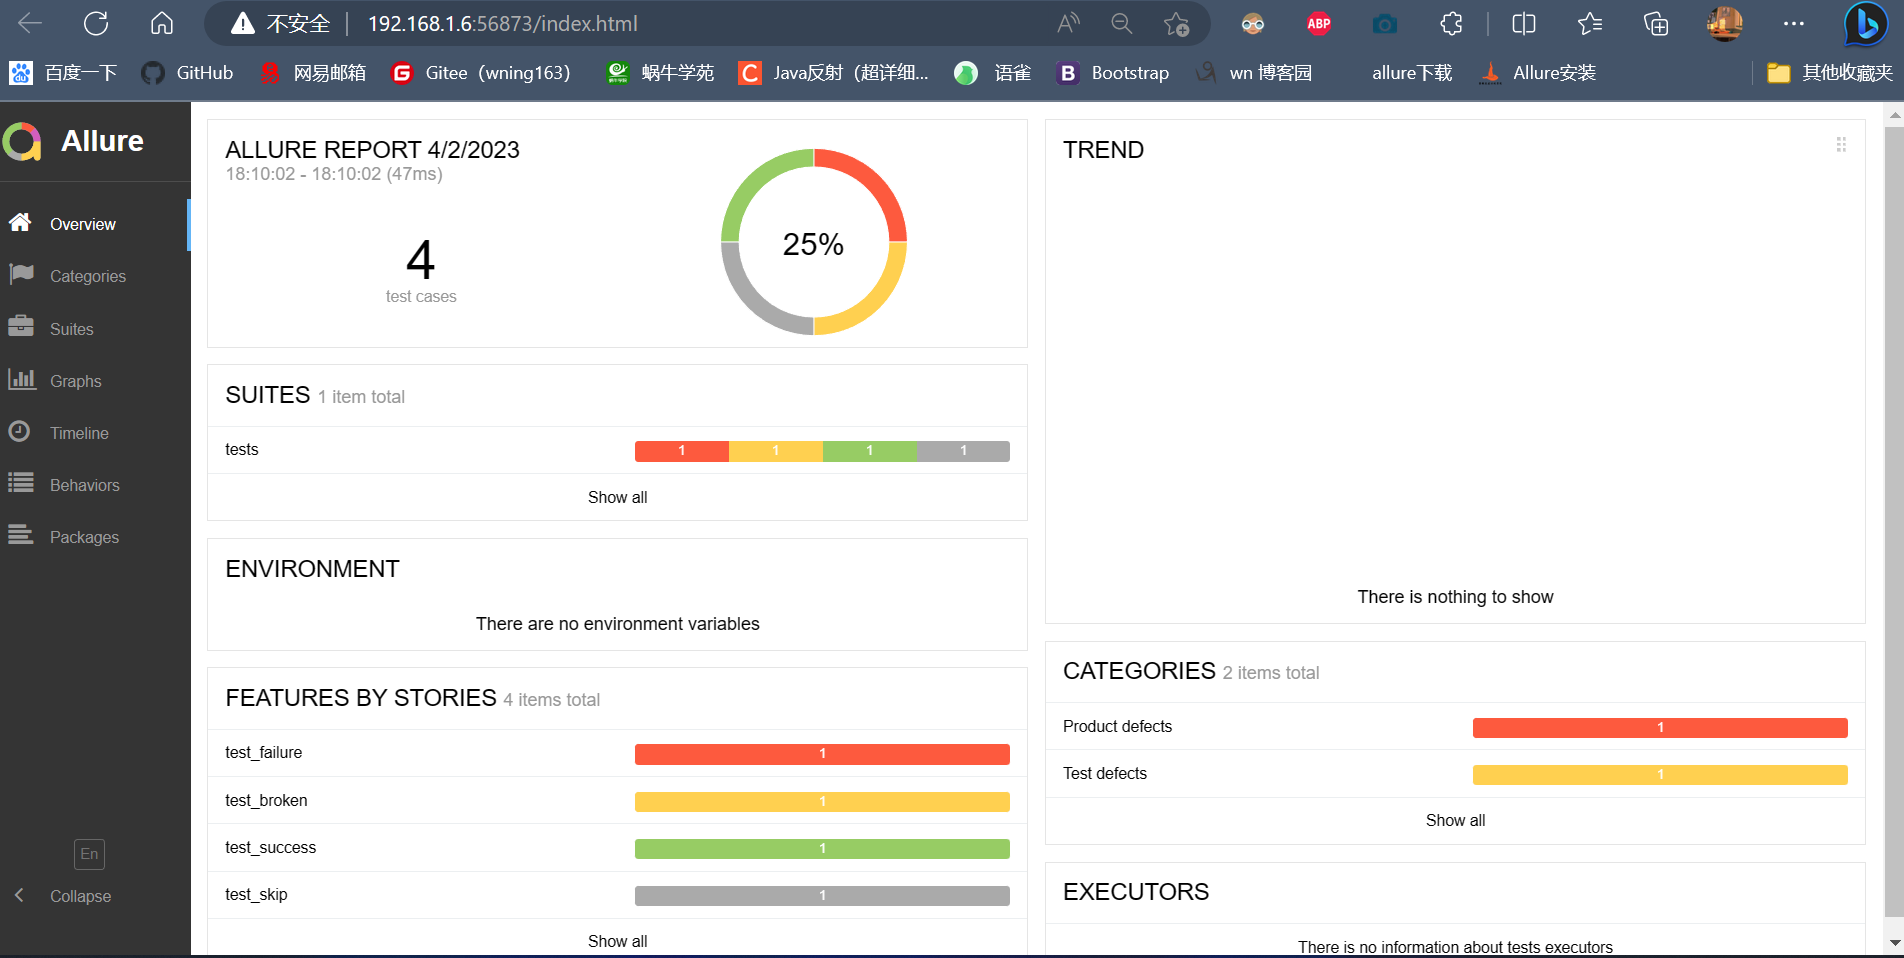
allure
1.需要电脑上安装了allure并且配置了环境变量
windows:下载,解压,并配置环境变量:https://github.com/allure-framework/allure2/releases
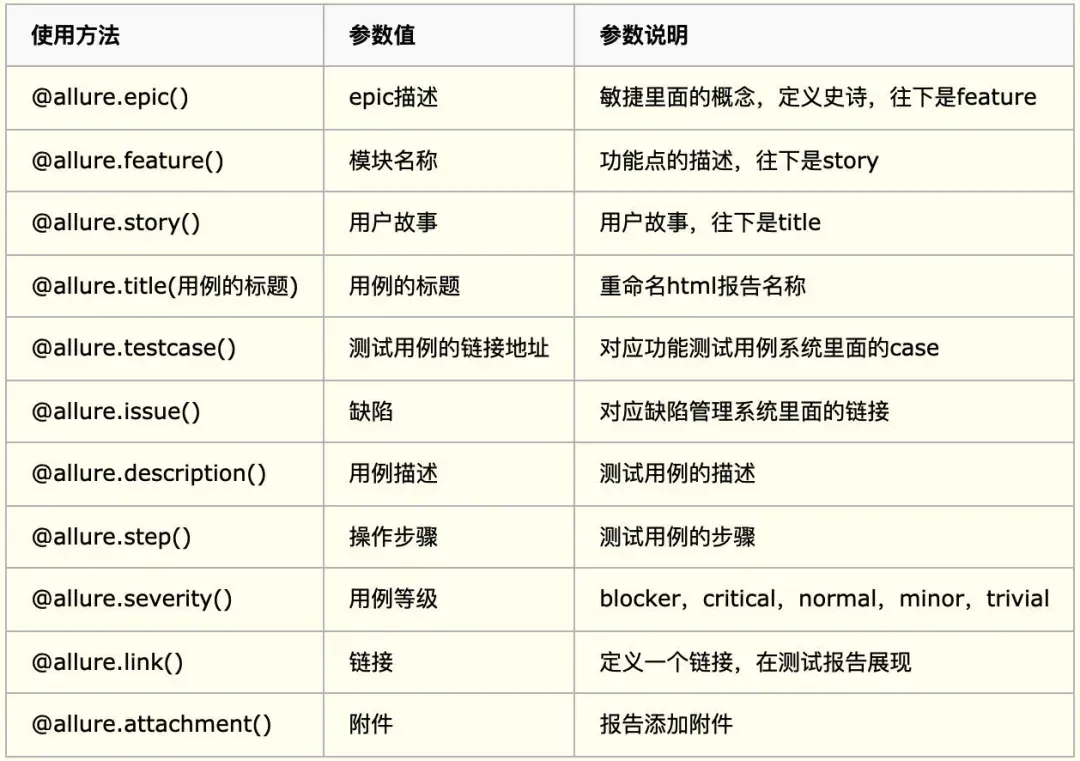
常用方法
示例
import allure
import pytest

@allure.feature('test_success')
def test_success():
    """this test succeeds"""
    assert True

@allure.feature('test_failure')
def test_failure():
    """this test fails"""
    assert False

@allure.feature('test_skip')
def test_skip():
    """this test is skipped"""
    pytest.skip('for a reason!')

@allure.feature('test_broken')
def test_broken():
    raise Exception('oops')

if __name__ == '__main__':
    # pytest.main(["-s","allure-test.py"])
    '''
    -q: 安静模式, 不输出环境信息
    -v: 丰富信息模式, 输出更详细的用例执行信息
    -s: 显示程序中的print/logging输出
    '''
    pytest.main(['-s', '-q','test_allure02.py','--clean-alluredir','--alluredir=allure-results'])
    os.system(r"allure generate -c -o allure-report")