$("#setup").click(() => tryCatch(setup));

$("#add-row").click(() => tryCatch(addRow));
$("#add-column").click(() => tryCatch(addColumn));
$("#add-calculated-column").click(() => tryCatch(addCalculatedColumn));

async function addRow() {
  await Excel.run(async (context) => {
    const sheet = context.workbook.worksheets.getItem("Sample");
    const expensesTable = sheet.tables.getItem("ExpensesTable");

    expensesTable.rows.add(null, [
      ["1/16/2017", "THE PHONE COMPANY", "Communications", "$120"],
      ["1/20/2017", "NORTHWIND ELECTRIC CARS", "Transportation", "$142"],
      ["1/20/2017", "BEST FOR YOU ORGANICS COMPANY", "Groceries", "$27"]
    ]);

    sheet.getUsedRange().format.autofitColumns();
    sheet.getUsedRange().format.autofitRows();

    await context.sync();
  });
}

async function addColumn() {
  await Excel.run(async (context) => {
    const sheet = context.workbook.worksheets.getItem("Sample");
    const expensesTable = sheet.tables.getItem("ExpensesTable");

    expensesTable.columns.add(null, [
      ["Deductable?"],
      ["Yes"],
      ["Yes"],
      ["No"],
      ["No"],
      ["Yes"],
      ["Yes"],
      ["No"],
      ["Yes"],
      ["Yes"],
      ["No"]
    ]);

    sheet.getUsedRange().format.autofitColumns();
    sheet.getUsedRange().format.autofitRows();

    await context.sync();
  });
}

async function addCalculatedColumn() {
  await Excel.run(async (context) => {
    const sheet = context.workbook.worksheets.getItem("Sample");
    const expensesTable = sheet.tables.getItem("ExpensesTable");

    const weekendFormula =
      '=IF(OR((TEXT([@DATE], "dddd") = "Saturday"), (TEXT([@DATE], "dddd") = "Sunday")), "Weekend", "Weekday")';
    expensesTable.columns.add(null, [
      ["Type of the Day"],
      [weekendFormula],
      [weekendFormula],
      [weekendFormula],
      [weekendFormula],
      [weekendFormula],
      [weekendFormula],
      [weekendFormula],
      [weekendFormula],
      [weekendFormula],
      [weekendFormula]
    ]);

    sheet.getUsedRange().format.autofitColumns();
    sheet.getUsedRange().format.autofitRows();

    await context.sync();
  });
}

/** Create a new table with sample data */
async function setup() {
  await Excel.run(async (context) => {
    context.workbook.worksheets.getItemOrNullObject("Sample").delete();
    const sheet = context.workbook.worksheets.add("Sample");

    const expensesTable = sheet.tables.add("A1:D1", true /*hasHeaders*/);
    expensesTable.name = "ExpensesTable";
    expensesTable.getHeaderRowRange().values = [["Date", "Merchant", "Category", "Amount"]];

    expensesTable.rows.add(null /*add at the end*/, [
      ["1/1/2017", "The Phone Company", "Communications", "$120"],
      ["1/2/2017", "Northwind Electric Cars", "Transportation", "$142"],
      ["1/5/2017", "Best For You Organics Company", "Groceries", "$27"],
      ["1/10/2017", "Coho Vineyard", "Restaurant", "$33"],
      ["1/11/2017", "Bellows College", "Education", "$350"],
      ["1/15/2017", "Trey Research", "Other", "$135"],
      ["1/15/2017", "Best For You Organics Company", "Groceries", "$97"]
    ]);

    sheet.getUsedRange().format.autofitColumns();
    sheet.getUsedRange().format.autofitRows();

    sheet.activate();
    await context.sync();
  });
}

/** Default helper for invoking an action and handling errors. */
async function tryCatch(callback) {
  try {
    await callback();
  } catch (error) {
    // Note: In a production add-in, you'd want to notify the user through your add-in's UI.
    console.error(error);
  }
}
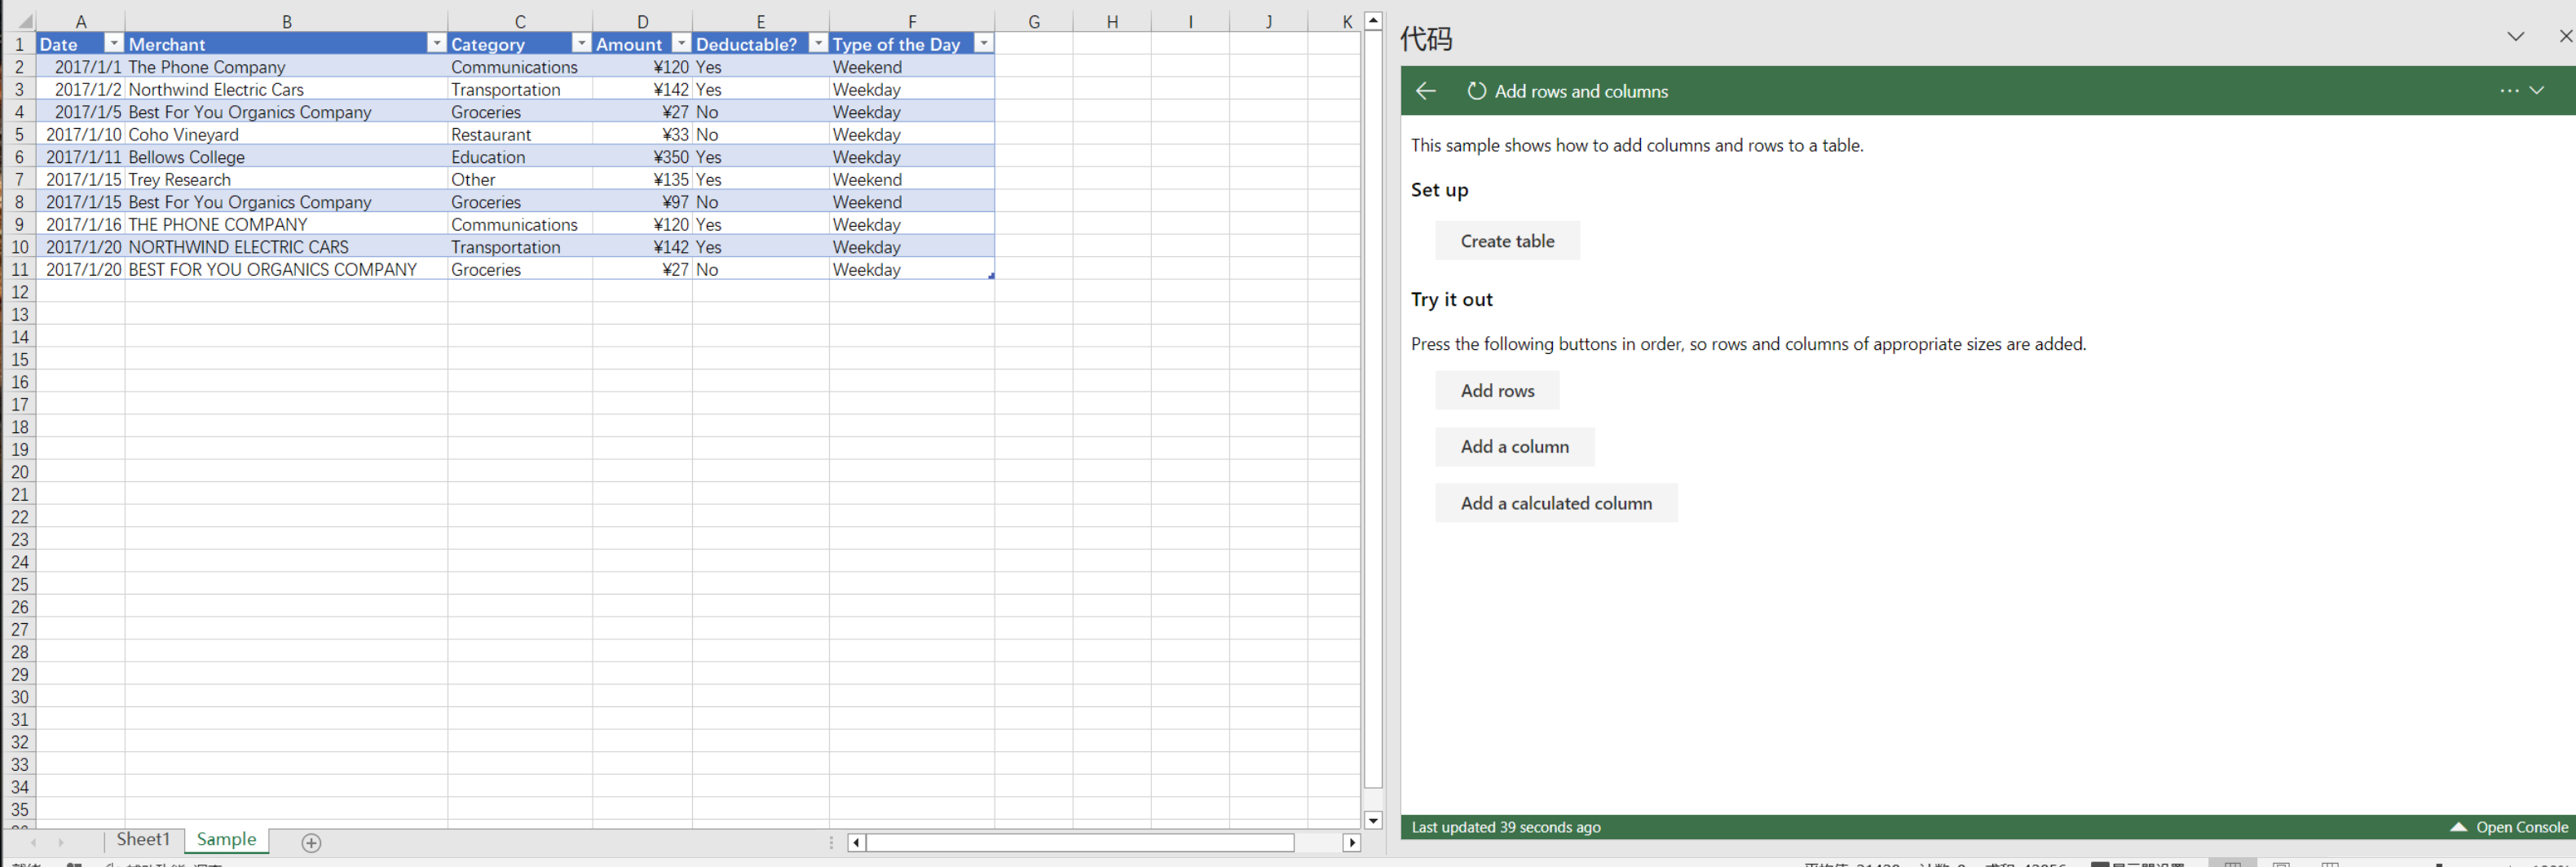
前端:
<section class="ms-font-m">
    <p>This sample shows how to add columns and rows to a table.</p>
</section>

<section class="setup ms-font-m">
    <h3>Set up</h3>
    <button id="setup" class="ms-Button">
        <span class="ms-Button-label">Create table</span>
    </button>
</section>

<section class="samples ms-font-m">
    <h3>Try it out</h3>
    <p>Press the following buttons in order, so rows and columns of appropriate sizes are added.</p>
    <button id="add-row" class="ms-Button">
            <span class="ms-Button-label">Add rows</span>
    </button>
    <p>
        <button id="add-column" class="ms-Button">
        <span class="ms-Button-label">Add a column</span>
    </button>
        <p>
            <button id="add-calculated-column" class="ms-Button">
        <span class="ms-Button-label">Add a calculated column</span>
    </button>
</section>
css:
section.samples {
    margin-top: 20px;
}

section.samples .ms-Button, section.setup .ms-Button {
    display: block;
    margin-bottom: 5px;
    margin-left: 20px;
    min-width: 80px;
}
https://appsforoffice.microsoft.com/lib/1/hosted/office.js
@types/office-js

office-ui-fabric-js@1.4.0/dist/css/fabric.min.css
office-ui-fabric-js@1.4.0/dist/css/fabric.components.min.css

core-js@2.4.1/client/core.min.js
@types/core-js

jquery@3.1.1
@types/jquery@3.3.1