1.pytest收集测试用例规则
pytest框架在收集用例的时候,默认会查找test_开头的.py 模块,并且在模块中找到test_ 开头的函数或Test开头的类。
根据这个规则,如果我们想收集yaml格式的文件当用例执行,需解决2个问题:
1.修改用例收集规则,改成收集yaml格式文件作为收集的目标
2.将yaml文件生成pytest的测试用例
pytest 在运行的时候,以你运行的目录,往上查找 conftest.py 文件,以 pytest.ini 所在的目
录为根路径。
test_a.py

def test_1():
    print('hello')

def test_2():
    print('world')
打断点运行查看:

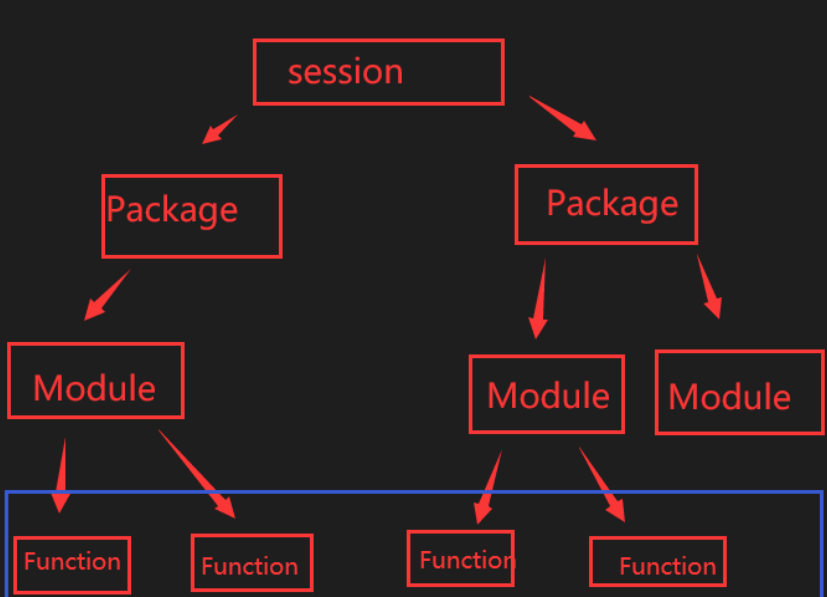
从图中我们可以清楚的知道:
1.每个用例最终会转成 一个 Function 对象:
2.Function 对象的上一层(parent ) 是 Module 模块对象:Module test_a.py
3.Module 模块的上一层是 Package 包,Package 包的上一层是 session 对象

于是我们知道pytest 收集用例的基本思路:
2. 如何构造pytest的item用例
从上面可以知道,构造pytest的item,需要:1.构造Package,2.构造Module, 3.构造Function
查看Function的源码:> from pytest import Function, Module
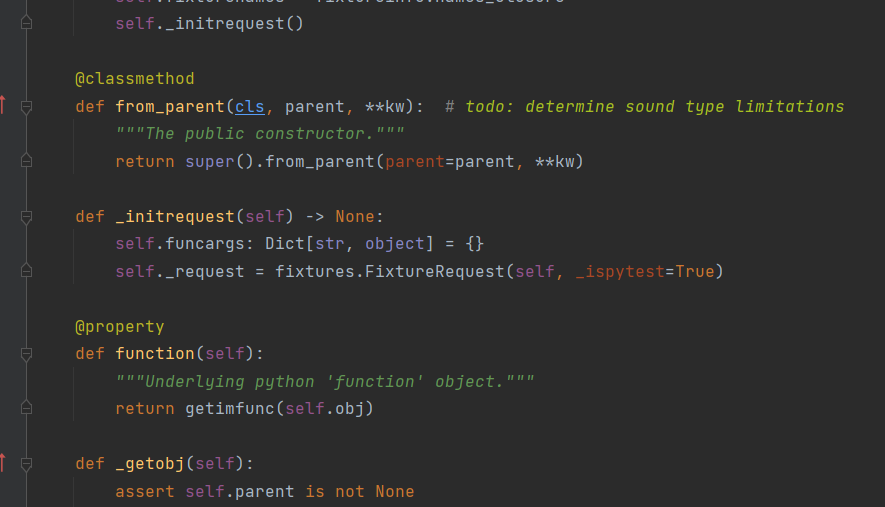
于是可以知道,基本思想是利用 Module 构建 Function!其调用伪代码如下: > Function.from_parent(Module)
既然可以利用 Module 构建 Function, 那如何构建 Module ? 当然是利用 Package 构建
Module!> Module.from_parent(Package)
既然可以利用 Package 构建 Module 那如何构建 Package ? 请看下图调用关系:

pytest 从 Config 开始,层层构建,直到 Function !Function 是 pytest 的最小执行单元。 手动
构建 item 就是模拟 pytest 构建 Function 的过程。也就是说,需要创建 Config ,然后利用
Config 创建 Session ,然后利用 Session 创建 Package ,…,最后创建 Function。
pytest 会自动创建好 Config, Session 和 Package ,这三者不用手动创建。
2. yaml文件构建成Module模块喝用例
先通过 pytest_collect_file 钩子收集到指定yaml文件用例。
# conftest.py
from pytest import Module
import types
def pytest_collect_file(file_path, parent):
  # 查找test 开头的yaml 文件
  if file_path.suffix in [".yml", ".yaml"] and (file_path.name.startswith("test") or file_path.name.endswith("test")):
    print(f"yaml 文件的路径:{file_path}")
    print(f"yaml 文件的名称:{file_path.stem}")
    # 构造 pytest 框架的 Module
    py_module = Module.from_parent(parent, path=file_path)
    # 动态创建
    MyModule = types.ModuleType(file_path.stem)
    # 重写_getobj
    py_module._getobj = lambda: MyModule
    return py_module
步骤1:先通过Module 类构造pytest 框架的 Module 用例模块
构造 pytest 框架的 Module
py_module = Module.from_parent(parent, path=file_path)
由于是一个yaml 文件,它不是一个真正的py模块,Module 类里面有个 _getobj 方法是 import
python的模块,yaml 文件是不能import 的,所以我们需要重新 _getobj 方法
以下是Module 类相关源码
class Module(nodes.File, PyCollector):
  """Collector for test classes and functions."""
  def _getobj(self):
    return self._importtestmodule()
步骤2:yaml 文件如何变成 py模块?这是解决问题的关键点,其实很简单,我们自己动态构造一个模块
就行了,一句代码就能解决.
动态创建模块
MyModule = types.ModuleType('test_x')
步骤3:到这里问题解决了一半,yaml 文件已经被我们动态构造成了 pytest 框架的 Module。
接下来我们需要解决另外一个问题,通过 Module 构造生成 Function 用例。Function 用例不需要再用类似于 Function.from_parent(parent) 这种方式构建了,我们只需要
给 Module 模块对象添加test开头的函数,它就会自动变成用例。
def run_function(*args, **kwargs):
  print("执行测试用例-----")
  # 向 module 中加入test 函数
  setattr(MyModule, "test_run", run_function)
完整的 conftest.py 中代码如下:
from pytest import Function, Module
import types
 def pytest_collect_file(file_path, parent):
  # 查找test 开头的yaml 文件
  if file_path.suffix in [".yml", ".yaml"] and (file_path.name.startswith("test") or file_path.name
    print(f"yaml 文件的路径:{file_path}")
    print(f"yaml 文件的名称:{file_path.stem}")
    # 构造 pytest 框架的 Module
    py_module = Module.from_parent(parent, path=file_path)
    # 动态创建
    MyModule = types.ModuleType(file_path.stem)
    def run_function(*args, **kwargs):
    print("测试用例-----")
    # 向 module 中加入test 函数
    setattr(MyModule, "test_run", run_function)
    # 重写_getobj
    py_module._getobj = lambda: MyModule
    return py_module
然后我们随便写一个空的 test_x.yaml 文件,它都能执行了

到这里我们所做的事情就非常清晰了,把yaml 文件动态生成 python 的模块。并通过钩子函数方法构造成pytest 框架的 Module 对象。
yaml文件的内容暂时是写死的一个固定函数执行,下一篇讲读取yaml文件内容按关键字执行。