
This article will show you how to utilize Microsoft Visual Studio to compile and install the MongoDB C and C++ drivers on Windows, and use these drivers to create a console application that can interact with your MongoDB data by performing basic CRUD operations.
Tools and libraries used in this tutorial:
Tools and libraries used in this tutorial:
-
Microsoft Windows 11
-
Microsoft Visual Studio 2022 17.3.6
-
Language standard: C++17
-
MongoDB C Driver version: 1.23
-
MongoDB C++ Driver version: 3.7.0
-
boost: 1.80.0
-
Python: 3.10
-
CMake: 3.25.0
Prerequisites
-
MongoDB Atlas account with a cluster created.
-
(Optional) Sample dataset loaded into the Atlas cluster.
-
Your machine’s IP address is whitelisted. Note: You can add 0.0.0.0/0 as the IP address, which should allow access from any machine. This setting is not recommended for production use.
Installation: IDE and tools
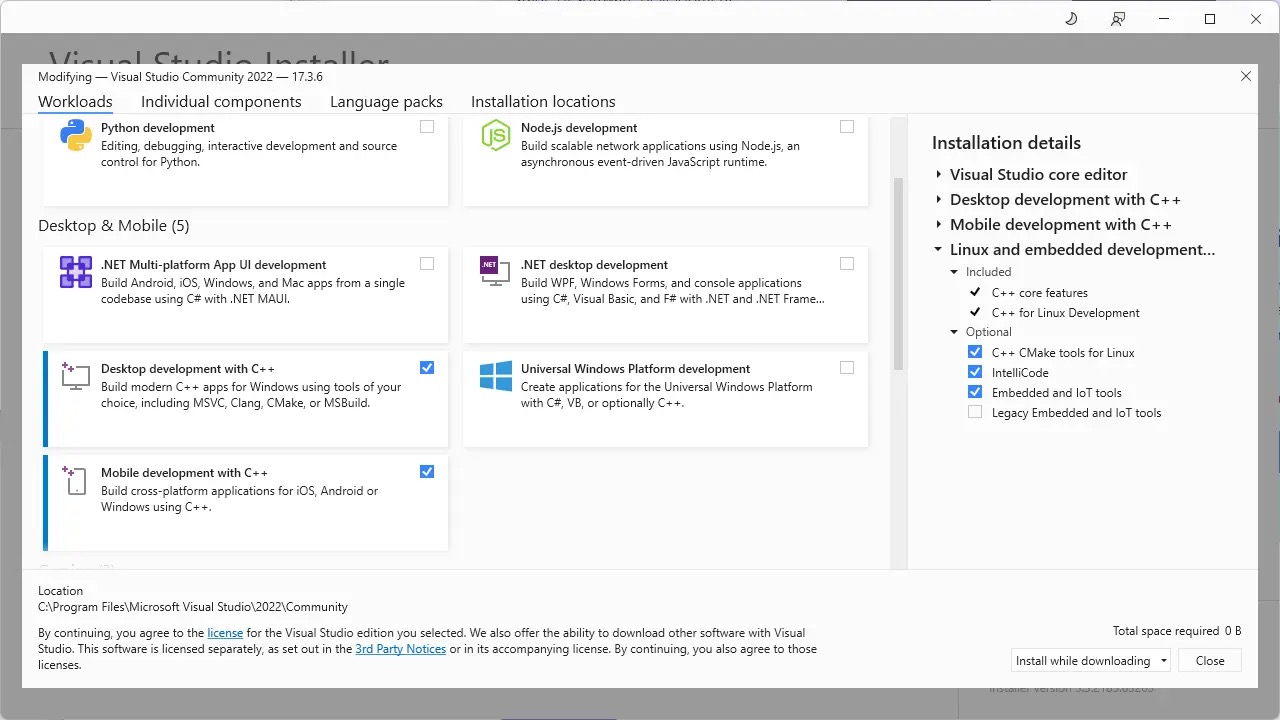
Step 1: Install Visual Studio: Download Visual Studio Tools - Install Free for Windows, Mac, Linux.
In the Workloads tab during installation, select “Desktop development with C++.”
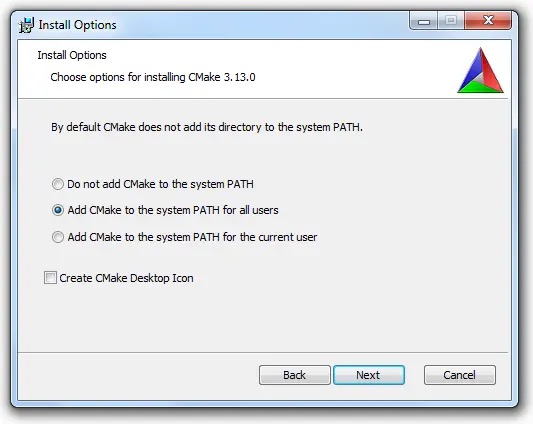
Step 2: Install CMake: Download | CMake
-
For simplicity, choose the installer.
-
In the setup, make sure to select “Add CMake to the system PATH for all users.” This enables the CMake executable to be easily accessible.
Step 3: Install Python 3: Download Python.
Step 4: (Optional) Download boost library from Boost Downloads and extract it to C:\boost.
Installation: Drivers
Detailed instructions and configurations available here:
Step 1: Install C Driver
C++ Driver has a dependency on C driver. Hence, we need to install C Driver first.
-
Download C Driver
-
Check compatibility at Windows - Installing the mongocxx driver for the driver to download.
-
Download release tarball — Releases · mongodb/mongo-c-driver — and extract it to C:\Repos\mongo-c-driver-1.23.0.
-
-
Setup build via CMake
-
Launch powershell/terminal as an administrator.
-
Navigate to C:\Repos\mongo-c-driver-1.23.0 and create a new folder named cmake-build for the build files.
-
Navigate to C: \Repos\mongo-c-driver-1.23.0\cmake-build.
-
Run the below command to configure and generate build files using CMake.
-
Code Snippet
cmake -G "Visual Studio 17 2022" -A x64 -S "C:\Repos\mongo-c-driver-1.23.0" -B "C:\Repos\mongo-c-driver-1.23.0\cmake-build"
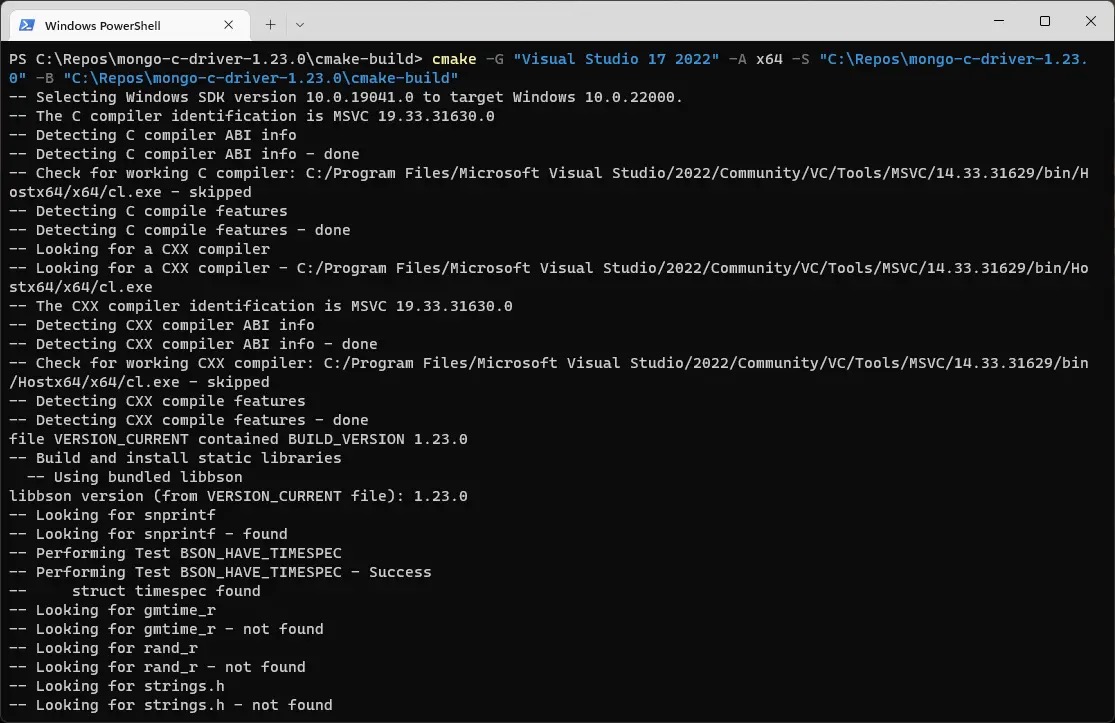
Note: Build setup can be done with the CMake GUI application, as well.
-
Execute build
-
Visual Studio’s default build type is Debug. A release build with debug info is recommended for production use.
-
Run the below command to build and install the driver
-
cmake --build . --config RelWithDebInfo --target install
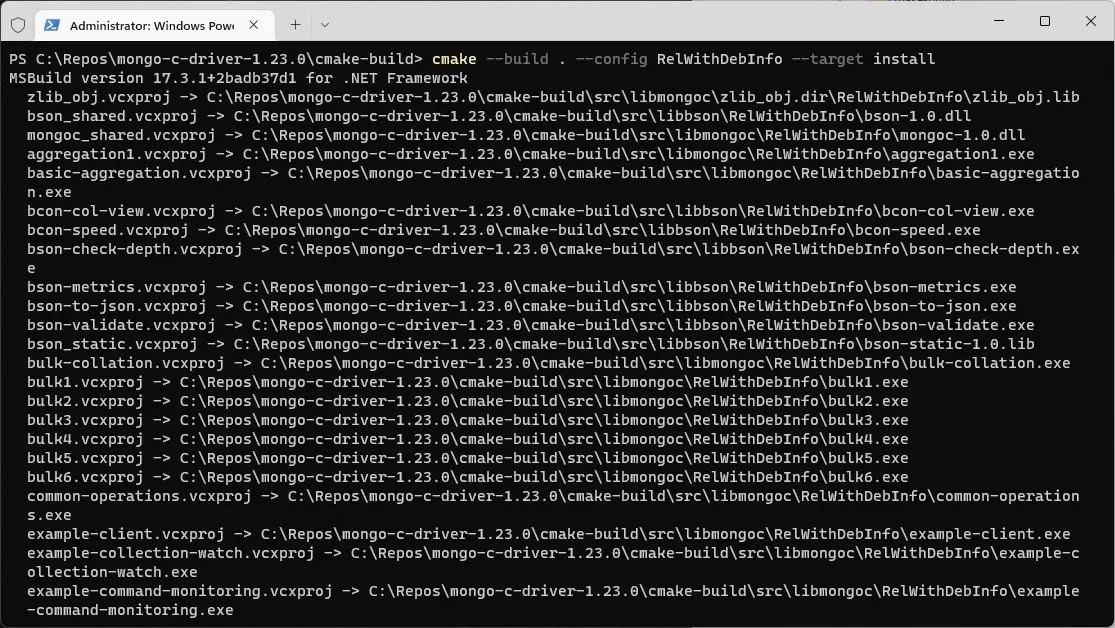
- You should now see libmongoc and libbson installed in C:/Program Files/mongo-c-driver.
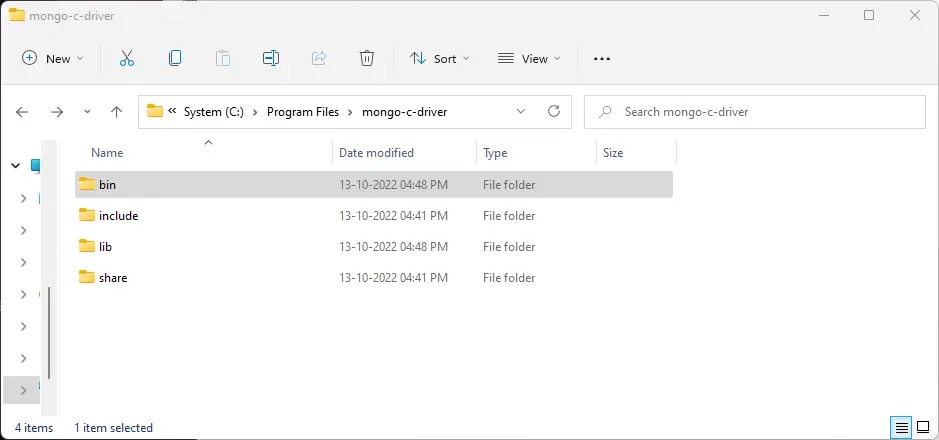
- Move the mongo-c-driver to C:/ for convenience. Hence, C Driver should now be present at C:/mongo-c-driver.
Step 2: Install C++ Driver
-
Download C++ Driver
- Download release tarball — Releases · mongodb/mongo-cxx-driver — and extract it to C:\Repos\mongo-cxx-driver-r3.7.0.
-
Set up build via CMake
-
Launch powershell/terminal as an administrator.
-
Navigate to C:\Repos\mongo-cxx-driver-r3.7.0\build.
-
Run the below command to generate and configure build files via CMake.
-
cmake .. -G "Visual Studio 17 2022" -A x64 -DCMAKE_CXX_STANDARD=17 -DCMAKE_CXX_FLAGS="/Zc:__cplusplus /EHsc" -DCMAKE_PREFIX_PATH=C:\mongo-c-driver -DCMAKE_INSTALL_PREFIX=C:\mongo-cxx-driver
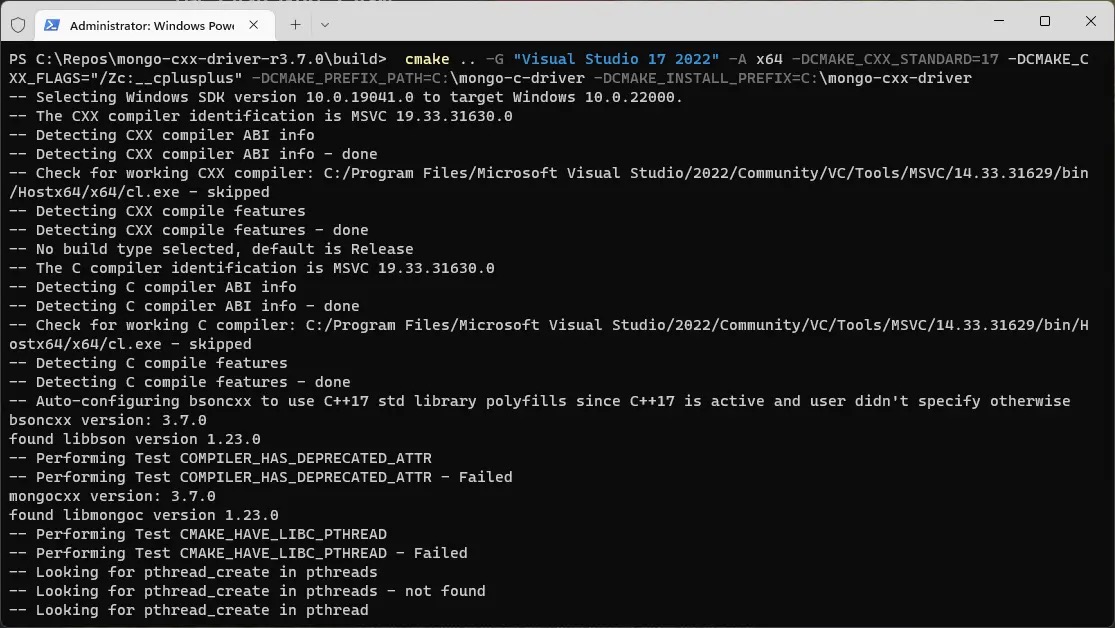
Note: Setting DCMAKE_CXX_FLAGS should not be required for C++ driver version 3.7.1 and above.
-
Execute build
- Run the below command to build and install the driver
cmake --build . --config RelWithDebInfo --target install
- You should now see C++ driver installed in C:\mongo-cxx-driver.
Visual Studio: Setting up the dev environment
-
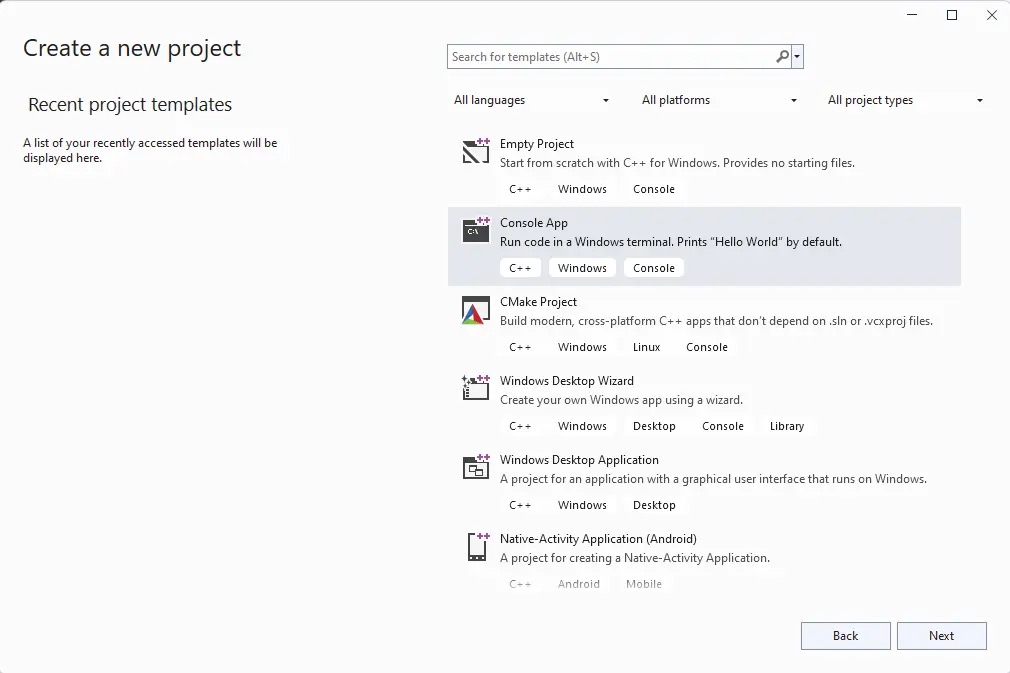
Create a new project in Visual Studio.
-
Select Console App in the templates.
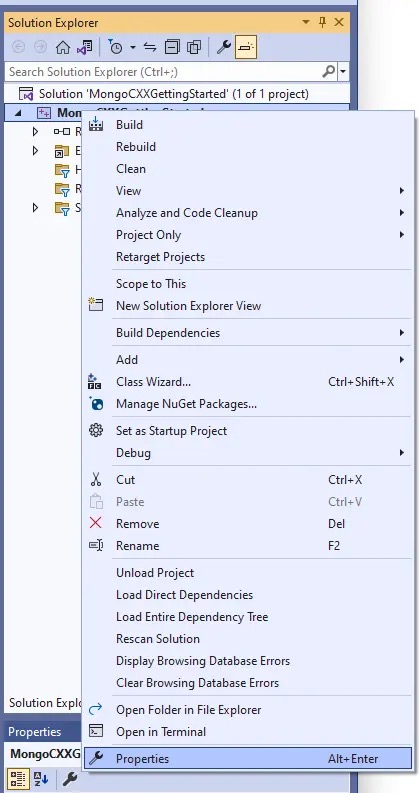
- Visual Studio should create a new project and open a .cpp file which prints “Hello World.” Navigate to the Solution Explorer panel, right-click on the solution name (MongoCXXGettingStarted, in this case), and click Properties.
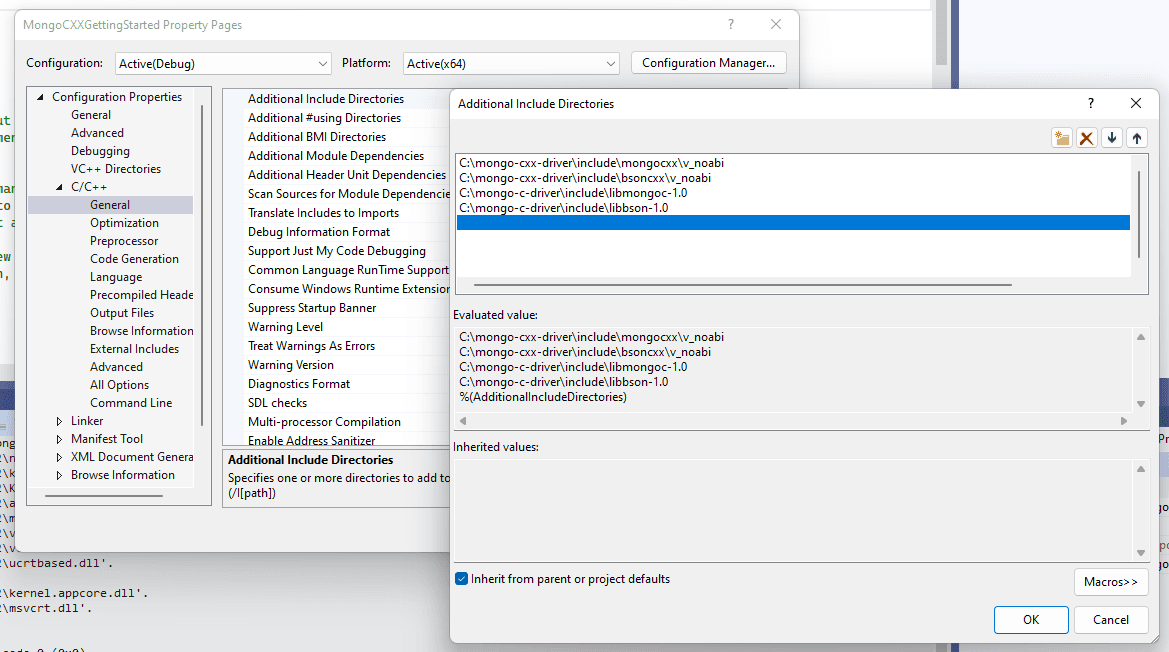
- Go to Configuration Properties > C/C++ > General > Additional Include Directories and add the include directories from the C and C++ driver installation folders, as shown below.
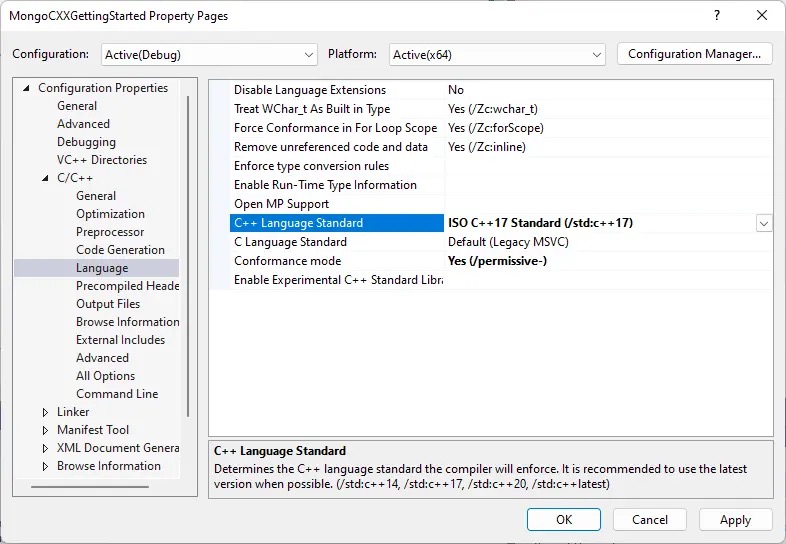
- Go to Configuration Properties > C/C++ > Language and change the C++ Language Standard to C++17.
-
Go to _Configuration Properties > C/C++ > Command Line_and add _/Zc:_cplusplus in the Additional Options field. This flag is needed to opt into the correct definition of __cplusplus.
-
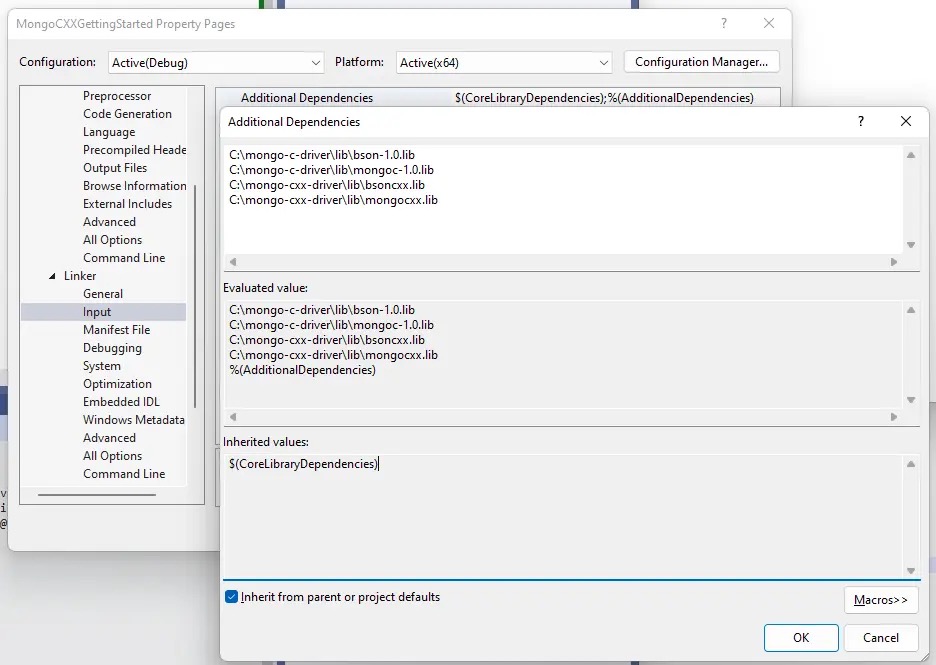
Go to Configuration Properties > Linker > Input and add the driver libs in Additional Dependencies section, as shown below.
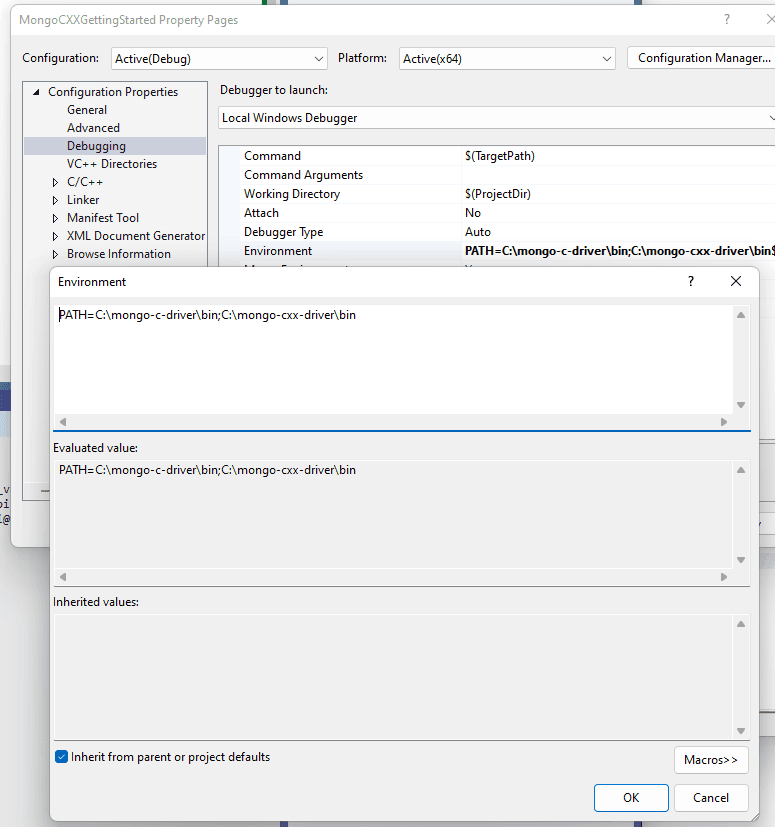
- Go to _Configuration Properties > Debugging > Environment_to add a path to the driver executables, as shown below.
Building the console application
Source available here
Let’s build an application that maintains student records. We will input student data from the user, save them in the database, and perform different CRUD operations on the database.
Connecting to the database
Let’s start with a simple program to connect to the MongoDB Atlas cluster and access the databases. Get the connection string (URI) to the cluster and create a new environment variable with key as “MONGODB_URI” and value as the connection string (URI). It’s a good practice to keep the connection string decoupled from the code.
Tip: Restart your machine after creating the environment variable in case the “getEnvironmentVariable” function fails to retrieve the environment variable.
#include <mongocxx/client.hpp>
#include <bsoncxx/builder/stream/document.hpp>
#include <bsoncxx/json.hpp>
#include <mongocxx/uri.hpp>
#include <mongocxx/instance.hpp>
#include <algorithm>
#include <iostream>
#include <vector>
using namespace std;
std::string getEnvironmentVariable(std::string environmentVarKey)
{
	char* pBuffer = nullptr;
	size_t size = 0;
	auto key = environmentVarKey.c_str();
	// Use the secure version of getenv, ie. _dupenv_s to fetch environment variable.
	if (_dupenv_s(&pBuffer, &size, key) == 0 && pBuffer != nullptr)
	{
		std::string environmentVarValue(pBuffer);
		free(pBuffer);
		return environmentVarValue;
	}
	else
	{
		return "";
	}
}
auto mongoURIStr = getEnvironmentVariable("MONGODB_URI");
static const mongocxx::uri mongoURI = mongocxx::uri{ mongoURIStr };
// Get all the databases from a given client.
vector<string> getDatabases(mongocxx::client& client)
{
	return client.list_database_names();
}
int main()
{
    // Create an instance.
    mongocxx::instance inst{};
    mongocxx::options::client client_options;
    auto api = mongocxx::options::server_api{ mongocxx::options::server_api::version::k_version_1 };
    client_options.server_api_opts(api);
    mongocxx::client conn{ mongoURI, client_options}
     auto dbs = getDatabases(conn);
     for (auto db : dbs)
     {
         cout << db << endl;
      }
      return 0;
}
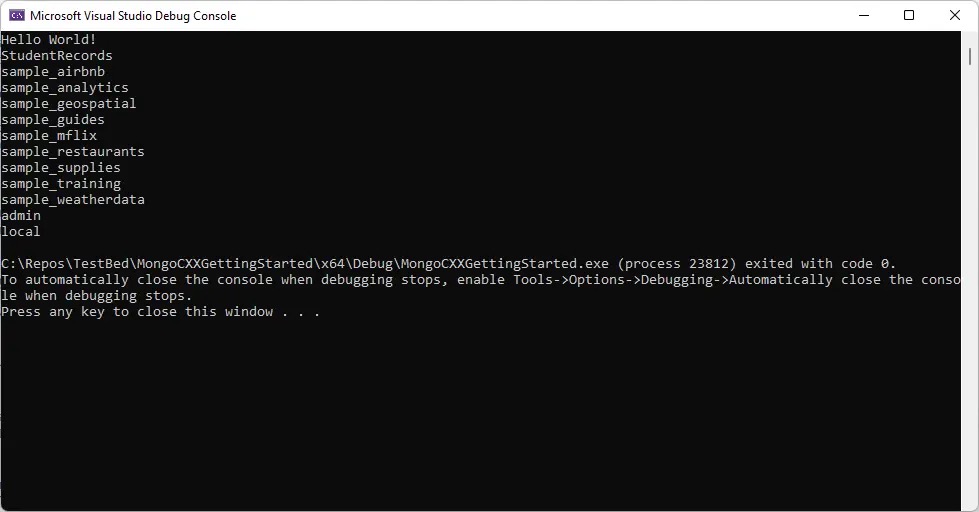
Click on “Launch Debugger” to launch the console application. The output should looks something like this:
CRUD operations
Since the database is successfully connected to our application, let’s write some helper functions to interact with the database, performing CRUD operations.
Create
// Create a new collection in the given database.
void createCollection(mongocxx::database& db, const string& collectionName)
{
	db.create_collection(collectionName);
}
// Create a document from the given key-value pairs.
bsoncxx::document::value createDocument(const vector<pair<string, string>>& keyValues)
{
	bsoncxx::builder::stream::document document{};
	for (auto& keyValue : keyValues)
	{
		document << keyValue.first << keyValue.second;
	}
	return document << bsoncxx::builder::stream::finalize;
}
// Insert a document into the given collection.
void insertDocument(mongocxx::collection& collection, const bsoncxx::document::value& document)
{
	collection.insert_one(document.view());
}
Read
// Print the contents of the given collection.
void printCollection(mongocxx::collection& collection)
{
	// Check if collection is empty.
	if (collection.count_documents({}) == 0)
	{
		cout << "Collection is empty." << endl;
		return;
	}
	auto cursor = collection.find({});
	for (auto&& doc : cursor)
	{
		cout << bsoncxx::to_json(doc) << endl;
	}
}
// Find the document with given key-value pair.
void findDocument(mongocxx::collection& collection, const string& key, const string& value)
{
	// Create the query filter
	auto filter = bsoncxx::builder::stream::document{} << key << value << bsoncxx::builder::stream::finalize;
	//Add query filter argument in find
	auto cursor = collection.find({ filter });
	for (auto&& doc : cursor)
	{
          cout << bsoncxx::to_json(doc) << endl;
	}
}
Update
// Update the document with given key-value pair.
void updateDocument(mongocxx::collection& collection, const string& key, const string& value, const string& newKey, const string& newValue)
{
	collection.update_one(bsoncxx::builder::stream::document{} << key << value << bsoncxx::builder::stream::finalize,
		bsoncxx::builder::stream::document{} << "$set" << bsoncxx::builder::stream::open_document << newKey << newValue << bsoncxx::builder::stream::close_document << bsoncxx::builder::stream::finalize);
}
Delete
// Delete a document from a given collection.
void deleteDocument(mongocxx::collection& collection, const bsoncxx::document::value& document)
{
	collection.delete_one(document.view());
}
The main() function
With all the helper functions in place, let’s create a menu in the main function which we can use to interact with the application.
// ********************************************** I/O Methods **********************************************
// Input student record.
void inputStudentRecord(mongocxx::collection& collection)
{
	string name, rollNo, branch, year;
	cout << "Enter name: ";
	cin >> name;
	cout << "Enter roll number: ";
	cin >> rollNo;
	cout << "Enter branch: ";
	cin >> branch;
	cout << "Enter year: ";
	cin >> year;
	insertDocument(collection, createDocument({ {"name", name}, {"rollNo", rollNo}, {"branch", branch}, {"year", year} }));
}
// Update student record.
void updateStudentRecord(mongocxx::collection& collection)
{
	string rollNo, newBranch, newYear;
	cout << "Enter roll number: ";
	cin >> rollNo;
	cout << "Enter new branch: ";
	cin >> newBranch;
	cout << "Enter new year: ";
	cin >> newYear;
	updateDocument(collection, "rollNo", rollNo, "branch", newBranch);
	updateDocument(collection, "rollNo", rollNo, "year", newYear);
}
// Find student record.
void findStudentRecord(mongocxx::collection& collection)
{
	string rollNo;
	cout << "Enter roll number: ";
	cin >> rollNo;
	findDocument(collection, "rollNo", rollNo);
}
// Delete student record.
void deleteStudentRecord(mongocxx::collection& collection)
{
	string rollNo;
	cout << "Enter roll number: ";
	cin >> rollNo;
	deleteDocument(collection, createDocument({ {"rollNo", rollNo} }));
}
// Print student records.
void printStudentRecords(mongocxx::collection& collection)
{
	printCollection(collection);
}
// ********************************************** Main **********************************************
int main()
{
     if(mongoURI.to_string().empty())
    {
	cout << "URI is empty";
	return 0;
    }
    // Create an instance.
    mongocxx::instance inst{};
    mongocxx::options::client client_options;
    auto api = mongocxx::options::server_api{ mongocxx::options::server_api::version::k_version_1 };
    client_options.server_api_opts(api);
    mongocxx::client conn{ mongoURI, client_options};
	const string dbName = "StudentRecords";
	const string collName = "StudentCollection";
	auto dbs = getDatabases(conn);
	// Check if database already exists.
	if (!(std::find(dbs.begin(), dbs.end(), dbName) != dbs.end()))
	{
		// Create a new database & collection for students.
conn[dbName];
	}
	auto studentDB = conn.database(dbName);
	auto allCollections = studentDB.list_collection_names();
	// Check if collection already exists.
	if (!(std::find(allCollections.begin(), allCollections.end(), collName) != allCollections.end()))
	{
		createCollection(studentDB, collName);
	}
	auto studentCollection = studentDB.collection(collName);
	// Create a menu for user interaction
	 int choice = -1;
	 do while (choice != 0)
	 {
		 //system("cls");
		 cout << endl << "**************************************************************************************************************" << endl;
		 cout << "Enter 1 to input student record" << endl;
		 cout << "Enter 2 to update student record" << endl;
		 cout << "Enter 3 to find student record" << endl;
		 cout << "Enter 4 to delete student record" << endl;
		 cout << "Enter 5 to print all student records" << endl;
		 cout << "Enter 0 to exit" << endl;
		 cout << "Enter Choice : ";
		 cin >> choice;
		 cout << endl;
		 switch (choice)
		 {
		 case 1:
			 inputStudentRecord(studentCollection);
			 break;
		 case 2:
			 updateStudentRecord(studentCollection);
			 break;
		 case 3:
			 findStudentRecord(studentCollection);
			 break;
		 case 4:
			 deleteStudentRecord(studentCollection);
			 break;
		 case 5:
			 printStudentRecords(studentCollection);
			 break;
		 case 0:
			 break;
		 default:
			 cout << "Invalid choice" << endl;
			 break;
		 }
	 } while (choice != 0);
	 return 0;
}
Application in action
When this application is executed, you can manage the student records via the console interface. Here’s a demo:
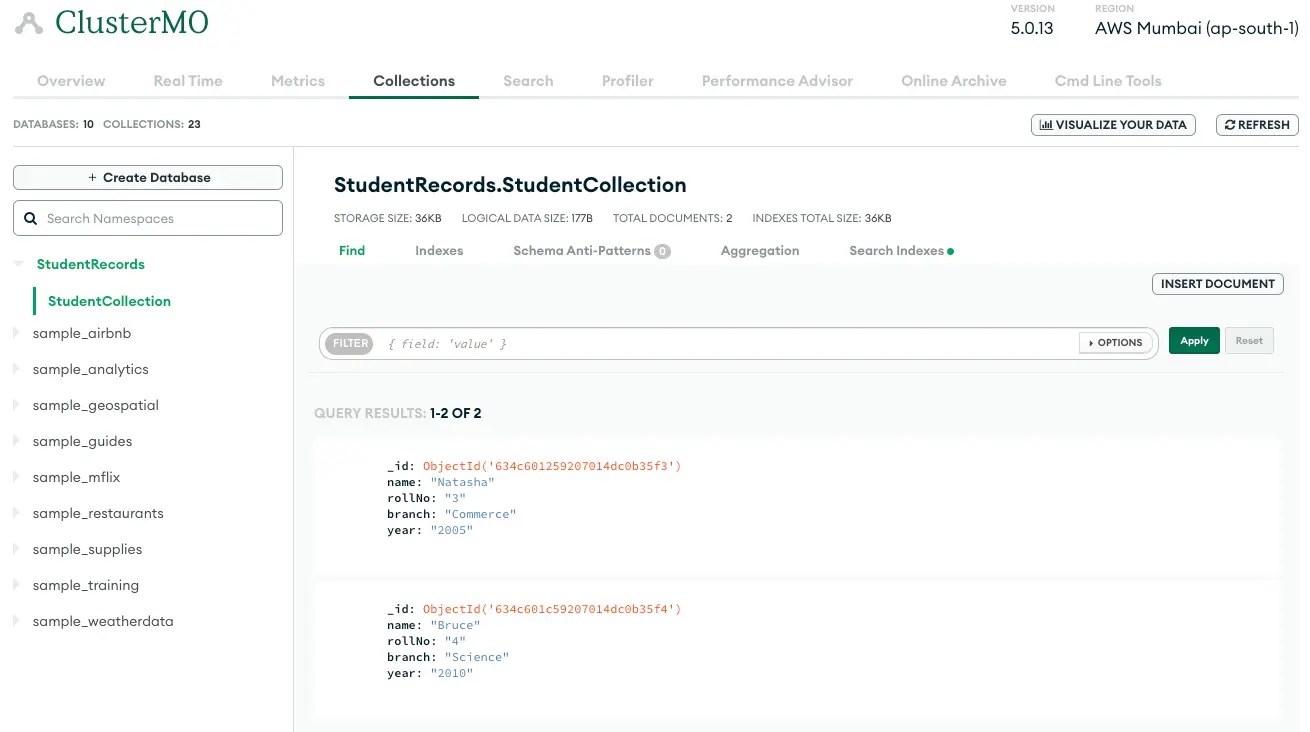
You can also see the collection in Atlas reflecting any change made via the console application.
Wrapping up
With this article, we covered installation of C/C++ driver and creating a console application in Visual Studio that connects to MongoDB Atlas to perform basic CRUD operations.
More information about the C++ driver is available at MongoDB C++ Driver.