x86开机
参考于:【哈工大】操作系统 李治军、linux-0.11源码。
需要读入执行的内容有:boot扇区中的bootsect、setup和system。源文件处于启动盘中排在前面扇区:

上电时
刚开机时处于实模式。CS=0xFFFF、IP=0x0000。寻址0xFFFF0(ROM BIOS映射区)。这里执行检查RAM、键盘、显示器、软硬磁盘,并将引导扇区(磁盘0磁道0扇区)读入0x7C00处。然后设置CS=0x07C0、IP=0x0000。执行载入的引导扇区代码。
以下代码只列出了部分。
bootsect.s
SYSSIZE = 0x3000 ! system模块大小

SETUPLEN = 4				! setup扇区数
BOOTSEG  = 0x07c0			! bootsector原始地址
INITSEG  = 0x9000			! bootsector移动的目标地址
SETUPSEG = 0x9020			! setup地址
SYSSEG   = 0x1000			! system加载位置
ENDSEG   = SYSSEG + SYSSIZE		! where to stop loading

entry _start				! 程序入口为_start
首先,_start函数将0x07C00下的bootsect复制到0x90000后,目的是腾出空间给OS中的system模块。然后跳转到该地址执行go:
_start:

! 初始化DS、ES、SI、DI,并把CX设置为扇区大小。
	mov	ax,#BOOTSEG
	mov	ds,ax
	mov	ax,#INITSEG
	mov	es,ax
	mov	cx,#256
	sub	si,si
	sub	di,di

! 复制DS:SI内容到ES:DI,即bootsect的256字(512字节)。
	rep
	movw

! IP置go,CS置INITSEG,并跳转执行。
	jmpi	go,INITSEG
bootsect扇区后紧临的4个扇区是setup,需要将其读入到SETUPSEG(load_setup),然后打印信息,加载system到0x10000(临时放置的地址,在setup中会被移动到0x0处):
go:	mov	ax,cs
	mov	ds,ax
	mov	es,ax
	mov	ss,ax
	mov	sp,#0xFF00		! arbitrary value >>512

! 读入setup的4个扇区。0x13是BIOS读磁盘扇区的中断,AH=0x02读磁盘,AL=0x04扇区数,CH=0x00柱面号,CL=0x02开始扇区,DH=0x00磁头号,DL=0x00驱动器号,ES:BX=0x90200内存地址。
load_setup:
	mov	dx,#0x0000
	mov	cx,#0x0002
	mov	bx,#0x0200
	mov	ax,#0x0200+SETUPLEN
	int	0x13
	jnc	ok_load_setup		! ok - continue
	mov	dx,#0x0000
	mov	ax,#0x0000		! reset the diskette
	int	0x13
	j	load_setup

ok_load_setup:
! 获取磁盘驱动器参数,特别是扇区/磁道数。
	mov	dl,#0x00
	mov	ax,#0x0800		! AH=8 is get drive parameters
	int	0x13
	mov	ch,#0x00
	seg cs
	mov	sectors,cx
	mov	ax,#INITSEG
	mov	es,ax

! 打印一些信息,0x10是BIOS的显示字符中断,BP指出字符地址。
	mov	ah,#0x03		! read cursor pos
	xor	bh,bh
	int	0x10
	mov	cx,#24
	mov	bx,#0x0007		! page 0, attribute 7 (normal)
	mov	bp,#msg1
	mov	ax,#0x1301		! write string, move cursor
	int	0x10

! 使用read_it读入system。
	mov	ax,#SYSSEG
	mov	es,ax		! segment of 0x010000
	call	read_it
...
! 跳转到0x9020:0x0000执行setup。
	jmpi	0,SETUPSEG
...
msg1:
	.byte 13,10
	.ascii "Loading system ..."
	.byte 13,10,13,10
setup.s
setup将完成OS启动前的设置。
INITSEG  = 0x9000	! we move boot here - out of the way
SYSSEG   = 0x1000	! system loaded at 0x10000 (65536).
SETUPSEG = 0x9020	! this is the current segment

entry start
start先设置一些信息,除了下面的光标地址、内存大小,还有显卡参数(0x9000C)、根设备号(0x901FC)等。
start:
! 使用BIOS的0x10中断,取出光标地址放在0x90000处。
	mov	ax,#INITSEG	! this is done in bootsect already, but...
	mov	ds,ax
	mov	ah,#0x03	! read cursor pos
	xor	bh,bh
	int	0x10		! save it in known place, con_init fetches
	mov	[0],dx		! it from 0x90000.

! 使用BIOS的0x15中断,取出内存大小放在0x90002处。
	mov	ah,#0x88
	int	0x15
	mov	[2],ax
...
然后,进入保护模式(开机时是实模式):
! now we want to move to protected mode ...

	cli				! 不允许中断

! 首先,把system移动到真实的地址0x00000处。
	mov	ax,#0x0000
	cld			! 'direction'=0, movs moves forward
do_move:
	mov	es,ax		! ES置0x0000
	add	ax,#0x1000
	cmp	ax,#0x9000
	jz	end_move
	mov	ds,ax		! DS置0x1000
	sub	di,di
	sub	si,si
	mov cx,#0x8000	! 移动大小为0x8000字节
	rep
	movsw
	jmp	do_move

! 然后,加载段描述符。
end_move:
	mov	ax,#SETUPSEG	! right, forgot this at first. didn't work :-)
	mov	ds,ax
	lidt	idt_48		! load idt with 0,0
	lgdt	gdt_48		! load gdt with whatever appropriate

! 启动A20总线。
	call	empty_8042
	mov	al,#0xD1		! command write
	out	#0x64,al
	call	empty_8042
	mov	al,#0xDF		! A20 on
	out	#0x60,al
	call	empty_8042

! 重新编程中断。
...

! 最终,设置保护模式。这里将CR0的PE置1,然后使用jumpi指令,IP置0,CS根据gdt表获取,8指定之下为0,即跳转到0x00000000处,也就是system处执行。
	mov	ax,#0x0001	! protected mode (PE) bit
	lmsw	ax		! This is it!
	jmpi	0,8		! jmp offset 0 of segment 8 (cs)
! This routine checks that the keyboard command queue is empty
! No timeout is used - if this hangs there is something wrong with
! the machine, and we probably couldn't proceed anyway.
empty_8042:
	.word	0x00eb,0x00eb
	in	al,#0x64	! 8042 status port
	test	al,#2		! is input buffer full?
	jnz	empty_8042	! yes - loop
	ret

gdt:
	.word	0,0,0,0		! dummy

	.word	0x07FF		! 8Mb - limit=2047 (2048*4096=8Mb)
	.word	0x0000		! base address=0
	.word	0x9A00		! code read/exec
	.word	0x00C0		! granularity=4096, 386

	.word	0x07FF		! 8Mb - limit=2047 (2048*4096=8Mb)
	.word	0x0000		! base address=0
	.word	0x9200		! data read/write
	.word	0x00C0		! granularity=4096, 386

idt_48:
	.word	0			! idt limit=0
	.word	0,0			! idt base=0L

gdt_48:
	.word	0x800		! gdt limit=2048, 256 GDT entries
	.word	512+gdt,0x9	! gdt base = 0X9xxxx
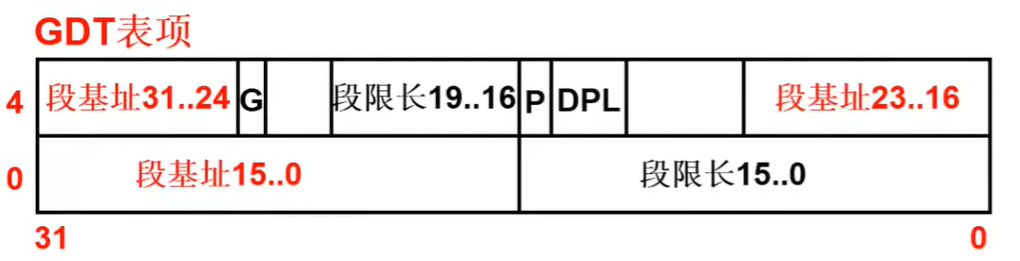
GDT表项格式如下,在jumpi 0,8中,CS选择子为8,查gdt表项对应0x07FF、0x0000、0x9A00、0x00C0,放入表项,对应的段基址为0。
system
system模块由许多文件编译而成,第一部分是head.s。
head.s
startup_32:
	# 指向gdt的0x10项(数据段)
	movl $0x10,%eax
	mov %ax,%ds
	mov %ax,%es
	mov %ax,%fs
	mov %ax,%gs
	# 设置系统栈
	lss stack_start,%esp
	# 这里又一次设置了idt和gdt表,setup中设置idt和gdi表的目的只是用于跳转到system模块执行,而system中执行需要新的idt和gdt表。
	call setup_idt
	call setup_gdt
...
	jmp after_page_tables
调用setup_paging来设置页表,RET后,执行main函数,前面压栈的是3个main的参数,为0。还压入了L6这个死循环函数,但main函数永远不会退出,所以L6永远不会执行。
after_page_tables:
	pushl $0		# These are the parameters to main :-)
	pushl $0
	pushl $0
	pushl $L6		# return address for main, if it decides to.
	pushl $main		# main函数压栈。
	jmp setup_paging # 设置页表.
L6:
	jmp L6
...
main.c
mem_init(main_memory_start,memory_end); // 主内存区初始化。mm/memory.c
trap_init();                            // 陷阱门(硬件中断向量)初始化,kernel/traps.c
blk_dev_init();                         // 块设备初始化,kernel/blk_drv/ll_rw_blk.c
chr_dev_init();                         // 字符设备初始化, kernel/chr_drv/tty_io.c
tty_init();                             // tty初始化, kernel/chr_drv/tty_io.c
time_init();                            // 设置开机启动时间 startup_time
sched_init();                           // 调度程序初始化(加载任务0的tr,ldtr)(kernel/sched.c)
// 缓冲管理初始化,建内存链表等。(fs/buffer.c)
buffer_init(buffer_memory_end);
hd_init();                              // 硬盘初始化,kernel/blk_drv/hd.c
floppy_init();                          // 软驱初始化,kernel/blk_drv/floppy.c
sti();                                  // 所有初始化工作都做完了,开启中断
// 下面过程通过在堆栈中设置的参数,利用中断返回指令启动任务0执行。
move_to_user_mode();                    // 移到用户模式下执行
if (!fork()) {		/* we count on this going ok */
    init();                             // 在新建的子进程(任务1)中执行。
}