1、创建EXCEL的方法
首先创建 Excel 对象,使用单元ComObj :
Var
  ExcelApp : Variant ;
begin
  ExcelApp := CreateOleObject ( '' Excel.Application '' ) ;
使用OLEOBJECT创建的EXCEL应用程序是一个Variant类型,所以DELPHI不能自动补充语句,也没有帮助文件,需要到visual basic中去寻求帮助,完成功能语句的调用。
下面的部分都是引用别人的内容:
使用oleobject创建的excel有许多优点:
l 不需要安装OFFICE控件
l 打开、保存等等更简单,可以省略参数的输入
但也有明显的缺点
l 不能自动填充代码
l 不能使用with do语句
l 需要手动关闭创建的office。
下面是一些关于oleobject的功能说明。
1 ) 显示当前窗口:
ExcelApp.Visible := True ;
2 ) 更改 Excel 标题栏:
ExcelApp.Caption := '' 应用程序调用 Microsoft Excel '' ;
3 ) 添加新工作簿:
ExcelApp.WorkBooks.Add ;
当然也可以定义一个变量OLEEXCELWB: Variant,
然后:OLEEXCELWB:= ExcelApp.WorkBooks.Add;则OLEEXCELWB就是新建的workbook;
4 ) 打开已存在的工作簿:
ExcelApp.WorkBooks.Open ( '' C : \Excel\Demo.xls '' ) ;
5 ) 设置第2个工作表为活动工作表:
ExcelApp.WorkSheets [ 2 ] .Activate ;
或
ExcelApp.WorksSheets [ '' Sheet2 '' ] .Activate ;
6 ) 给单元格赋值:
ExcelApp.Cells [ 1 , 4 ] .Value := '' 第一行第四列 '' ;
7 ) 设置指定列的宽度(单位:字符个数),以第一列为例:
ExcelApp.ActiveSheet.Columns [ 1 ] .ColumnsWidth := 5 ;
8 ) 设置指定行的高度(单位:磅)(1磅=0.035 厘米),以第二行为例:
ExcelApp.ActiveSheet.Rows [ 2 ] .RowHeight := 1 / 0.035 ; // 1厘米
9 ) 在第8行之前插入分页符:
ExcelApp.WorkSheets [ 1 ] .Rows [ 8 ] .PageBreak := 1 ;
10 ) 在第8列之前删除分页符:
ExcelApp.ActiveSheet.Columns [ 4 ] .PageBreak := 0 ;
11 ) 指定边框线宽度:
ExcelApp.ActiveSheet.Range [ '' B3 : D4 '' ] .Borders [ 2 ] .Weight := 3 ;
1 - 左 2 - 右 3 - 顶 4 - 底 5 - 斜 ( \ ) 6 - 斜 ( / ) ,7-10指的是range边框
12 ) 清除第一行第四列单元格公式:
ExcelApp.ActiveSheet.Cells [ 1 , 4 ] .ClearContents ;
13 ) 设置第一行字体属性:
ExcelApp.ActiveSheet.Rows [ 1 ] .Font.Name := '' 隶书 '' ;
ExcelApp.ActiveSheet.Rows [ 1 ] .Font.Color := clBlue ;
ExcelApp.ActiveSheet.Rows [ 1 ] .Font.Bold := True ;
ExcelApp.ActiveSheet.Rows [ 1 ] .Font.UnderLine := True ;
14 ) 进行页面设置:
a.页眉:
ExcelApp.ActiveSheet.PageSetup.CenterHeader := '' 报表演示 '' ;
b.页脚:
ExcelApp.ActiveSheet.PageSetup.CenterFooter := '' 第&P页 '' ;
c.页眉到顶端边距2cm:
ExcelApp.ActiveSheet.PageSetup.HeaderMargin := 2 / 0.035 ;
d.页脚到底端边距3cm:
ExcelApp.ActiveSheet.PageSetup.HeaderMargin := 3 / 0.035 ;
e.顶边距2cm:
ExcelApp.ActiveSheet.PageSetup.TopMargin := 2 / 0.035 ;
f.底边距2cm:
ExcelApp.ActiveSheet.PageSetup.BottomMargin := 2 / 0.035 ;
g.左边距2cm:
ExcelApp.ActiveSheet.PageSetup.LeftMargin := 2 / 0.035 ;
h.右边距2cm:
ExcelApp.ActiveSheet.PageSetup.RightMargin := 2 / 0.035 ;
i.页面水平居中:
ExcelApp.ActiveSheet.PageSetup.CenterHorizontally := 2 / 0.035 ;
j.页面垂直居中:
ExcelApp.ActiveSheet.PageSetup.CenterVertically := 2 / 0.035 ;
k.打印单元格网线:
ExcelApp.ActiveSheet.PageSetup.PrintGridLines := True ;
15 ) 拷贝操作:
a.拷贝整个工作表:
ExcelApp.ActiveSheet.Used.Range.Copy ;
b.拷贝指定区域:
ExcelApp.ActiveSheet.Range [ '' A1 : E2 '' ] .Copy ;
c.从A1位置开始粘贴:
ExcelApp.ActiveSheet.Range. [ '' A1 '' ] .PasteSpecial ;
d.从文件尾部开始粘贴:
ExcelApp.ActiveSheet.Range.PasteSpecial ;
16 ) 插入一行或一列:
a.ExcelApp.ActiveSheet.Rows [ 2 ] .Insert ;
b.ExcelApp.ActiveSheet.Columns [ 1 ] .Insert ;
17 ) 删除一行或一列:
a.ExcelApp.ActiveSheet.Rows [ 2 ] .Delete ;
b.ExcelApp.ActiveSheet.Columns [ 1 ] .Delete ;
18 ) 打印预览工作表:
ExcelApp.ActiveSheet.PrintPreview ;
19 ) 打印输出工作表:
ExcelApp.ActiveSheet.PrintOut ;
20 ) 工作表保存:
If Not ExcelApp.ActiveWorkBook.Saved Then
ExcelApp.ActiveSheet.PrintPreview ;
21 ) 工作表另存为:
ExcelApp.ActiveWorkBook.SaveAs ( '' C : \Excel\Demo1.xls '' ) ;
22 ) 放弃存盘:
ExcelApp.ActiveWorkBook.Saved := True ;
23 ) 关闭工作簿:
ExcelApp.WorkBooks.Close ;
24 ) 退出 Excel:
ExcelApp.Quit ;
上面部分引用了别人的内容,都是在网上找的,如有冒犯,敬请指出,本人将尽快予以改正。
2、使用DELPHI定义的office类型
DELPHI定义了excelworkbook,excelworksheet等OFFICE类型,使用这些类型则可以自动填充代码,也可以使用with do语句。
需要应用单元:ExcelXP
下面的语句,就是此应用:
var oleobj:Variant; i,j:Integer;
    es:ExcelWorksheet;
begin
  oleobj:=CreateOleObject('Excel.Application');
  oleobj.Visible:=true;
  oleobj.DisplayAlerts:=False;
  oleobj.workbooks.add;
  es:=iunknown(oleobj.Workbooks[1].Worksheets[2]) as ExcelWorksheet;
  with es.Range['B2','G11'] DO
  for I := 1 to 10 do
    for j := 1 to 5 do
      ITEM[i,J]:=Format('%d行,%d列',[i,j]);
  oleobj.cells[1,2].value:='only a test';
  oleobj.activeworkbook.saveas('d:\abc.xls',TRUE);
运行结果:
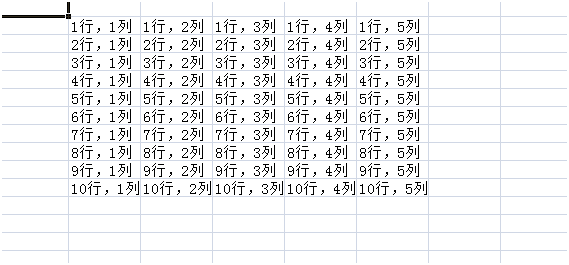
为什么oleobj.cells[1,2].value:='only a test';没有修改第一行,第二列的内容呢?
因为实际上该语句得到了很好地执行,但activesheet是sheet1,所以修改的sheet1的内容。
实际上,我们的delphi在安装OFFICE控件后,每次重新启动DELPHI,安装好的DELPHI控件需要手动引入,但单元“ExcelXP”即便不引入OFFIECE控件也可直接引用。
把variant类型的数据转换为DELPHI定义的excel类型的关键是使用iunknown进行转换。除此之外,就没有什么特殊的了。