前言
我们都知道可以使用SpringBoot快速的开发基于Spring框架的项目。由于围绕SpringBoot存在很多开箱即用的Starter依赖,使得我们在开发业务代码时能够非常方便的、不需要过多关注框架的配置,而只需要关注业务即可。
例如我想要在SpringBoot项目中集成Redis,那么我只需要加入spring-data-redis-starter的依赖,并简单配置一下连接信息以及Jedis连接池配置就可以。这为我们省去了之前很多的配置操作。甚至有些功能的开启只需要在启动类或配置类上增加一个注解即可完成。
那么如果我们想要自己实现自己的Starter需要做些什么呢?下面就开始介绍如何实现自己的SpringBoot-xxx-starter。
原理
首先说说原理,我们知道使用一个公用的starter的时候,只需要将相应的依赖添加的Maven的配置文件当中即可,免去了自己需要引用很多依赖类,并且SpringBoot会自动进行类的自动配置。那么 SpringBoot 是如何知道要实例化哪些类,并进行自动配置的呢? 下面简单说一下。
首先,SpringBoot 在启动时会去依赖的starter包中寻找 resources/META-INF/spring.factories 文件,然后根据文件中配置的Jar包去扫描项目所依赖的Jar包,这类似于 Java 的 SPI 机制。
第二步,根据 spring.factories配置加载AutoConfigure类。
最后,根据 @Conditional注解的条件,进行自动配置并将Bean注入Spring Context 上下文当中。
我们也可以使用@ImportAutoConfiguration({MyServiceAutoConfiguration.class}) 指定自动配置哪些类。
实现
终于到了代码实现的步骤,接下来就开始编码我们自己的SpringBoot-starter。
第一步创建一个SpringBoot 项目,并添加下面两个依赖到pom.xml文件当中
<dependencies>
    <dependency>
        <groupId>org.springframework.boot</groupId>
        <artifactId>spring-boot-configuration-processor</artifactId>
        <optional>true</optional>
    </dependency>
    <dependency>
        <groupId>org.springframework.boot</groupId>
        <artifactId>spring-boot-autoconfigure</artifactId>
    </dependency>
</dependencies>
其中 spring-boot-configuration-processor 的作用是编译时生成 spring-configuration-metadata.json ,此文件主要给IDE使用。如当配置此jar相关配置属性在 application.yml ,你可以用ctlr+鼠标左键点击属性名,IDE会跳转到你配置此属性的类中。
我们日常使用的Spring官方的Starter一般采取spring-boot-starter-{name} 的命名方式,如 spring-boot-starter-web 。
而非官方的Starter,官方建议 artifactId 命名应遵循{name}-spring-boot-starter 的格式。 例如:ysc-spring-boot-starter 。
<groupId>com.ysc</groupId>
<artifactId>simple-spring-boot-starter</artifactId>
<version>1.0.0-SNAPSHOT</version>
<packaging>jar</packaging>
第二步编写我们的Service类
这里讲一下我们的Starter要实现的功能,很简单,提供一个Service,包含一个能够将配置文件中配置的字符串根据传入的字符进行分割的方法String[] split(String separatorChar)。
public class StarterService {
    private String config;

    public StarterService(String config) {
        this.config = config;
    }

    public String[] split(String separatorChar) {
        return StringUtils.split(this.config, separatorChar);
    }

}
第三步编写配置文件读取类
@ConfigurationProperties("example.service")
public class StarterServiceProperties {
    private String config;

    public void setConfig(String config) {
        this.config = config;
    }

    public String getConfig() {
        return config;
    }
}第四步,编写AutoConfigure类 ,这步是关键点
@Configuration

@EnableConfigurationProperties(StarterServiceProperties.class)//如果需要在@Configuration文件中使用到某个Properties,就得使用该注解
public class StarterAutoConfigure {

    @Autowired
    private StarterServiceProperties properties;

    @Bean
    @ConditionalOnMissingBean
    @ConditionalOnProperty(prefix = "example.service", value = "enabled", havingValue = "true")
    StarterService starterService (){
        return new StarterService(properties.getConfig());
    }

}
解释一下代码中用到的几个注解:
@ConditionalOnClass,当classpath下发现该类的情况下进行自动配置。@ConditionalOnMissingBean,当Spring Context中不存在该Bean时。@ConditionalOnProperty(prefix = "example.service",value = "enabled",havingValue = "true"),当配置文件中example.service.enabled=true时。
下面列举SpringBoot中的所有@Conditional注解及作用
@ConditionalOnBean:当容器中有指定的Bean的条件下
@ConditionalOnClass:当类路径下有指定的类的条件下
@ConditionalOnExpression:基于SpEL表达式作为判断条件
@ConditionalOnJava:基于JVM版本作为判断条件
@ConditionalOnJndi:在JNDI存在的条件下查找指定的位置
@ConditionalOnMissingBean:当容器中没有指定Bean的情况下
@ConditionalOnMissingClass:当类路径下没有指定的类的条件下
@ConditionalOnNotWebApplication:当前项目不是Web项目的条件下
@ConditionalOnProperty:指定的属性是否有指定的值
@ConditionalOnResource:类路径下是否有指定的资源
@ConditionalOnSingleCandidate:当指定的Bean在容器中只有一个,或者在有多个Bean的情况下,用来指定首选的Bean @ConditionalOnWebApplication:当前项目是Web项目的条件下 最后一步,在resources/META-INF/下创建spring.factories文件,并添加如下内容:
org.springframework.boot.autoconfigure.EnableAutoConfiguration=com.example.autocinfigure.StarterAutoConfigure至此,我们的一个Starter代码部分就是完成了,下面将项目安装到本地Maven仓库中。
发布
1.在项目根目录执行 mvn install 进行打包安装。
2. 在cmd 下执行 mvn install:install-file -Dfile=D:\project\ simple-spring-boot-starter \target\ simple-spring-boot-starter-1.0-SNAPSHOT -DgroupId= com.ysc -DartifactId= simple-spring-boot-starter -Dversion= 1.0-SNAPSHOT -Dpackaging=jar
测试
将Starter项目的依赖添加到我们自己的SpringBoot项目中
<dependency>
    <groupId>com.ysc</groupId>
    <artifactId>simple-spring-boot-starter</artifactId>
    <version>1.0-SNAPSHOT</version>
</dependency>在application.yml 配置文件中添加配置信息:
example
  service
    enabled: true
config: abc-des-dde,SSS-DRS-RE,SDR-SDFR-XXX在本地使用JUnit进行代码测试
@Autowired
private StarterService starterService;

@Test
public void starterTest() {
    String[] splitArray = starterService.split(",");
    System.out.println(splitArray);
}
好,到这我们的一个自定义Stater就完成了
maven编译插件
<plugin>
    <groupId>org.apache.maven.plugins</groupId>
    <artifactId>maven-compiler-plugin</artifactId>
    <version>3.6.0</version>
    <configuration>
        <source>1.8</source>
        <target>1.8</target>
    </configuration>
</plugin>
统一版本管理
查看日志:《spring boot如何进行统一版本的管理》
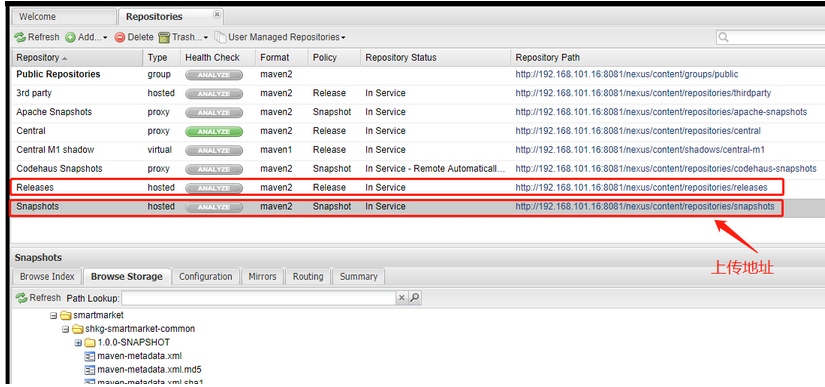
发布到maven私服配置:命令 mvn deploy
已知:
maven settting.xml
<server>
<id>maven-releases</id>
<username>admin</username>
<password>admin123</password>
</server>
<server>
<id>maven-snapshots</id>
<username>admin</username>
<password>admin123</password>
</server>
pom.xml 配置
如果工程版本号是以-SNAPSHOT结尾的就会发布到快照中(快照jar,maven会每次都抽取最新到本地仓库中;版本jar,如果本地已存在,就不会再拉取,有新版本的情况才会更新)
<distributionManagement>
    <repository>
        <id>maven-releases</id>
        <url>http://192.168.101.16:8081/nexus/content/repositories/releases/</url>
    </repository>

    <snapshotRepository>
        <id>maven-snapshots</id>
        <url>http://192.168.101.16:8081/nexus/content/repositories/snapshots/</url>
    </snapshotRepository>
</distributionManagement>
- springboot-starter springboot starterspringboot-starter springboot-starter springboot starter 数据源springboot-starter springboot starter springboot-start springboot-start springboot机制start springboot starter springboot-parent-starter springboot原理starter springboot-parent-starter springboot starter springboot对象starter