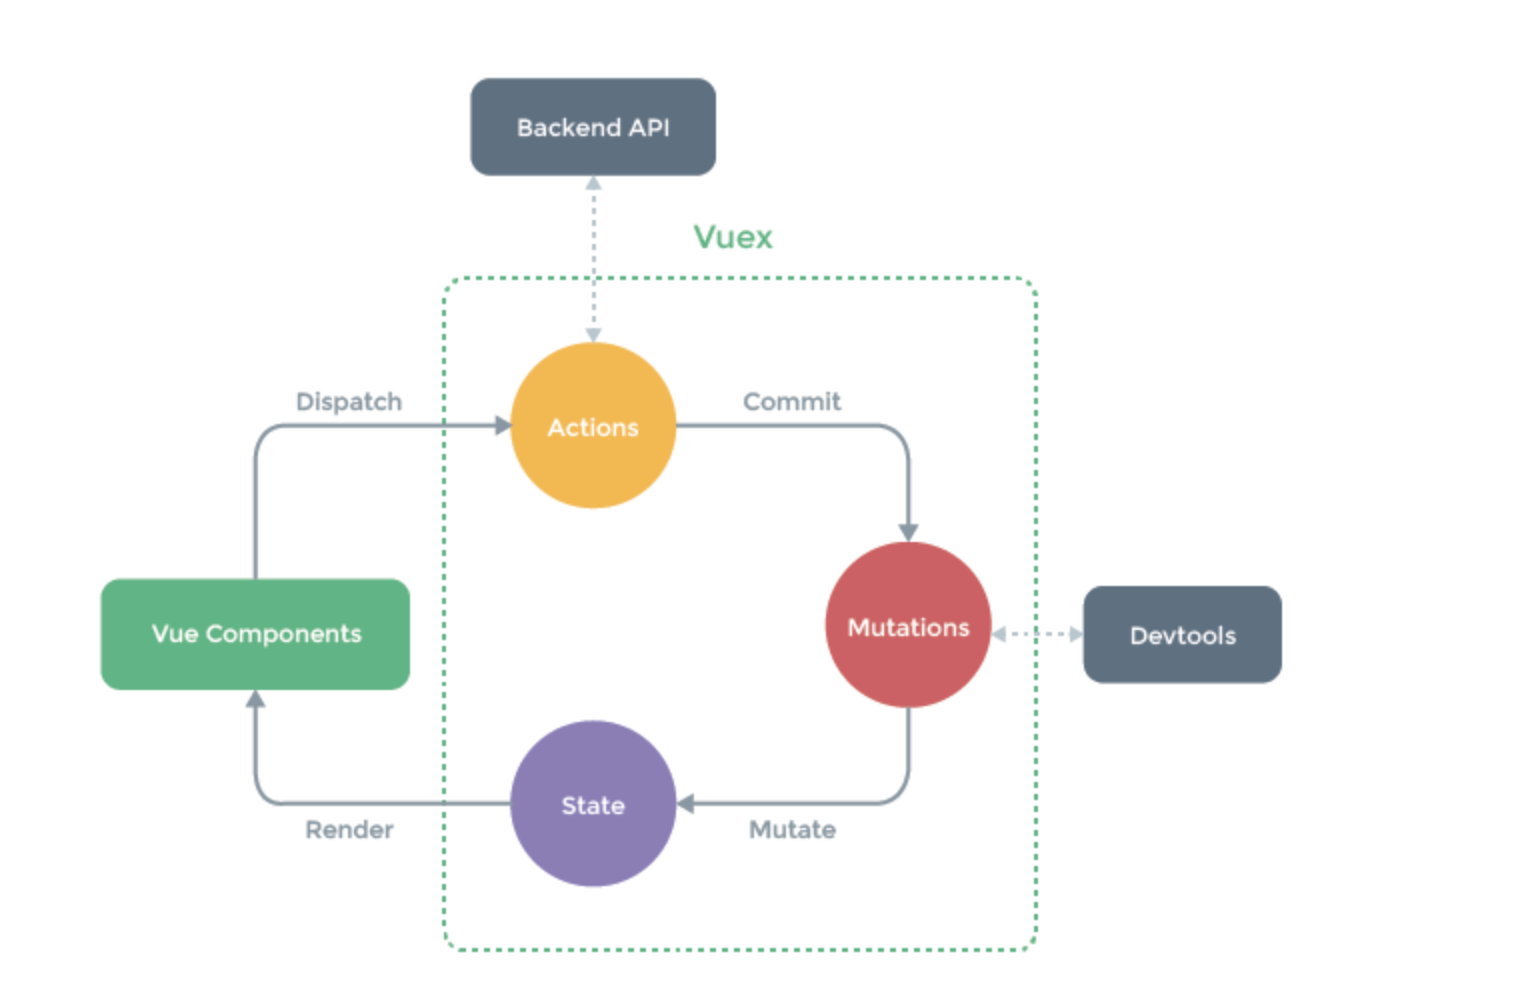
1.概念
在Vue中实现集中式状态(数据)管理的一个Vue插件,对vue应用中多个组件的共享状态进行集中式的管理(读/写),也是一种组件间通信的方式,且适用于任意组件间通信。

基本使用:
1.在HomeView.vue中操作state中值
HomeView.vue:
<template>
  <div class="home">
    <h1>vuex的使用</h1>

    购物车商品数量--------->{{this.$store.state.num}}  //可以直接查询
    <hr>
    <button @click="handlclick">点我购物车加一</button>
  </div>
</template>

<script>
// @ is an alias to /src


export default {
  name: 'HomeView',
  methods:{
    handlclick(){
      //1.直接操作
      this.$store.state.num+=1
    }
  }

}
</script>
store------index中:
import Vue from 'vue'
import Vuex from 'vuex'

Vue.use(Vuex)

export default new Vuex.Store({
  state: {
    num:10
  },
  mutations: {
  },
  actions: {
  },

})
2.通过dispatch触发actions:
HomeView.vue:
<template>
  <div class="home">
    <h1>vuex的使用</h1>

    购物车商品数量--------->{{this.$store.state.num}}
    <hr>
    <button @click="handlclick">点我购物车加一</button>
  </div>
</template>

<script>
// @ is an alias to /src


export default {
  name: 'HomeView',
  methods:{
    handlclick(){
      //2.通过dispatch触发actions
      this.$store.dispatch('add',2)   //add必须是actions中的方法
    }
  }

}
</script>
store------index中:
import Vue from 'vue'
import Vuex from 'vuex'

Vue.use(Vuex)

export default new Vuex.Store({
  state: {
    num:10
  },
  mutations: {
    madd(state,count){
      state.num=state.num+count
    }
  },
  actions: {
    add(context,count){
      //使用commit触发mutations中的函数
      context.commit('madd',count)    //madd为mutations的函数,count为HomeView.vue传来的参数
    }
  },

})
Router的使用:
about页面跳转到index页面中:
方式一:使用 router-link 标签,to 地址
<template>
  <div class="about">
    <h1>首页</h1>
    <router-link  to="/index">
      <button>
        点击跳转到index页面
      </button>
    </router-link>

  </div>
</template>
方式二:js控制
<template>
  <div class="about">
    <h1>首页</h1>
    <button @click="ClickGo">点击跳转index</button>
  </div>
</template>


<script>
export default {
  name: "About",
  methods:{
    ClickGo(){
      this.$router.push('/index')
    }
  }
}

</script>
路由跳转时,可以使用对象
通过对象跳转路由name形式
<template>
  <div class="about">
    <h1>首页</h1>
    <router-link  :to="{name:'index'}">
      <button>
        点击跳转到index页面
      </button>
    </router-link>

  </div>
</template>
通过对象跳转路由path形式:
<template>
  <div class="about">
    <h1>首页</h1>
    <router-link  :to="{path:'/index'}">
      <button>
        点击跳转到index页面
      </button>
    </router-link>
  </div>
</template>


<script>
export default {
  name: "About",
}

</script>
对象中可以有query属性,是个对象类型,会把里面的key-value拼到路径后面
<template>
  <div class="about">
    <h1>首页</h1>
    <router-link  :to="{path:'/index',query: {id: 1,age: 19}}">
      <button>
        点击跳转到index页面
      </button>
    </router-link>
  </div>
</template>


<script>
export default {
  name: "About",
}

</script>
index页面中取出query的参数:this.$route.query
<template>
  <div>
    <h1>第二个首页</h1>
  </div>
</template>

<script>
export default {
  name: "Index",
  created() {
    console.log(this.$route.query)
  }
}
</script>

<style scoped>

</style>
this.router 的一些方法
this.$router.push(path): 相当于点击路由链接(可以返回到当前路由界面)
this.$router.replace(path): 用新路由替换当前路由(不可以返回到当前路由界面)
this.$router.back(): 请求(返回)上一个记录路由
this.$router.go(-1): 请求(返回)上一个记录路由
this.$router.go(1): 请求下一个记录路由
<template>
  <div>
    <h1>ydh的页面</h1>
    <router-link to="ydh01">
      <button>ydh01</button>
    </router-link>


    <router-link to="ydh02">
      <button>ydh02</button>
    </router-link>

    <router-view>

    </router-view>
  </div>
</template>

<script>
export default {
  name: "Ydh"
}
</script>

<style scoped>

</style>
2.新建两个页面组件,ydh01.vue,ydh02.vue,配置路由children
import Vue from 'vue'
import VueRouter from 'vue-router'
import HomeView from '../views/HomeView.vue'
import Index from "@/views/Index";
import Ydh from "@/views/Ydh";
import ydh01 from "@/views/ydh/ydh01";
import ydh02 from "@/views/ydh/ydh02";
import Ydh01 from "@/views/ydh/ydh01";
import Ydh02 from "@/views/ydh/ydh02";

Vue.use(VueRouter)

const routes = [
    {
        path: '/',
        name: 'home',
        component: HomeView
    },
    {
        path: '/about',
        name: 'about',
        // route level code-splitting
        // this generates a separate chunk (about.[hash].js) for this route
        // which is lazy-loaded when the route is visited.
        component: () => import(/* webpackChunkName: "about" */ '../views/AboutView.vue')
    },

    {
        path: '/index',
        name: 'index',
        component: Index
    },

    {
        path: '/ydh',
        name: 'ydh',
        component: Ydh,
        children: [{
            path: 'ydh01',
            component: Ydh01
        },
            {
                path: 'ydh02',
                component: Ydh02
            }
        ]
    },
]

const router = new VueRouter({
    mode: 'history',
    base: process.env.BASE_URL,
    routes
})

export default router
路由守卫(前置路由守卫):
概念:前置路由守卫,再进入路由之前做判断
执行流程:写在router-index.js中,以后访问任意一个路由,都会执行这个代码
router-index.js中:
router.beforeEach((to, from, next) => {
    console.log('前置路由守卫', to, from)
    // 要是访问ydh01,都不能跳转'
    if (to.path == '/ydh/ydh01') {
        alert('你没有权限')
    } else {
        next()
    }
})
<template>
  <div class="home">
    <h1>操作localstorage的增删改查</h1>
    <button @click="addlocalstorage">增加</button>
    <button @click="deletelocalstorage">删除</button>
    <button @click="getlocalstorage">查看</button>

  </div>
</template>

<script>
// @ is an alias to /src


export default {
  name: 'HomeView',
  methods: {
    addlocalstorage() {
      var userinfo = {name: 'ydh', age: 18}
      localStorage.setItem('userinfo', JSON.stringify(userinfo))
    },
    deletelocalstorage() {
      localStorage.clear()
    },
    getlocalstorage() {
      var userinfo = localStorage.getItem('userinfo')
      console.log(JSON.parse(userinfo).name)
      console.log(JSON.parse(userinfo).age)
    }
  }
}
</script>
<template>
  <div class="about">
    <h1>操作sessionstorage的增删改查</h1>
    <button @click="addsessionstorage">增加</button>
    <button @click="deletesessionstorage">删除</button>
    <button @click="getsessionstorage">查看</button>
  </div>
</template>


<script>
export default {
  name: "About",
  methods: {
    addsessionstorage() {
      var userinfo = {name: 'ydh', age: 18}
      sessionStorage.setItem('userinfo', JSON.stringify(userinfo))
    },
    deletesessionstorage() {
      sessionStorage.clear()
    },
    getsessionstorage() {
      var userinfo = sessionStorage.getItem('userinfo')
      console.log(JSON.parse(userinfo).name)
      console.log(JSON.parse(userinfo).age)
    }
  }
}

</script>
import cookies  from 'vue-cookies'
Vue.use(cookies)
cookie.vue中:
<template>
  <div class="about">
    <h1>操作cookie的增删改查</h1>
    <button @click="addcookie">增加</button>
    <button @click="deletecookie">删除</button>
    <button @click="getcookie">查看</button>
  </div>
</template>


<script>
export default {
  name: "About",
  methods: {
  addcookie(){
    this.$cookies.set('name','ydh','5')
  },
    getcookie(){
    console.log(this.$cookies.get('name'))
    },
    deletecookie(){
    this.$cookies.remove('name')
    }
  }
}

</script>