laravel 安装配置功能
linux 安装
curl -s https://laravel.build/example-app | bash
通过composer安装
composer create-project laravel/laravel example-app
//下载8版本
composer create-project laravel/laravel example-app v8.*

cd example-app

php artisan serve
更新laravel 框架
https://www.php.cn/faq/544989.html
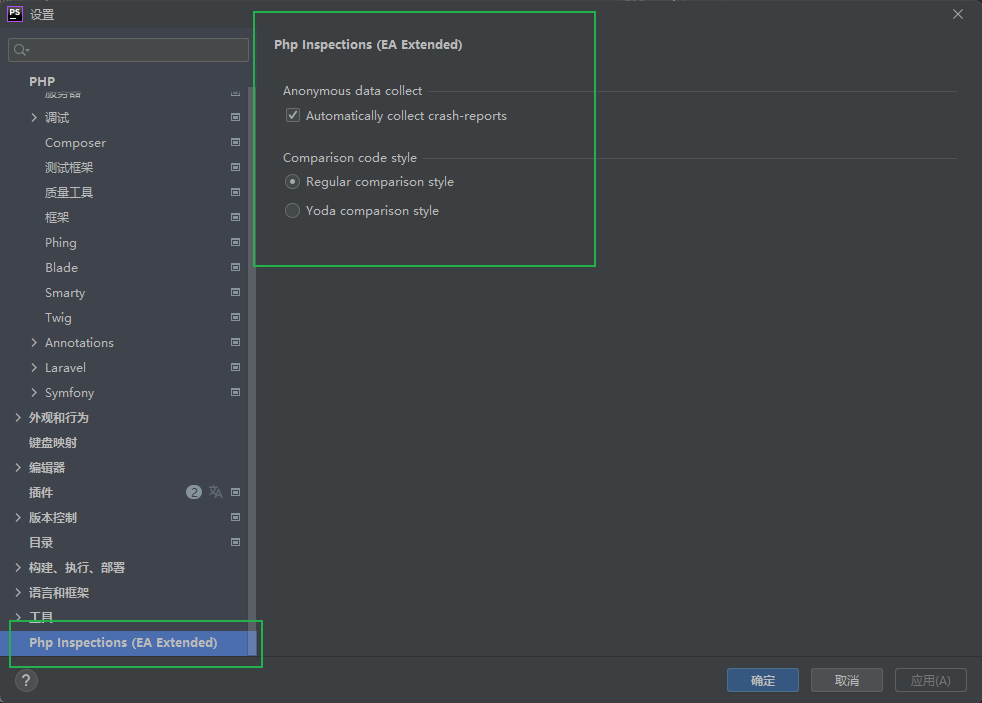
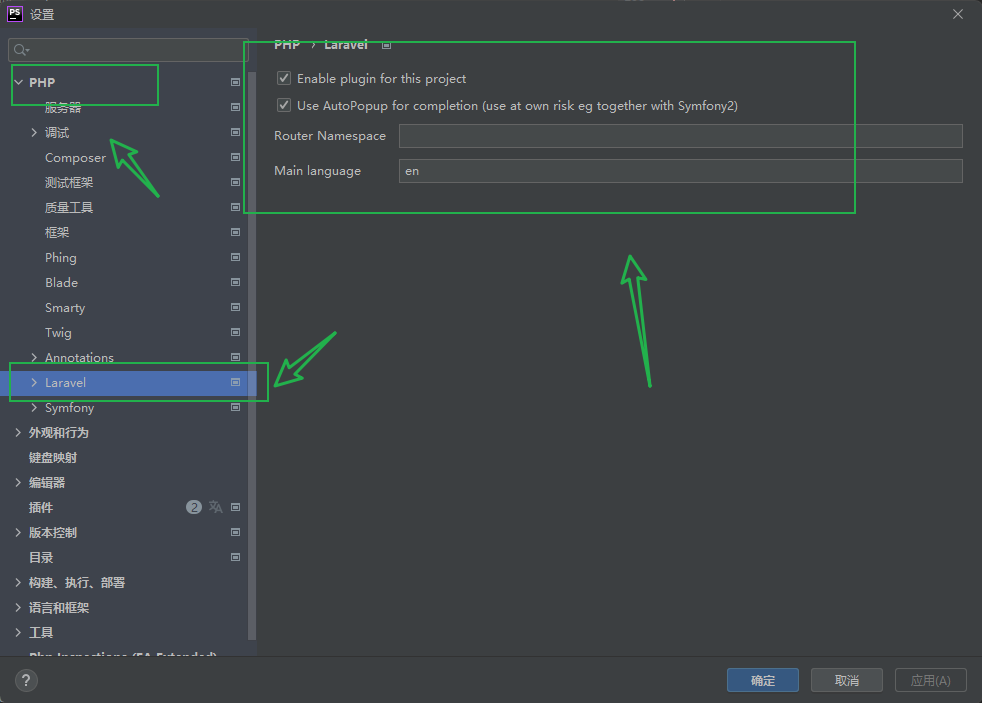
安装phpstorm开发插件
安装
composer require barryvdh/laravel-ide-helper
php artisan ide-helper:generate
#  选择 generate 生成提示索引命令
//更多的参数
ide-helper:eloquent
# //Add \Eloquent helper to \Eloquent\Model
ide-helper:generate
# 生成一个新的IDE帮助程序文件。
ide-helper:meta
# 生成PhpStorm的元数据
ide-helper:models
# 为模型生成自动补全
到phpstorm搜索插件 laravel 安装 laravel Query 安装
apchae配置
<VirtualHost *:80>
	# 设置网站目录
	DocumentRoot "F:\www\class\web\www.zfw.com\public"
	# 设置网站域名
	ServerName www.zfw.com
	# 一定要设置日志,日志可以访问我们进行系统统计
	# 日志是目录不会自动创建需要手动创建,文件是会自动创建
	# 错误日志
	ErrorLog "F:\www\class\web\www.zfw.com\logs\error.log"
	# 成功日志
	CustomLog "F:\www\class\web\www.zfw.com\logs\access.log" combined
	# 设置目录访问权限
	<Directory "F:\www\class\web\www.zfw.com\public">
	    # 指定目录启用特性
	    Options Indexes FollowSymLinks
	    # 是否允许使用.htaccess文件
	    AllowOverride All
	    # 访问目录权限 apache2.4
	    Require all granted
	</Directory>
</VirtualHost>
伪静态
<IfModule mod_rewrite.c>
    RewriteEngine On
    RewriteBase /
    RewriteCond %{REQUEST_FILENAME} !-f
    RewriteCond %{REQUEST_FILENAME} !-d
    RewriteRule . /index.PHP [L]
</IfModule>
配置数据库连接
env文件
DB_CONNECTION=mysql
DB_HOST=127.0.0.1
DB_PORT=3306
DB_DATABASE=wwwzfwcom
DB_USERNAME=root
DB_PASSWORD=root
//前缀
DB_PREFIX=zfw_
新建数据库
| 数据库 | 字符集 | 排序规则 |
|---|---|---|
| mysql | utf8mb4 | urf8mb4_unicode_ci |
本地化配置
设置中文配置: config/app.php
# 时区
'timezone' => 'PRC',
# 验证提示中文
'locale' => 'zh-CN',
# faker中文
'faker_locale' => 'zh_CN',
中文验证
https://github.com/caouecs/Laravel-lang/tree/master/src/
https://packagist.org/packages/laravel-lang/lang#3.0.9/
https://laravel-lang.com/
语言包
composer require laravel-lang/lang
https://blog.csdn.net/qq_40829735/article/details/118038006
删除旧的安装新的
composer remove laravel-lang/publisher laravel-lang/lang laravel-lang/attributes laravel-lang/http-statuses
直接安装
composer require laravel-lang/common --dev
# 添加
php artisan lang:add zh_CN
# 更新
php artisan lang:update
# 使用 publish 来发布语言包
php artisan lang:publish
可省略--- 将 zh_CN 语言包从 vender里面拿出来 放到 resources/lang
安装验证码扩展
地址: https://packagist.org/packages/mews/captcha
Composer方法安装代码依赖包:
composer require mews/captcha
配置
修改配置文件:config/app.php
适用于 Laravel 5.1+
 'providers' => [
         // ...
        Mews\Captcha\CaptchaServiceProvider::class,
    ]

  'aliases' => [
         // ...
        'Captcha' => Mews\Captcha\Facades\Captcha::class,
    ]
自定义设置
php artisan vendor:publish
选择Captcha
config/captcha.php
return [
     'default'    => [
        //验证码长度
         'length'     => 5 ,
         'width'      => 120 ,
         'height'     => 36 ,
         'quality'    => 90 ,
         'math'       => true ,   //启用数学验证码
        'expire '     => 60 ,     //验证码过期
    ],
    // ...
];
禁用验证
要禁用验证码验证,请使用CAPTCHA_DISABLE环境变量。例如.env配置:
CAPTCHA_DISABLE = true
用法示例
//返回url
captcha_src();
Captcha::src();
<!-- 在模板中使用 -->
<!-- 其他用法跟校验 看官方文档 -->
<form action="{{ url->current() }}" method="post">
    <!-- .... -->
    <input type='text' name='captcha' value=''> <img src="{{ captcha_src() }}">

    <input type='submit'>
</form>
    //表单验证
    $validateData=$this->validate($request,[
        'captcha'=>'required|captcha'
    ]);
    if($validateData->fails()){
        //验证失败
        return redirect('admin/login')->withErrors($validateData)->withInput();
    }
分页功能
https://learnku.com/docs/laravel/10.x/pagination/14884#b05120
php代码
//每页展示的数量
$pagesize=5;
$data=Db::table('xrshop')->paginate($pagesize);
return view('admin.list',compact('data'))
前端视图
<div class="container">
    @foreach ($users as $user)
        {{ $user->name }}
    @endforeach
</div>
{{ $users->links() }}
<!-- 调整分页链接窗口 控制每侧显示多少个链接 -->
{{ $users->onEachSide(5)->links() }}
分页功能 多条件查询的时候要把旧的的查询内容通过appends()来传入
@if(!empty($old))
{{--            {!! $users->appends($old)->render() !!}--}}
    {{ $users->appends($old)->links() }}
@else
    {{ $users->links() }}
@endif
返回json数据注意事项
使用这种括号 {!! !!}
var items = {!!  json_encode($items) !!};
var items = {!!  json_encode($users->toArray()['data']) !!};
注意,外层不要加引号。相当于拼接字符串构成一行代码。
这里用到了 Laravel Blade 模板的取消转义功能
否则,json 中的引号会被转义
[{"appointment_date":"2017-12-28","appointment_price":56465},{"appointment_date":"2018-01-3","appointment_price":654}]
设置默认样式 使用Bootstrap
在 App\Providers\AppServiceProvider 使用boot方法
后可以直接引入Bootstrap的样式文件来显示效果或者选择下面修改css样式
use Illuminate\Pagination\Paginator;
/**
 * 引导应用程序服务
 */
public function boot(): void
{
    Paginator::useBootstrapFive();
    Paginator::useBootstrapFour();
}
前端修改样式
<style>
    #pull_right{
        text-align:center;
    }
    .pull-right {
        /*float: left!important;*/
    }
    .pagination {
        display: inline-block;
        padding-left: 0;
        margin: 20px 0;
        border-radius: 4px;
    }
    .pagination > li {
        display: inline;
    }
    .pagination > li > a,
    .pagination > li > span {
        position: relative;
        float: left;
        padding: 6px 12px;
        margin-left: -1px;
        line-height: 1.42857143;
        color: #428bca;
        text-decoration: none;
        background-color: #fff;
        border: 1px solid #ddd;
    }
    .pagination > li:first-child > a,
    .pagination > li:first-child > span {
        margin-left: 0;
        border-top-left-radius: 4px;
        border-bottom-left-radius: 4px;
    }
    .pagination > li:last-child > a,
    .pagination > li:last-child > span {
        border-top-right-radius: 4px;
        border-bottom-right-radius: 4px;
    }
    .pagination > li > a:hover,
    .pagination > li > span:hover,
    .pagination > li > a:focus,
    .pagination > li > span:focus {
        color: #2a6496;
        background-color: #eee;
        border-color: #ddd;
    }
    .pagination > .active > a,
    .pagination > .active > span,
    .pagination > .active > a:hover,
    .pagination > .active > span:hover,
    .pagination > .active > a:focus,
    .pagination > .active > span:focus {
        z-index: 2;
        color: #fff;
        cursor: default;
        background-color: #428bca;
        border-color: #428bca;
    }
    .pagination > .disabled > span,
    .pagination > .disabled > span:hover,
    .pagination > .disabled > span:focus,
    .pagination > .disabled > a,
    .pagination > .disabled > a:hover,
    .pagination > .disabled > a:focus {
        color: #777;
        cursor: not-allowed;
        background-color: #fff;
        border-color: #ddd;
    }
    .clear{
        clear: both;
    }
</style>
展示效果
artisan常用指令
安装
composer require laravel/tinker
phpstorm 可以通过 ctrl+shift+x 通过配置运行命令来查看更多的指令信息
常用
//运行服务
php artisan serve
//生成模块
php artisan make:model
//生成控制器
php artisan make:controller
//生成资源路由控制
php artisan make:controller PhotoController -r
php artisan make:controller PhotoController --resource
//生成中间件
php artisan make:middleware
//显示路由信息
php artisan route:list
//筛选路由信息
php artisan route:list name=admin
//创建新的命令类
php artisan make:command Tests
//创建后使用命令
php artisan app:tests
// 服务提供者
php artisan make:provider RiakServiceProvider
数据迁移
# 生成数据迁移文件
php artisan make:migration create_flights_table
# 执行数据迁移
php artisan migrate
# 查看执行了那些迁移
php artisan migrate:status
# 执行强制迁移
php artisan migrate --force
# 回滚迁移
php artisan migrate:rollback
# 回滚5部
php artisan migrate:rollback --step=5
# 会回滚应用已运行过的所有迁移:
php artisan migrate:reset
# 首先会回滚已运行过的所有迁移,随后会执行migrate
php artisan migrate:refresh
# 重置数据库,并运行所有的 seeds...
php artisan migrate:refresh --seed
数据填充
# 生成的 seeders 都放在 database/seeders
php artisan make:seeder UserSeeder
# 运行命令
php artisan db:seed
#  选项来指定一个特定的填充类:
php artisan db:seed --class=UserSeeder
# 这将删除数据库中所有表并重新运行所有迁移。此命令对于完全重建数据库非常有用
php artisan migrate:fresh --seed
# --seed 选项可以用来指定要运行的填充文件
php artisan migrate:fresh --seed --seeder=UserSeeder
# 在生成环境中强制运行填充命令
php artisan db:seed --force
表单验证
快速开始
简单示例
/**
 * 存储一篇新的博客文章。
 */
public function store(Request $request): RedirectResponse
{
    $validated = $request->validate([
        'title' => 'required|unique:posts|max:255',
        'body' => 'required',
    ]);
    // 博客文章验证通过...
    return redirect('/posts');
}
在首次验证失败时停止运行
$request->validate([
    'title' => 'bail|required|unique:posts|max:255',
    'body' => 'required',
]);
如果传入的 HTTP 请求包含「嵌套」参数,你可以在验证规则中使用. 语法来指定这些参数:
$request->validate([
    'title' => 'required|unique:posts|max:255',
    'author.name' => 'required',
    'author.description' => 'required',
]);
另外,如果你的字段名称包含点,则可以通过使用反斜杠将点转义,以防止将其解释为. 语法:
$request->validate([
    'title' => 'required|unique:posts|max:255',
    'v1\.0' => 'required',
]);
显示验证错误信息
<!-- /resources/views/post/create.blade.php -->

<h1>Create Post</h1>

@if ($errors->any())
    <div class="alert alert-danger">
        <ul>
            @foreach ($errors->all() as $error)
                <li>{{ $error }}</li>
            @endforeach
        </ul>
    </div>
@endif
<!-- Create Post Form -->
回填表单
当 Laravel 由于验证错误而生成重定向响应时,框架将自动将所有请求的输入闪存到 session 中。这样做是为了方便你在下一个请求期间访问输入,并重新填充用户尝试提交的表单。
$title = $request->old('title');
Blade 模板中直接使用old 来获取
<input type="text" name="title" value="{{ old('title') }}">
表单请求验证
创建表单请求
php artisan make:request StorePostRequest
在目录 app/Http/Requests 中
如果此目录不存在 运行 php artisan make:request 创建该目录
常用的就是前三种
class ew extends FormRequest
{
    /**
     * 确定用户是否有权提出此请求。
     */
    public function authorize(): bool
    {
        return true;
    }

    /**
     * 获取应用于请求的验证规则。
     *
     * @return array<string, \Illuminate\Contracts\Validation\ValidationRule|array<mixed>|string>
     */
    public function rules(): array
    {
        return [
            'title' => 'required|unique:posts|max:255',
            'body' => 'required',
        ];
    }
        //自定义验证错误信息
    public function messages(): array
    {
        return [
            'title,required'=>'标题移动要写',
        ];
    }
    //获取验证错误的自定义属性
    //重写 attributes 方法来指定自定义名称。此方法应返回属性 / 名称对的数组:
    public function attributes(): array
    {
        return [
            'email' => 'email address',
        ];
    }

    use Illuminate\Support\Str;

    /**
     * 准备验证数据。
     * 如果您需要在应用验证规则之前修改或清理请求中的任何数据,您可以使用
     */
    protected function prepareForValidation(): void
    {
        $this->merge([
            'slug' => Str::slug($this->slug),
        ]);
    }

    use Illuminate\Support\Str;

    /**
     * 处理已通过的验证
     */
    protected function passedValidation(): void
    {
        $this->replace(['name' => 'Taylor']);
    }
}
简单使用示例
使用依赖注入来实现自动验证 不需要在控制器中添加任何逻辑验证
/**
 * 存储新博客文章。
 */
public function store(StorePostRequest $request): RedirectResponse
{
    // 传入的请求有效...

    // 检索已验证的输入数据...
    $validated = $request->validated();

    // 检索已验证的输入数据的一部分。。。
    $validated = $request->safe()->only(['name', 'email']);
    $validated = $request->safe()->except(['name', 'email']);

    // 存储博客文章...

    return redirect('/posts');
}
在表单请求后添加钩子
use Illuminate\Validation\Validator;

/**
 * 配置验证实例。
 */
public function withValidator(Validator $validator): void
{
    $validator->after(function (Validator $validator) {
        if ($this->somethingElseIsInvalid()) {
            $validator->errors()->add('field', 'Something is wrong with this field!');
        }
    });
}
配置选项
//表示验证器是否应在第一个规则失败时停止。
protected $stopOnFirstFailure = true;
// 如果验证失败,用户应重定向到的 URI。
protected $redirect = '/dashboard';
// 如果验证失败,用户应该重定向到的路由。
protected $redirectRoute = 'dashboard';
手动创建验证器
示例
use Validator;

public function store(Request $request): RedirectResponse
{
    $validateData = Validator::make($params, [
        //验证规则
        'username' => 'required|between:4,18',
        'password' => 'required|between:4,18|alpha_dash',
    ], [
        //错误信息
        'username.between' => '用户名要在4到18位',
        'password.between' => '密码要在4到18位',
    ]);

     if ($validateData->fails()) {
        //如果出现错误 跳转页面并返回错误信息
        return redirect('admin/login')
            ->withErrors($validateData)
            ->withInput();
    }
   // 获取验证后的输入...
        $validated = $validator->validated();

        // 获取验证后输入的一部分...
        $validated = $validator->safe()->only(['name', 'email']);
        $validated = $validator->safe()->except(['name', 'email']);

        // 存储博客文章...

        return redirect('/posts');

}
自动重定向
Validator::make($request->all(), [
    'title' => 'required|unique:posts|max:255',
    'body' => 'required',
])->validate();
命名错误包
Validator::make($request->all(), [
    'title' => 'required|unique:posts|max:255',
    'body' => 'required',
])->validateWithBag('post');
如果您在同一页上有多个表单,您可能希望为包含验证错误的 MessageBag 命名,以便检索特定表单的错误消息。为此,将名称作为第二个参数传递给 withErrors:
return redirect('register')->withErrors($validator, 'login');
你可以通过 $errors 变量访问命名后的 MessageBag 实例:
{{ $errors->login->first('email') }}
返回已验证的数据
$validated = $request->validated();
$validated = $validator->validated();
$validated = $request->safe()->only(['name', 'email']);
$validated = $request->safe()->except(['name', 'email']);
$validated = $request->safe()->all();
// 迭代验证数据...
foreach ($request->safe() as $key => $value) {
    // ...
}
// 访问验证数据数组...
$validated = $request->safe();
$email = $validated['email'];
// merge 方法可以给验证过的数据添加额外的字段:
$validated = $request->safe()->merge(['name' => 'Taylor Otwell']);
//方法以 collection 实例的形式来检索验证的数据:
$collection = $request->safe()->collect();
错误信息
//  first方法返回给定字段的第一条错误信息:
$errors = $validator->errors();
echo $errors->first('email');
// get检索一个给定字段的所有错误信息,返回值类型为数组
foreach ($errors->get('email') as $message) {
    // ...
}
//对于数组表单字段,可以使用 * 来检索每个数组元素的所有错误信息:
foreach ($errors->get('attachments.*') as $message) {
    // ...
}
//于检索所有字段的所有错误信息,返回值类型为数组:
foreach ($errors->all() as $message) {
    // ...
}
//方法可用于确定一个给定字段是否存在任何错误信息:
if ($errors->has('email')) {
    // ...
}
常用的验证规则
https://learnku.com/docs/laravel/10.x/validation/14856#189a36
required
//不能为空
between:min,max
//待验证字段值的大小必须介于给定的最小值和最大值(含)之间。字符串、数字、数组和文件的计算方式都使用 size 方法。
boolean
//验证的字段必须可以转换为 Boolean 类型。 可接受的输入为 true, false, 1, 0, 「1」, 和 「0」。
confirmed
//用在确认密码
//验证字段必须与 {field}_confirmation 字段匹配。例如,如果验证字段是 password,则输入中必须存在相应的 password_confirmation 字段。
current_password
// 验证字段必须与已认证用户的密码匹配
date
//验证字段必须是 strtotime PHP 函数可识别的有效日期。
decimal:min,max
//验证字段必须是数值类型,并且必须包含指定的小数位数:
// 必须正好有两位小数(例如 9.99)...
'price' => 'decimal:2'
// 必须有 2 到 4 位小数...
'price' => 'decimal:2,4'

email
//验证的字段必须符合 e-mail 地址格式
'enum'
//规则是一种基于类的规则,用于验证被验证字段是否包含有效的枚举值
//Enum 规则的构造函数只接受枚举的名称作为参数:
image
//正在验证的文件必须是图像(jpg、jpeg、png、bmp、gif、svg 或 webp)
in:foo,bar,…
// 验证字段必须包含在给定的值列表中  由于此规则通常要求你 implode 数组
integer
//验证的字段必须是一个整数。
ip
//验证的字段必须是一个 IP 地址。
ipv4
////验证的字段必须是一个 IPv4 地址。
ipv6
//验证的字段必须是一个 IPv6 地址。
json
//验证的字段必须是一个有效的 JSON 字符串。
max:value
//验证的字段的值必须小于或等于最大值 value。字符串、数字、数组和文件的处理方式与 size 规则相同。
min:value
//验证的字段的值必须大于或等于最小值 value。字符串、数字、数组和文件的处理方式与 size 规则相同。
not_in:foo,bar,…
//验证的字段不能包含在给定值列表中。可以使用 Rule::notIn 方法流畅地构建规则:
regex:pattern
// 验证的字段必须匹配给定的正则表达式。

// 在内部,此规则使用 PHP 的 preg_match 函数。指定的模式应遵循 preg_match 所需的相同格式,并且也包括有效的分隔符。例如:'email' => 'regex:/^.+@.+$/i'。

size:value
// 验证的字段必须具有与给定的_value 相匹配的大小。
// 对于字符串数据,value 对应于字符数。
// 对于数字数据,value 对应于给定的整数值(该属性还必须具有 numeric 或 integer 规则)。
// 对于数组,size 对应于数组的 count。
// 对于文件,size 对应于文件大小(以千字节为单位)
string
// 验证的字段必须是一个字符串。如果您希望允许字段也可以为 null,则应将 nullable 规则分配给该字段。
unique:table,column
// 验证字段在给定的数据库表中必须不存在。
uppercase
// 验证字段必须为大写。
url
// 验证字段必须为有效的 URL。
ulid
// 验证字段必须为有效的通用唯一词典排序标识符(ULID)。
uuid
// 验证字段必须为有效的 RFC 4122(版本 1、3、4 或 5)通用唯一标识符(UUID)。
强制唯一规则忽略给定的 ID:
有时,您可能希望在唯一验证期间忽略给定的 ID。例如,考虑一个 “更新个人资料” 屏幕,其中包括用户的姓名、电子邮件地址和位置。您可能希望验证电子邮件地址是否唯一。但是,如果用户仅更改了名称字段而未更改电子邮件字段,则不希望因为用户已经拥有相关电子邮件地址而抛出验证错误。
要指示验证器忽略用户的 ID,我们将使用 Rule 类来流畅地定义规则。在此示例中,我们还将指定验证规则作为数组,而不是使用 | 字符来分隔规则:
use Illuminate\Database\Eloquent\Builder;
use Illuminate\Support\Facades\Validator;
use Illuminate\Validation\Rule;

Validator::make($data, [
    'email' => [
        'required',
        Rule::unique('users')->ignore($user->id),
    ],
]);
//不需要将模型键的值传递给 ignore 方法,您也可以传递整个模型实例。Laravel 将自动从模型中提取键:
Rule::unique('users')->ignore($user)
//如果您的表使用的是除 id 以外的主键列名,可以在调用 ignore 方法时指定列的名称:
Rule::unique('users')->ignore($user->id, 'user_id')
//默认情况下,unique 规则将检查与正在验证的属性名称匹配的列的唯一性。但是,您可以将不同的列名称作为第二个参数传递给 unique 方法:
Rule::unique('users', 'email_address')->ignore($user->id)
//您可以通过自定义查询并使用 where 方法来指定其他查询条件。例如,让我们添加一个查询条件,将查询范围限定为仅搜索具有 account_id 列值为 1 的记录:
'email' => Rule::unique('users')->where(fn (Builder $query) => $query->where('account_id', 1))
有条件添加规则
当字段具有特定值时跳过验证
有时,您可能希望在给定字段具有特定值时不验证另一个字段。您可以使用 exclude_if 验证规则来实现这一点。在下面的示例中,如果 has_appointment 字段的值为 false,则不会验证 appointment_date 和 doctor_name 字段:
use Illuminate\Support\Facades\Validator;

$validator = Validator::make($data, [
    'has_appointment' => 'required|boolean',
    'appointment_date' => 'exclude_if:has_appointment,false|required|date',
    'doctor_name' => 'exclude_if:has_appointment,false|required|string',
]);
或者,您可以使用 exclude_unless 规则,除非另一个字段具有给定值,否则不验证给定字段:
$validator = Validator::make($data, [
    'has_appointment' => 'required|boolean',
    'appointment_date' => 'exclude_unless:has_appointment,true|required|date',
    'doctor_name' => 'exclude_unless:has_appointment,true|required|string',
]);
仅在字段存在时验证
在某些情况下,您可能希望仅在验证数据中存在该字段时才对该字段运行验证检查。要快速实现此操作,请将 sometimes 规则添加到您的规则列表中:
$v = Validator::make($data, [
    'email' => 'sometimes|required|email',
]);
加密和验证
$str = '123456'
//  哈希加密
$hash=\Hash::make($str);
//快速使用
$hash=bcrypt('$str');
//哈希验证
\Hash::check($str,$hash);
生成url
生成基础url
$post = App\Models\Post::find(1);

echo url("/posts/{$post->id}");

// http://example.com/posts/1
访问当前 URL
// 获取当前 URL 没有 query string...
echo url()->current();
// 获取当前 URL 包括 query string...
echo url()->full();
// 获取上个请求 URL
echo url()->previous();

use Illuminate\Support\Facades\URL;
echo URL::current();
route 函数
Route::get('/post/{post}/comment/{comment}', function (Post $post, Comment $comment) {
    // ...
})->name('comment.show');

echo route('comment.show', ['post' => 1, 'comment' => 3]);

// http://example.com/post/1/comment/3
CSRF请求
页面中 ajax请求
<meta name="csrf-token" content="{{ csrf_token() }}">
<script>
$.ajaxSetup({
    headers: {
        'X-CSRF-TOKEN': $('meta[name="csrf-token"]').attr('content')
    }
});
</script>
表单
<form method="POST" action="/profile">
    @csrf

    <!-- 相当于。。。 -->
    <input type="hidden" name="_token" value="{{ csrf_token() }}" />
</form>
模型关联
多对多
<?php

namespace App\Models;

use Illuminate\Database\Eloquent\Model;
use Illuminate\Database\Eloquent\Relations\BelongsToMany;

class Role extends Model
{
    /**
     * 拥有此角色的用户
     */
    public function users(): BelongsToMany
    {
        return $this->belongsToMany(User::class);

        //第一个个参数  关联的表
        //第二个参数传递给 中间表的表名
        //第三个参数是定义此关联的模型在连接表里的外键名,
        //第四个参数是另一个模型在连接表里的外键名:
        return $this->belongsToMany(Role::class, 'role_user', 'user_id', 'role_id');
    }
}
访问
use App\Models\User;

$user = User::find(1);

foreach ($user->roles as $role) {
    // ...
    //中间表字段
    echo $role->pivot->created_at;
}
使用预加载访问
User::with('roles')->find(1)
使用自定义名称 访问中间表数据
$users = User::with('podcasts')->get();
foreach ($users->flatMap->podcasts as $podcast) {
    echo $podcast->subscription->created_at;
}
数据库操作
事务
use Illuminate\Support\Facades\DB;
//开启事务
DB::beginTransaction();
// 回滚
DB::rollBack();
// 提交
DB::commit();
transaction 可以自动进行提交和回滚
出错会抛出异常
use Illuminate\Support\Facades\DB;

DB::transaction(function () {
    DB::update('update users set votes = 1');

    DB::delete('delete from posts');
}, 5);
删除
//删除
use App\Models\Flight;
$flight = Flight::find(1);
$flight->delete();

//通过查询删除 不会报错
RolePrem::where('role_id',$id)->delete();

//通过主键删除 不存在会报错
Flight::destroy(1);
Flight::destroy(1, 2, 3);
Flight::destroy([1, 2, 3]);
//删除所有模型关联的数据库记录
Flight::truncate();
添加扩展
php artisan make:provider DBServiceProvider
文件路径在 app/provider
use Illuminate\Database\Query\Builder  as QueryBuilder;
public function boot(): void
{
    // 将数据的索引设置 $index
    QueryBuilder::macro('abbbc', function ($index) {
        // echo '扩展的方法';
        $res =   $this->get()->toArray();
        $result = [];
        foreach($res as $val){
            $result[$val->$index] = $val;
        }
        return $result;
    });
}
注册到 config\app里面
'providers' => ServiceProvider::defaultProviders()->merge([
//   ...
    App\Providers\DBServiceProvider::class,
])->toArray(),
使用示例
 $cates=DB::table('article_cate')->abbbc('id');
//  将数据的索引设置为 id ;
所有视图共享数据
在服务提供器的boot方法
在后面所有的视图都可以访问
或者在父控制器里面添加
view()->share('cate',$cate);
使用Redis缓存
安装
composer require predis/predis
配置 .env 文件
CACHE_DRIVER=redis
配置 config/databases 文件
'redis' => [
    'client' => env('REDIS_CLIENT', 'predis'),
    // ...
],
助手函数
cache($key) //获取缓存
cache([$key=>$value]) //设置缓存
简单示例
public function index()
{
    $cache_key = 'article_cid';
    $data=cache($cache_key);
    if($data){
        dump($data);
        return ;
    }
    $data=DB::table('article')->where('cid',21)->paginate(20);
    cache([$cache_key=>$data]);
    dump('数据已经缓存');
}
文件存储
保存文件$request->file("file")->store('public/imgs')
软连接 php artisan storage:link 会自动生成软连接
访问静态文件需要通过软链接来访问
配置文件 config\filesystems.php
'links' => [
    public_path('storage') => storage_path('app/public'),
],
// 软连接地址
比如 真实地址在 app/public/123.png
实际请求要通过映射地址 storage/123.png 来访问