没错,自从把ubuntu搞坏之后无奈把之前的例程全删了,因此所有的笔记都没了,又得从新分析一遍
main函数
先从最简单的main分析

此函数主要创建一个屏幕句柄用来显示,然后调用nn_test来开始yolov2的操作,并且传入画布,显示等都在里面操作,最后跳出来后摧毁屏幕
nn_test函数
此函数很长,一点点分析
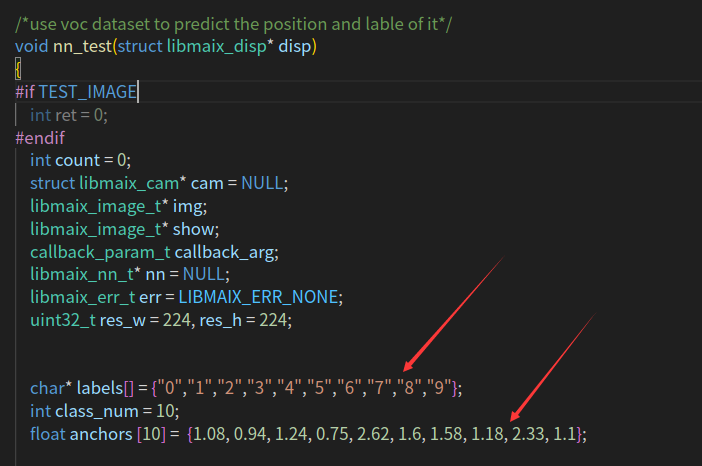
创建一堆变量,然后写入标签,画框大小,这个画框大小是按比例的,两个一组,然后输入的yolov2长宽是固定的,是224*224的其他的都很好看懂,除了callback句柄

这里设置了框的个数和设置yolov2的设置初始化参数和解码句柄。
#define TEST_IMAGE   0
#define DISPLAY_TIME 1

#if DISPLAY_TIME
    struct timeval start, end;
    int64_t interval_s;
    #define CALC_TIME_START() do{gettimeofday( &start, NULL );}while(0)
    #define CALC_TIME_END(name)   do{gettimeofday( &end, NULL ); \
                                interval_s  =(int64_t)(end.tv_sec - start.tv_sec)*1000000ll; \
                                printf("%s use time: %lld us\n", name, interval_s + end.tv_usec - start.tv_usec);\
            }while(0)
#else
    #define CALC_TIME_START()
    #define CALC_TIME_END(name)
#endif

    printf("--nn module init\n");
    libmaix_nn_module_init();
    printf("--image module init\n");
    libmaix_image_module_init();
    libmaix_camera_module_init();

    /*create the net process img is not display image*/
    printf("--create image\n");
    img = libmaix_image_create(res_w, res_h, LIBMAIX_IMAGE_MODE_RGB888, LIBMAIX_IMAGE_LAYOUT_HWC, NULL, true);
    if(!img)
    {
        printf("create RGB image fail\n");
        goto end;
    }
    // the show image for display
    show = libmaix_image_create(disp->width, disp->height, LIBMAIX_IMAGE_MODE_RGB888, LIBMAIX_IMAGE_LAYOUT_HWC, NULL, true);
    if(!show)
    {
        printf("create RGB image fail\n");
        goto end;
    }
    // camera init
#if !TEST_IMAGE
    printf("--create cam\n");
    cam = libmaix_cam_create(0, res_w, res_h, 1, 1);
    if(!cam)
    {
        printf("create cam fail\n");
        goto end;
    }
    printf("--cam start capture\n");
    err = cam->start_capture(cam);
    if(err != LIBMAIX_ERR_NONE)
    {
        printf("start capture fail: %s\n", libmaix_get_err_msg(err));
        goto end;
    }
    #ifdef CONFIG_ARCH_V831
    libmaix_cam_t* cam2 = libmaix_cam_create(1, disp->width, disp->height, 0, 0);
    #endif

    #ifdef CONFIG_ARCH_V831
    err = cam2->start_capture(cam2);
    #endif

#endif
这一段则是是否湖区图片和帧计算的,同时创建两张画布

这里则是设置模型的路径,我们训练好模型后主要改的就是这里
 libmaix_nn_layer_t input = {
        .w = yolo2_config.net_in_width,
        .h = yolo2_config.net_in_height,
        .c = 3,                                                             //通道数
        .dtype = LIBMAIX_NN_DTYPE_UINT8,
        .data = NULL,
        .need_quantization = true,
        .buff_quantization = NULL
    };
    libmaix_nn_layer_t out_fmap = {
        .w = yolo2_config.net_out_width,
        .h = yolo2_config.net_out_height,
        .c = (class_num + 5) * anchor_len,  //通道数
        .dtype = LIBMAIX_NN_DTYPE_FLOAT,//输入是uint8输出是浮点数
        .data = NULL
    };
    char* inputs_names[] = {"input0"};
    char* outputs_names[] = {"output0"};
设置输入输出的句柄
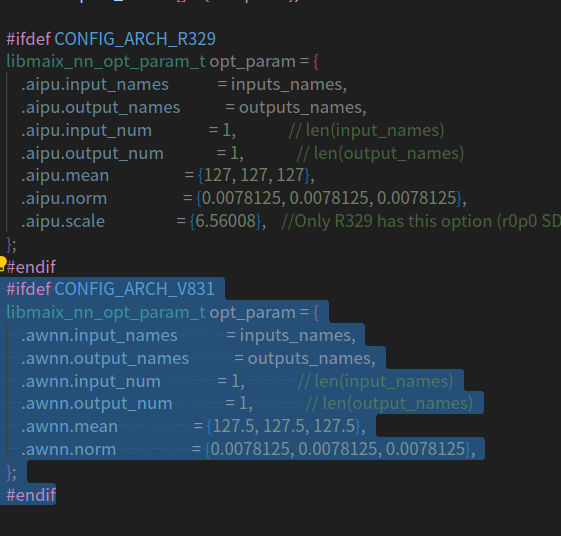
模型的总设置参数,这个在训练的时候应该就设置好了的,不大需要改动
    // malloc buffer
    float* output_buffer = (float*)malloc(out_fmap.w * out_fmap.h * out_fmap.c * sizeof(float));
    if(!output_buffer)
    {
        printf("no memory!!!\n");
        goto end;
    }

    //allocate quantized data buffer
    uint8_t* quantize_buffer = (uint8_t*)malloc(input.w * input.h * input.c);
    if(!quantize_buffer)
    {
        printf("no memory!!!\n");
        goto end;
    }
    out_fmap.data = output_buffer;
    input.buff_quantization = quantize_buffer;
对输入输出的句柄进行内存给予
   // nn model init
    printf("-- nn create\n");
    nn = libmaix_nn_create();
    if(!nn)
    {
        printf("libmaix_nn object create fail\n");
        goto end;
    }
    printf("-- nn object init\n");
    err = nn->init(nn);
    if(err != LIBMAIX_ERR_NONE)
    {
        printf("libmaix_nn init fail: %s\n", libmaix_get_err_msg(err));
        goto end;
    }
    printf("-- nn object load model\n");
    err = nn->load(nn, &model_path, &opt_param);
    if(err != LIBMAIX_ERR_NONE)
    {
        printf("libmaix_nn load fail: %s\n", libmaix_get_err_msg(err));
        goto end;
    }
创建nn,并且初始化nn模型,这里其实不打需要改动,也是因为我能力不足吧
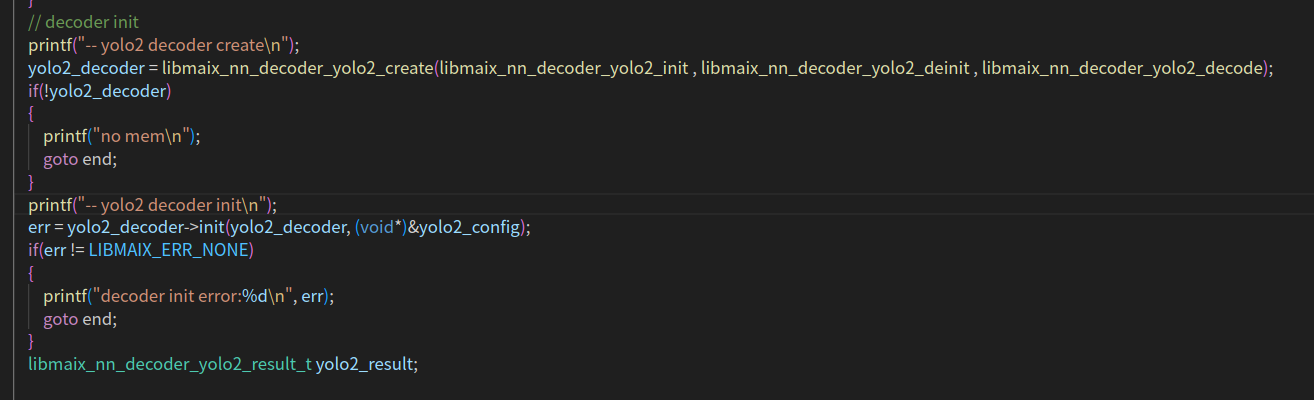
yolov2模型的初始化,参数设置完了也不需要改动,接下来就是开始循环
#if !TEST_IMAGE
        err = cam->capture_image(cam,&img);
        # ifdef CONFIG_ARCH_V831
        err = cam2->capture_image(cam2, &show);
        #endif

        if(err != LIBMAIX_ERR_NONE)
        {
            // not ready, sleep to release CPU
            if(err == LIBMAIX_ERR_NOT_READY)
            {
                usleep(20 * 1000);
                continue;
            }
            else
            {
                printf("capture fail: %s\n", libmaix_get_err_msg(err));
                break;
            }
        }

#endif
抓取图像,如果err为0说明cpu还没准备好,需要稍等一下否则就是失败了
        CALC_TIME_START();
        input.data = (uint8_t *)img->data;
        err = nn->forward(nn, &input, &out_fmap);
        if(err != LIBMAIX_ERR_NONE)
        {
            printf("libmaix_nn forward fail: %s\n", libmaix_get_err_msg(err));
            break;
        }
        err = yolo2_decoder->decode(yolo2_decoder, &out_fmap, (void*)&yolo2_result);

        if(err != LIBMAIX_ERR_NONE)
        {
            printf("yolo2 decode fail: %s\n", libmaix_get_err_msg(err));
            goto end;
        }

        #ifdef CONFIG_ARCH_R329
        callback_arg.disp = disp;
        callback_arg.img = img;
        if(yolo2_result.boxes_num > 0)
        {
            printf("yolo2_result_boxes_num is %d \n",yolo2_result.boxes_num);

            libmaix_nn_decoder_yolo2_draw_result(yolo2_decoder, &yolo2_result, count++, labels, on_draw_box, (void*)&callback_arg);
        }
        err = libmaix_cv_image_resize(img, disp->width, disp->height, &show);
        disp->draw_image(disp,show);
        CALC_TIME_END("one image");
        #endif

        #ifdef CONFIG_ARCH_V831
        callback_arg.disp = disp;
        callback_arg.img = show;
        if(yolo2_result.boxes_num > 0)
        {
            printf("yolo2_result_boxes_num is %d \n",yolo2_result.boxes_num);

            libmaix_nn_decoder_yolo2_draw_result(yolo2_decoder, &yolo2_result, count++, labels, on_draw_box, (void*)&callback_arg);
        }
        disp->draw_image(disp,show);
        #endif
        disp->draw_image(disp,show);
接下来就是对抓取到的图片进行yolov2的解析,并且开始计时计算帧数,其中img是给r329的,show是v831的
#if TEST_IMAGE
        break;
#endif
    }
end:
    if(yolo2_decoder)
    {
        yolo2_decoder->deinit(yolo2_decoder);
        libmaix_nn_decoder_yolo2_destroy(&yolo2_decoder);
    }
    if(output_buffer)
    {
        free(output_buffer);
    }
    if(nn)
    {
        libmaix_nn_destroy(&nn);
    }
    if(cam)
    {
        printf("--cam destory\n");
        libmaix_cam_destroy(&cam);
    }
    if(show)
    {
        printf("--image destory\n");
        libmaix_image_destroy(&show);
    }
    if(img)
    {
        printf("--image destory\n");
        libmaix_image_destroy(&img);
    }
    printf("--image module deinit\n");
    libmaix_nn_module_deinit();
    libmaix_image_module_deinit();
    libmaix_camera_module_deinit();
接下来就是对创建的句柄等等进行一个个的销毁
小结
那么简单的解析就到此,我们做模型的话只需要改动路径和框比例就差不多了,其他不怎么需要我们动手,但是这代码实在是繁琐,我尝试着简化一下